Clinometer
Contents:
- Introduction
- Clinometer Tweaks
- YouTube video with more information
- Clinometer Installation
- Other Options
Introduction:
What is a clinometer? It is a combination tilt, slope and altimeter gauge pod that came factory installed on certain Toyota 4WD trucks, its mostly found in the '84-'88/9 SR5 pickups and 4Runners. A similar meter is found on the 4WD Tercel wagons, although it lacks the altimeter portion.
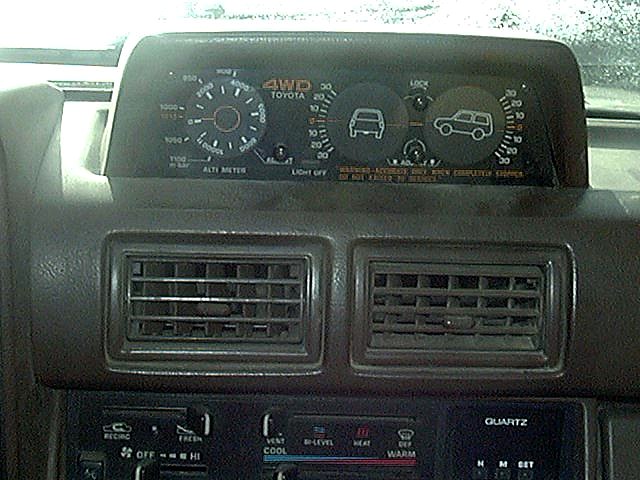
Its normally installed on the dash, in a slight recess and is held in place with a bracket and two screws. Its entirely mechanical in nature, the only electrical connection is for a back light. I find its a fairly useful gadget.
- Altimeter/Barometer:
-
The altimeter is handy when in the mountains to see how high up you are
heading towards a pass and is a sort of poor man's GPS when coupled
with a topo map. I find mine is fairly accurate in two different
ranges. From sea level up to around 4000' and then reset at 4000', its
good up to the maximum reading of around 12000'. I try to set it on the
road when passing elevation signs, California is pretty good putting
signs at every 1000' increment on mountain roads. Setting the altimeter
is easy to do, just turn the far left knob until the pointer on the
gauge points to the elevation you are currently at. If you don't know
your elevation, here is a handy page that you can look up the
elevation given your zip code. Or many smart phones have built
in GPS functions and you should be able to find your elevation there
(or with a real GPS).
- The altimeter works off barometric pressure, so it will vary with the weather conditions. In fact, Toyota has set the altimeter up to read barometric pressure as well, at least near sea level. The 0' mark on the altimeter dial points to the barometric pressure which is shown in mBars in orange lettering around the elevation readings. In the above photo, you can see the 0' mark is pointing just past the 1013 (mBar) mark on the outside, this corresponds to about 29.92"/Hg pressure reading on a barometer. The 1013 mBar pressure is the standard atmospheric pressure at sea level. Pressures below 1013 (low pressure), especially when falling, indicate the potential for worsening weather and pressures above 1013 (high pressure), especially when rising can indicate improving or good weather. Note that going up in elevation causes the barometric pressure to fall, approxmately 4% per 1000 feet elevation gain, so you would need to compensate for that to get a relative barometric pressure reading. It is not like you are going to be doing 7 day weather forecasts with the crude barometer dial, but if you notice that you have gained 500' of elevation overnight, this is probably due to falling pressure ahead of an impending storm, so watch out! And, you could use a known barometric pressure to set the altimeter, by turning the "0" on the dial to the known pressure. This will probably be the least accurate way to set the meter as the pressure scale is pretty coarse (marks every 50 mBars).
- Tilt Meter:
- This meter shows the sideways tilt or g-force on the vehicle in degrees. A 30 degree side slope is equal to a 0.50g side or cornering force or a 50% grade. I find this meter is quite handy to help me "calibrate" my internal tilt gauge when wheeling. I notice if I haven't been wheeling for a while, I tend to lose my sense of side slope judgement and even a 10-15 degree tilt feels tippy. I can look at the meter and get a hard number and after a few side hills, I get the internal gauge working again. Its also handy in terrain where the horizon is not horizontal or when wheeling at night and you can't get a good visual reference.
- Slope Meter:
- This is probably the least useful of the 3 gauges. If just shows the slope of the hill you are climbing or descending. With the stock range of readings, the meter will peg out way before the vehicle's climbing capabilities are met. It works just like the tilt meter and can be used as a poor man's "g" or acceleration meter. Similar to the tilt meter, a 30° slope reading under acceleration would equate to a 0.5g acceleration. With the massive power and torque of the 22RE engine, you'll be hard pressed to peg the slope meter :)
See the following section for information on how to increase the range on the tilt and slope meters.
[back to the top]
![]()
Clinometer Tweaking:
One of the "cool" things I like about the 1st generation SR-5 4Runners is the dash-mounted clinometer. Its somewhat of a gadget, but I find it to be somewhat useful on and off road. The altimeter is nice to have and can also serve as a barometer. The gauges are lighted and easy to see. One thing I did not like about mine, were that they seemed to stop just a bit past 30° tilt or grade. When I first took the truck off-road, I found 30° was more than enough lean to get the old heart going, and heeding Toyota's warning:
"Warning - Accurate only when completely stopped. Do not exceed 30 degrees."But, I soon discovered my truck did not tip over past 30°, and I wished the gauge would go farther to help indicate the degree of slope I was on. I find that when I first start getting tippy, I can look at the gauge and see that it is only at say 20°, then I can relax knowing its nowhere near rolling. I've had numerous occasions where extended lengths of trail were done with the tilt needle pegged at ~35°, with no idea how far over I really was.
Anyway, one afternoon, I decided to open up the clinometer and see how it worked. Quite a mechanical marvel. In the image to the lower left, the dial to the left is the up/down meter, the one to the right is the left-right meter, viewed from the back side. In the center is the tilt sensing gear. It uses a heavy brass weight attached to the bottom of the big center gear. That big gear drives the smaller gear to the right that turns the dial on the gauge. You'll note there is about a 4:3 ratio in terms of the gear diameters. So when the big gear turns 30°, the smaller gear moves the display about 40° (i.e. 30 x 4 / 3 = 40). This is what makes the 30° mark on the gauge look like it is closer to 40° physical angle. Likewise the slope indicator also has this increased sensitivty, just harder to see as the gear train is front-back instead of side by side.
On the up-down gear, there is a plastic tab that stops the gear at the +/-30° point, its easily removed. On the left-right gear, there are stops cast into the clear plastic housing the are easily removed with a small carbide bit in a Dremel tool. To the left, its hard to go much past the stop, as part of the housing is in the way. To the right, you can open it up farther, but internally, the brass weight on the gear will hit the "lock" mechanism and stop.
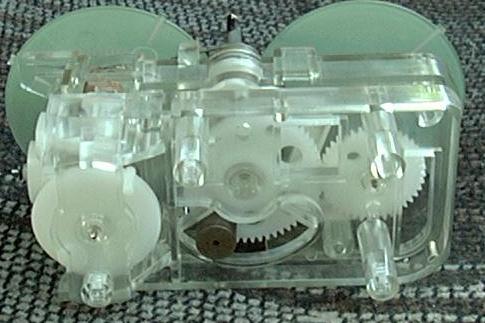
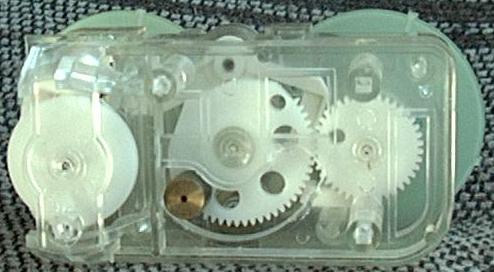
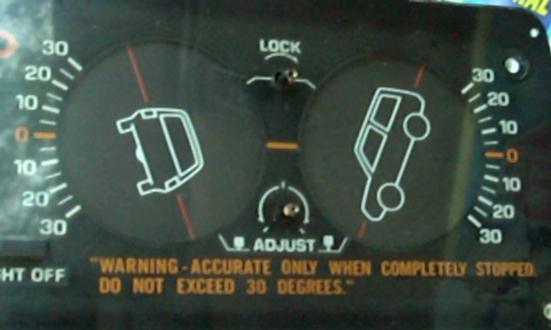
Anyway, I made those modifications, put it back together and gave it a test. In the above right picture, you can see the results, at least 45° of meter travel, can't wait to go out and try it out off-road!
- Note:
- I don't typically watch the clinometer dials as I drive off-road. Once you get upwards of 30°, you are so focused on the terrain ahead, that the meter reading is not important. But what I do find handy is that especially when I have not been out wheeling for a time, I do take a look at the tilt meter when I first start to go off-camber. When you are not used to that feeling or in unfamiliar terrain, a 10°-20° tilt can feel like you are getting ready to roll. But you can glance at the gauge and see that what the angle really is, then knowing you are not tipped over that far, you can relax and sort of "re-calibrate" your inner tilt meter. Also handy at times when you are on a side slope that is increasing in tilt and you can see when you are getting up to "interesting" angles, so you can decide if you want to preceed or not.
- Cost:
- Nada, zip, zilch!
- Rating:
-

![]()
Installing a Clinometer:
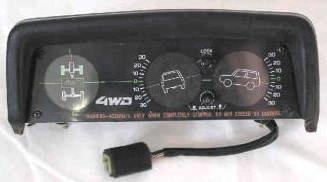
Don't have one in your truck and want to have one. Two options are to get one from a 4WD pickup or 4Runner (usually an SR5 option) and you'll have altimeter and the tilt/slope meters. Other option is from a Tercel 4WD wagon, you'll get til/slope meter and the 4WD indicator in the 3rd dial area (see below). Since you already have the 4WD light in the dash, its not quite as nice. Clinometers show up on eBay from time to time, or check the junkyards.
So you found a clinometer and want to install it.
- Mechanical install is pretty easy on the early trucks, you should have slight depression in the dash for it. Not sure what all needs to be done to install one mechanically, but you end up with a bracket on the dash and then two screws hold the gauges to the bracket.
What about wiring?
-
The entire clinometer is purely mechanical, the only need for power is
for back lighting (and the 4WD light for a Tercel clinometer).
- 1. Wire the back light to a switched power (ACC) and ground connection and use the built-in switch to turn it on and off.
-
2. Use a light source for power then ground the other wire, such as
something that turns on with the parking or headlights.
- The back light will turn on and off w/ the dash lights but won't dim, as the dimming resistor is in the ground leg of all the dash lights.
-
3. Wire the light in parallel with some dimming dash light, such as the
back light for the cigarette lighter. This way the back light turns on
and off with the rest of the lights and dims along with them, too.
- This option above is the most correct and should work the best since that is how all the dimming dash light work, they are floating int hat they are not directly tied to power OR ground. All the "ground" side connections are tied to the rheostat that serves to limit the current in the lights to make them dim.
-
So what wires hook to what?
-
The 4Runner-style clinometer (altimeter, tilt and slope meters) has 2
wires
- Black and Black w/ White stripe for the back light
-
The Tercel-style clinometer (4WD, tilt and slope meters) has 4 wires,
wire colors may vary:
-
Backlight:
- Green w/ Red stripe (or Red) wire is the hot side of the back light
- Green w/ Yellow stripe (or Black) wire is the ground side of the back light
-
4WD Light:
- Red (or White w/ Red stripe) wire is the hot side of the 4WD light
- Yellow (or White w/ Black stripe) wire is the ground side of the 4WD light
-
Backlight:
-
The 4Runner-style clinometer (altimeter, tilt and slope meters) has 2
wires
Other Options:
- Cost: $50-$100 on eBay or a junkyard (ca. 2000 prices, likely 5-10 times that nowadays)) - search for toyota clinometer on eBay or Amazon
-
Tercel
Clinometer Installation
- There are also aftermarket clinometer options available, some with just tilt and grade, like this one, others with a third display, like this one with a compass.
 ===>>
===>> 
Visitor # since 22.FEB.2003
[Last updated: 10.January.2026]
![]()