Cat-Back Exhaust
![]()
Introduction:
On my '85 4Runner, the rear tailpipe used to exit behind the left rear wheel, below the spring shackle. It was subject to damage in this location. I came up with an idea for re-routing it through the springs and rear bumperette. I had some spare 2" stainless steel flexible tubing, a S/S square exhaust tip, a 1-3/4" to 2" reducer fitting and some muffler clamps in my junk ('er I mean parts) collection. As it turned out, I didn't need to even cut the tubing, I had a piece exactly the right length left over from my pickup exhaust project.
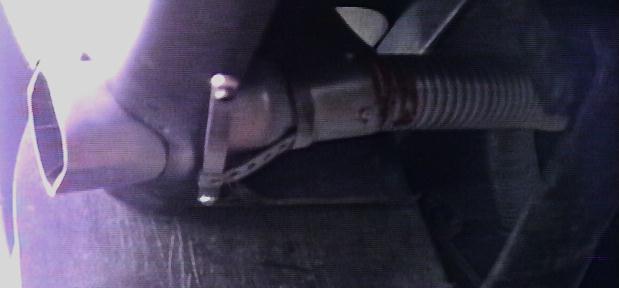
I began by cutting the tailpipe behind the muffler, just after the upward bend. The reducer connects the stock pipe to the flex tubing, which is bent to the clear the axle and meet the new exit location.
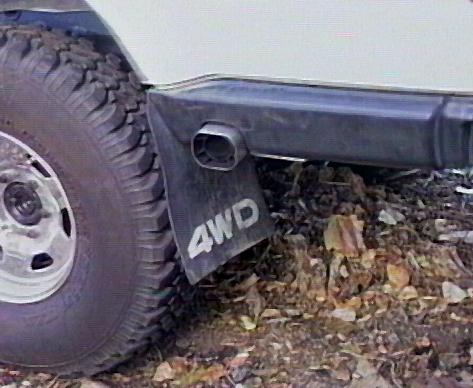
I traced the outline of the exhaust tip on the inside of the bumperette and then cut out a hole for it to pass through.
Finally, I added a piece of aluminum from the mud flap mounting bracket to the bumperette to support the tip from beneath. I also used a piece of strapping around the bar to anchor the tip from moving in and out.
I've used the S/S flex tubing for about 5 years on my diesel pickup and it has held up extremely well. The new tailpipe exit is about 6" higher and 8" closer to the rear wheel than the stock location. It is both lighter than the stock pipe as well as having 70% larger cross section. Initial seat of the pants testing shows improved high-end performance, no loss of low end torque and a nicer exhaust sound.
UPDATE 1.0:
I thought the location I chose was "high enough" to escape the rigors of 4-wheeling - WRONG! On a trip to a local off-road vehicle park, I had driven up a rocky creek bed, followed by a fellow wheeler in a Defender 90 (w/ 31" tires). After climbing over one large rock, I noticed his tailpipe had been crushed between the rock and his frame. He fixed it enough to get home and I thought that was that.
Months later, I had the plastic bumperettes off my truck and noticed that one of the brackets on the driver's side looked different than the one on the passenger side. Lo and behold, I too had smacked my tail pipe on the same rock, not enough to crush the pipe but enough to bend the bracket! Time for a new idea, which in retrospect appears obvious:
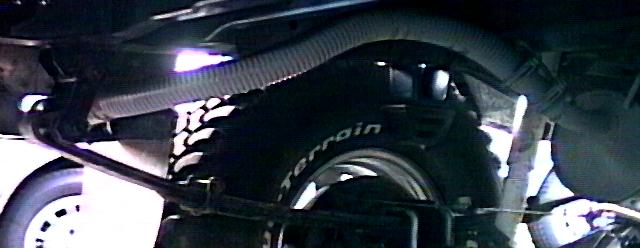
I simply routed the 2" tubing over the frame instead of under it. With a 1" body lift, there is a bit over 2" of clearance between the frame and cargo area floor. I wrapped the tube in some insulation and then used a large band clamp to secure it to the frame to prevent rattling. Now the exhaust tip hangs down next to the spring shackle, just outside the frame. I have also taken off the bumperettes and removed the tack-welded brackets.
After rerouting the tail pipe, I just finally got tired of the stock muffler one afternoon. I had an old glass-pack style muffler taking up space in my garage (remnants of my pickup-muffler experiments), so I held it up next to the stock muffler and I'll be darned it id didn't look like it belonged there. A quick turn with the pipe cutter after the cat and that big bus-sized muffler was out and the nice shiny s/s bullet was in. I used a muffler clamp w/ attached rubber strap that wraps around the round frame cross member to hold the rear end, while the front is attached near the cat hanger.
Now, I can finally hear my engine, it is not loud, just audible over the whine of the M/Ts on the road. But, now with a low restriction, 2" cat-back exhaust, my power seems to be up significantly. I have gained an entire gear on nearby freeway hills, ones I used to need 3rd are now 4th gear and some 4th gears climbs are done in 5th. No loss of low end torque, either. I'm totally happy with the results, and I can't beat the price and a cleaner garage to boot!
UPDATE 2.0:
All was fine, until I installed my LC Engineering Street Performer header. That in itself caused any trouble, but, when I bit the bullet, cut off the rusted-in-place catalytic convertor to have a look inside, I saw it was almost totally plugged. Only about a 1" diameter circle of open matrix remained in the center, the rest was plugged. After installing a nice free flow cat, I found my once barely audible exhaust note was now too loud. Apparently the plugged cat was doing a good job or muffling the sound, while robbing most of the engine's power. So, I did some quick measurements, did a little research and picked out a nice Flowmaster 50-series muffler. They have a nice design-your-own muffler feature, you choose the case, inlet and outlet size and location, and use that information to create a part number. I then plugged than number into Summit Racing's web page and 2 days later had a shiny new Flowmaster on my door step. Gotta love that Internet. Muffler fit in like it was intended, sound levels were back to reasonable levels and now I could finally open the throttle without blowing my eardrums out!
Cost:
  For me: no cost, otherwise:
   $22 T304 S/S flex tubing........(2" ID, 5' length - JC Whitney
 #21KT4047B)
    30 Borla T304 S/S exhaust tip..(also from JC Whitney
 #24KT2120W)
    13 Reducer and exhaust clamps..(from the local auto parts store)
    70 30" long, 2" inlet/outlet s/s bullet muffler (JC Whitney
 #???)
   ------------------------------
   $135
Rating:

Back to my Cheap Tricks main page.
![]()


Visitor # since 28.AUG.2001
[Last updated: 22.March.2021]