Centramatic's Continuous Wheel Balancers
Contents:
- Introduction
- Wheel Balancing, some background
-
Installation
- Lug-centric vs. hub-centric wheels
- Road Test
Introduction:
When I first bought my 4Runner, it had fairly worn out 30x9.50 radial all-terrain tires and they rode quite nice on the road. Then I lifted it enough to clear some 33x9.50 mud-terrain tires. With the new suspension and tires, the ride was still quite nice. However, after a few years of wheeling, the tires wore down and started to go out of balance. With only 5-10k miles of tread left, I didn't want to pay to have them balanced again. Besides, compared to the bias ply 33x15.50 mud tires I was also running, they were as smooth as silk! Speaking of those bias ply tires, after getting them mounted and balanced (up to 15 oz. of lead per tire) I found they rode really rough on the highway. I thought they might break in over time, didn't happen. You could see and feel the tires were physically out of round (up to 3/8" run-out) so I eventually had them trued (or shaved at Rayhill Brake and Wheel in Visalia, CA.) to remove the high spots. After doing that, most of the balancing weights were pulled off and while they rode smoother on the highway, they were now out of balance (this story continues, below).
So, I now had two set of wheels in need of balancing. Since Toyota's "lug-centric" wheels are notoriously hard to balance on common "hub-centric" balancers, I wanted a solution that was both permanent and accurate. If it worked on all my wheels, even better. Tires used off-road are notorious hard to balance and keep balanced. They are big, they have large tread blocks (subject to "chunking") and clip-on weights can get scraped off on rocks, stick-on weights can be scraped off in mud and snow. Also, aired-down tires are prone to spinning on the rim which can lead to an out-of-balance condition even if the weights remain on the rim.
Wheel Balancing, some background:
Wheel/tire combinations can be balanced in many different ways, including static and dynamic, on and off vehicle, as well and various types of permanent balancing systems.
Static Balance:
Also known as "bubble balancing" uses a fairly inexpensive machine to balance the wheel/tire assembly at rest using a bubble level as an indicator. This technique takes some operator skill to perform good balancing as you need to carefully split the balancing weights on the inside and outside of the wheel to avoid dynamic imbalance.
Dynamic Balance:
Also known as "spin balancing" can be done either on or off the vehicle. The majority of tires are probably balanced on computerized spin balancers. After clamping the wheel on the machine, setting the wheel dimensions, it spins up and calculates the locations and amount of weight to apply to the rim to correct the balance. Most spin balancers center the wheel on a cone-shaped mounting device. This works fine for vehicles that locate the wheel on the vehicle via the hub (i.e. "hub-centric"). For vehicles, like Toyota, that locate the wheel on the hub via the lug nuts (i.e. "lug-centric") a special lug-centric adapter should be used to properly balance the wheel. On vehicle balancers avoid this problem, spinning up the wheel in place.
In either case, there are several types of balancing weight that can be used, depending on the application. The most common weight is a clip-on lead weight attached to the lip of the rim. As mentioned above, clip-on weights on the outside of the rim are prone to being scraped off in the rocks. They also may not be suitable for certain alloy wheels. Adhesive backed weights are another option and have the advantage that they can be placed in the center of the wheel, if needed. But once again, they are prone to being scraped off in mud, snow and sand.
Weights on the wheel have an inherent problem due to the wheel/tire geometry. Since the imbalance is probably located out at the tire tread, it has more affect on balance than an equal weight located at the rim radius. For example on a 33x15 tire, an ounce of imbalance at the tread (16.5" radius) would require over 2 ounces of weight on the rim to correct (16.5/7.5x1oz.=2.2oz.). A more effective (and expensive) method of balancing a tire involve the application of heavy rubber patches to the inside of the tire. This has the advantage that less weight is needed and the weight is safe from rocks and tire spinning, but the tire must be repeatedly mounted, spun, and dis-mounted to balance.
Another form of dynamic balancing involves shaving rubber from the tire to achieve balance. This is very helpful in cases where tires are physically out of round (as was the case with my Swamper TSL/SX tires). However, it can involve the removal of significant amounts of tread and is more expensive than balancing with weights. Some tire chain stores offer this service, but only up to about 31" diameter tires. Shops that deal with large trucks and tractors often have on-vehicle tire shavers that can be used for this purpose.
Permanent Balancing:
Several options exist for permanent wheel balancing. These include liquid and dry powder weight added to the inside of the tire and external weighted balancing rings the clamp between the wheel and hub. Both these options are commonly used for over-the-highway trucks, where tires can last 100,000 miles or longer. Frequent off-vehicle balancing costs could add up over the lifetime of the tire. One popular dry powder balancing product is known as Equal. Installation of the balancing material is done on a deflated tire, using a special tool to inject the powder into the valve stem. Alternately, it can be placed in the tire prior to mounting. Proper technique must be observed to keep water out, including being careful with liquid tire mounting lubricant and use of dry air for inflation. For a tire used in off-road situations, where frequent air-down/up cycles are common, user's may want to consider adding an air dryer to their on-board air system. Both liquid and powder in-tire balancers can cause problems with clogged valve stems, too.
The other option for permanent balancing is the external, or wheel-mounted balancing rings. There are two designs common in North America, one is Sun-Tech Innovations and the other is Centramatic. Sun-Tech uses liquid mercury as the balancing medium while Centramatic uses steel shot in oil. In either case, the balancers work by making use of centrifugal force to distribute the weight inside the tube to compensate for dynamic tire balance as it rotates. Assume some excess tread weight is present at one point on the tire. As it rotates, this causes an acceleration of the wheel and tire in the direction of the heavy spot. The balancing medium in the tube will flow away from this acceleration until such time as the out of balance situation is corrected. The centrifugal force holds the weight against the outside of the balancing tube. Since the balancing tube is located inside the rim, it is closer to the center of the wheel. These balancers require a certain speed threshold to activate, usually around 20-25 MPH. Below that speed, tire balance is probably not an issue. Several advantages of this type of balancer for off-roading is that they automatically compensate for tires that spin on the rim, or tread that gets chucked on sharp rocks, and are tucked safely away from trail damage inside the rim. Drawbacks are that the balancers have a fixed amount of balance medium and can only correct balance to that limit, on the order of 12 oz. of lead. Also, like external weights, the balancer operates at a smaller radius than the tire, making it progressively less effective as the tire diameter increases for a give wheel diameter.
- Hub-Centric:
- A hub and wheel design in which the wheel is centered on a raised center portion of the hub. The lug nuts/bolts then serve only to hold the wheel in place on the hub. Most tire balancing machines use a conical wheel mounting mechanism to locate the wheel/tire on the machine for balancing.
- Lug-Centric:
- A hub and wheel design in which the wheel is centered by the lug nuts/bolts themselves, often with clearance between the center of the hub and the cut out in the wheel. Toyota wheels are lug-centric and as such require a special lug-centric fixture to be properly balanced on a cone-type balancing machine, as the wheel center hole may not be exactly centered on the lug center point.
After researching my options, I decided to give Centramatic's Continuous Wheel Balancing system a try. Long popular with over-the-road truckers, Centramatic has recently designed a balancer to fit popular light truck wheels, including 6-lug Toyotas. I phoned them up and ordered a set of:
P/N: 300-305; Model KP-12
Price $199.00/set of 4 plus $5 shipping
(in contrast the Sun Tech balancers are about $380/set)
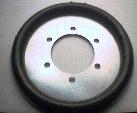
A week later a box arrived from Centramatic with the four wheel balancers. Closer examination revealed a galvanized steel center disc to which was crimped a plastic "donut" full of heavy steel shot suspended in a synthetic oil. Kind of reminded me of one of the old hula-hoops with the pellets inside that made a "shoop-shoop" sound as it spun. Each unit weighs about 5 pounds, or so. The inner hub cutout is 4-1/4" dia. and easily fits over the stock hub, the outer diameter is 12-1/2", so you should check that your rims have enough clearance inside for the balancer to fit, the plastic donut projects about 1-1/8" at its maximum thickness. They fit inside both my Toyota factory 15x6 rims as well as my 15x10 custom rims (both steel). There was not a lot of extra room, though, so be sure to measure your rims before ordering.
UPDATE: Apparently Centramatic has decided to drop the 15" version of this product, except for police vehicles. What prompted this, I'm not sure, but it looks like Sun Tech is the only other option at this time.
Installation:
Installation is fairly straight forward, jack up the vehicle, remove the wheel, slide the balancer over the hub, plastic donut facing out, and re-install the wheel.
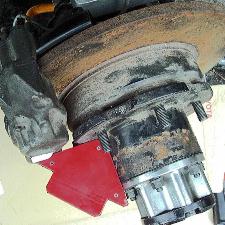
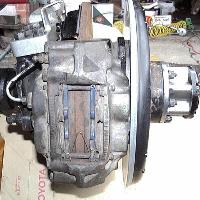
Simple enough in back, but on my '85 front solid axle, I found the brake caliper protruded beyond the face of the hub a bit. In the picture above, the red magnet is not quite flush with the hub mounting surface. I painted the protruding part of the caliper white and you can see it sticks out at least 1/4" beyond the hub face. Most wheels are dished away from the hub surface so this is not a problem, but the balancer disc extends straight out from the hub all the way to the inside of the rim.
- NOTE:
- Apparently on the '86-'88/9 22RE pickups and 4Runners, the spacing on the IFS/4-cyl front calipers is such that no wheel spacers or even grinding is needed, so the balancer installation is simple.
I ground down the small raised section on the caliper to remove most of the interference. Even so, I found it necessary to add a 1/4" spacer (pictured) to gain enough breathing room between the balancer disk and the caliper. I have run these spacers with my 33x9.50 tires for over two years now without problem. There is enough extra length in the stock wheel studs to accommodate a 1/4" spacer and still have a few threads protruding beyond the lug nuts for safety. Users of 1/2" thick or thicker wheel spacers will have no clearance issues at all.
Note: If you are dead set against wheel spacers, best to check the caliper clearance on your truck *before* ordering this product, it may not be for you!
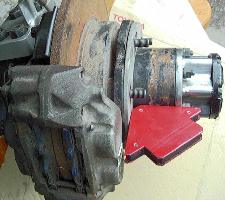
Here is the installed balancer and the somewhat tight clearance at the brake caliper (this is still with the 1/4" spacer installed). Actually there is more clearance than pictured above, since the balancer is somewhat dished inwards until the wheel is bolted down, flattening the dish and pulling the outer edge away from the caliper.
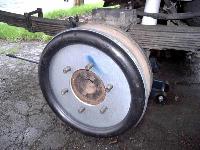
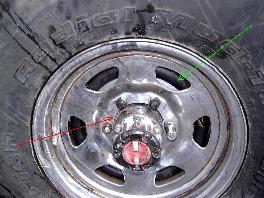
In the photo above, you can see the wheel balancer weight ring behind the wheel indicated by the green arrow. Also, as a point of reference, the red arrow points to a small, but visible, gap between the wheel and the front hub. While this has nothing to do with the wheel balancer, it does show that Toyota wheels are typically "lug-centric" or centered by the wheel lugs. It is this very gap that tells you that, because if there is a gap between the wheel and the hub, the hub can't be centereing the wheel (as in a hub-centric design), so it therefore must be lug-centric. And it is interesting to note that the Centramatic wheel balancers are also a lug-centric design, they have an oversize center hole to clear the hub.
One potential consideration is that the balancer disc effectively blocks air from flowing in through the wheel, kind of like those "dust shields" for reducing brake dust on your wheels. Toyota uses an inner brake shield around the brake disc. This shield is prone to filling with mud and snow when driving in those conditions. I had been considering cutting this shield back. However, it can't be just be removed as it provides important spacing for the hub spindle attachment mechanism and also supports the lower attachment point for the flexible portion of the front brake lines. However, in my case, my new crossover steering arms provide a brake line mount on the steering arm itself, necessitating some modification to the shield. So, grabbing my air-powered nibbler and metal-cutting band saw, I went to work removing the bulk of the shield. I had my axle apart anyway both to install the new steering arms as well as replacing the birfield joints, but I imagine it would be possible to trim the shield in place if desired. This is an optional step and I'm not advocating the need to do this, just documenting what I did. You can see the cut away brake shield in the preceding caliper-clearance picture.
Road Test:
According to Centramatic:
"It is not necessary to balance your wheels prior to installation but it is advised to insure maximum performance."
At slow speeds, there is a definite "shoop-shoop" sound as the shot rolls around inside the tube. Once you get above 25 MPH, the sound stops and the balancers start working. Interestingly, once the shot settles into place, they stay quiet until you drop below about 5 MPH. The balancers seem to work fine with my slightly out-of-balance BFG M/Ts.
With the new HySteer crossover steering setup, did install a steering stabilizer, to control the front end wobbles when hitting bumps. It was not needed for normal driving, but did help dampen the wobbles when hitting bumps. I also increased my caster angle and this seemed to help, too.
Update:
So, I decided to see how the balancer would stand up to a set of lumpy, 33x15.50 bias ply SuperSwamper TSL/SX tires, the score:
- Centramatic: 2
- Swampers: 2
Looks like a dead heat to me. The somewhat out of balance front tires worked great, no wobble or vibration after you warm them up to eliminate the bias-ply flat spots. The rear tires, on the other hand (which both had ~15 oz. of lead weight removed when they were shaved) are not quite able to balance out. I can feel them smooth out, then start to shake, balance out again, etc. I took the two rear tires in to have them re-balanced. They each took about *20* oz. of lead to (sort-of) balance, so no wonder the wheel balancers were not able to control these monsters. Anyway, with the weights and the balancers, the ride is now finally smooth, I can easily run up to about 70 MPH (at which point my 22RE engine is about maxed out :).
For off-road use, I've found no problems, so far. After a recent snow run, in which one bead picked up a handful of wood chunks after climbing up a tree root lined trail, I found this didn't upset the balance at all.
And now after 18 years of use, I can say I am still running these balancers. Have used them on 6 sets of tires now over the years and the last few sets, are ones that I mounted and "balanced" myself. In doing so, I think I have now easily saved the cost of the balancers with money (and time) saved at the tire shops. I use an inexpensive tire mounting tool from Harbor Freight and use a simple bubble balancer with stick on weights to do a quick static balance on the tires after I mount them (probably not required, but I think it is a good idea) and then the balancers take over.
Available from: Centramatic Perma Balance
1300 East Belknap Street
Fort Worth, TX. 76111
Ph: +1(817) 332-3636
FAX: +1(817) 870-1866
TollFree: +1(800) 523-8473 email: centra2@centramatic.com
[Author: Roger Brown] [Initial Creation: 13.JAN.2000]
[Last updated: 30.March.2022 ]
Visitor # 89600 since 02.NOV.2004
