Toyota 4Runner Soft Top Options
Contents:
[Return to the main Cheap Tricks page...]Commercial Soft Top Options:
There are a few commercial soft top options for the 1st generation (1984-1989) 4Runners:
- Kayline Mfg. made Soft Tops up through 2001
-
Kayline went out of business, however all their patterns and product
line were purchased by Specialty
Top Company in 2002
- It seems STC may be out of business now as well.
- Here's an excellent review/installtion article on the soft top.
- Can-Back is the other soft top option for the 1st generation 4Runner.
- KillerToyTops has a nice 1st gen 4Runner full and bikini top.
- SoftTopper is apparently now offering a 4Runner soft top
- Downey Offroad (RIP) used to have a couple of soft top options for the 1st gen 4Runners
I picked up a used Kayline soft top for my '85 4Runner. One drawback to is was that you had to drill about 100 holes to mount the frame to the body before you could install the top. When I got my used Kayline top, it had been set up to avoid 90% of the drilling. Here's how it mounts:
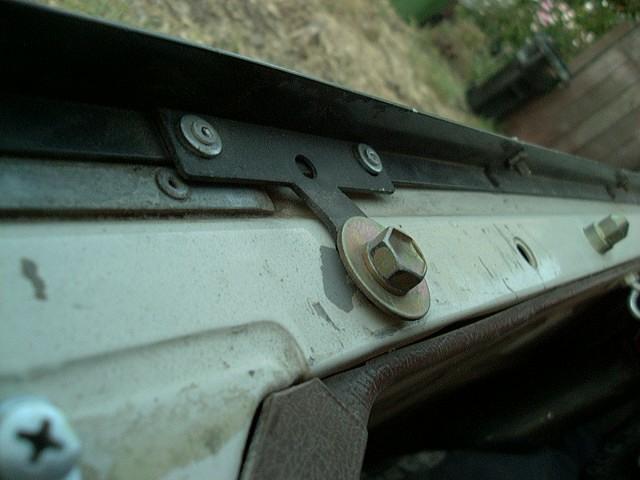
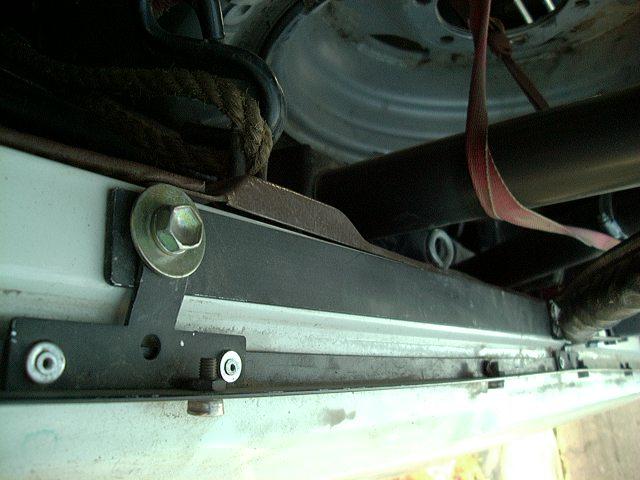
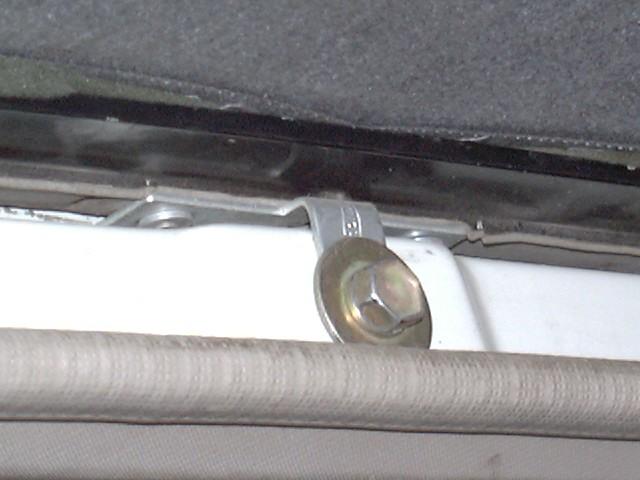
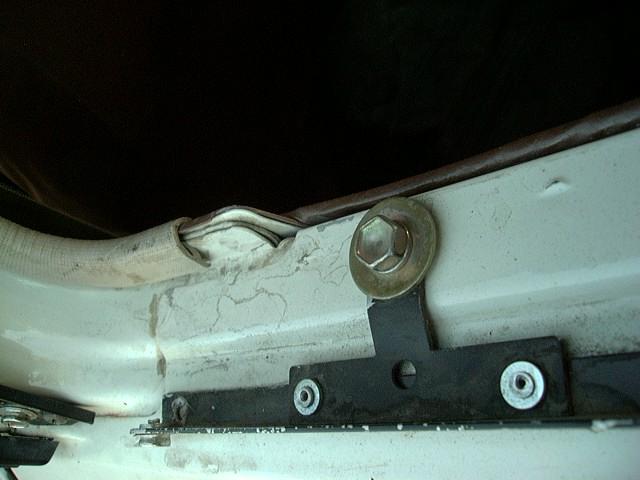
As seen above, by riveting T-brackets to the Kayline frame to line up with the stock shell mounting bolt holes, it is possible to use most of the stock mounting holes to attach the Kayline top. Some screws are still required at the ends of the Kayline frame, where it is too far from the stock holes. Note how the T-brackets are bent and formed to sit on top of the Kayline frame to allow it to stay in contact with the body sheet metal. The rear window channel is still screwed on, but it stays attached year round. I find I can install or remove my Kayline top in under 30 minutes now.
Can't locate the tee-brackets or lack the equipment to drill and bend them? No problem, an easy-to-install hardware kit is available below.
[return to the top of this page]Soft Top Install Kit: SOLD OUT
 |
 |
| A: Basic Hardware Kit: SOLD OUT | B: Deluxe Hardware Kit: SOLD OUT |
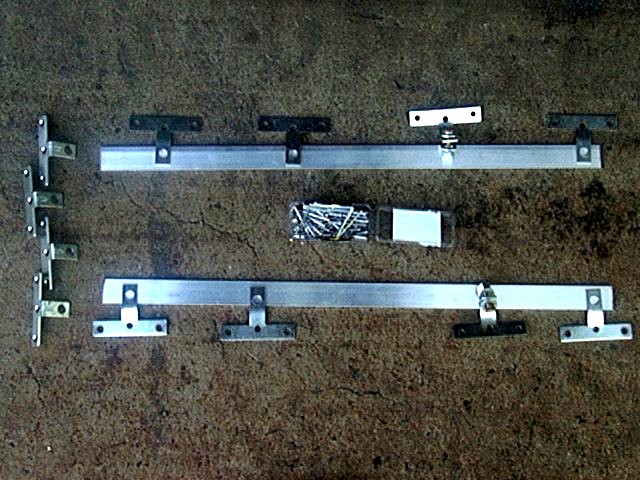
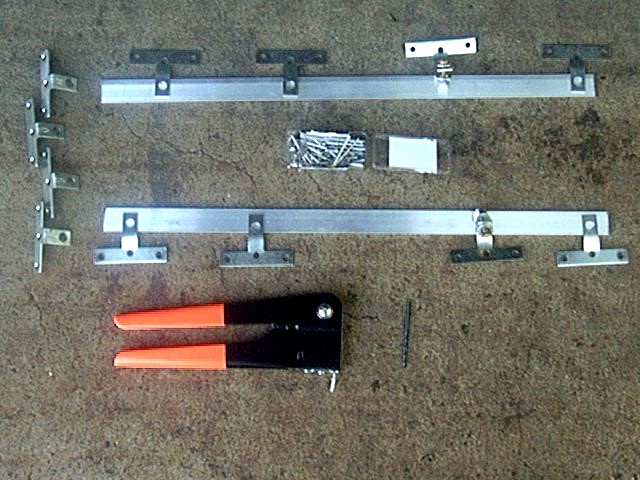
If you would like to convert your soft top to the quick installation version shown above, a ready-to-install kit is available from 4Crawler Offroad to do just this. Kit consists of 12 tee brackets, drilled and pre-bent to match up to the factory hard top mounting holes, plus misc. steel bracket pieces, ready to pop-rivet to your soft top frame:
-
Cost for the basic hardware kit is $110.00: SOLD OUT
- See image A above
-
For owner's of the STC top, a deluxe hardware kit with 2 additional
tee-brackets for the cab sides is $130.00: SOLD OUT
- Adds 2 more of the left-most (C) brackets
You can obtain the 3 inch repair Tee plates with this Amazon link as well as some 1/8 x 1 inch flat bar stock. You'll also need a pop-rivet gun (pictured in B above, gun not included with the kit) to install these, available at any hardware store or on Amazon
Installation:
Installation is straight forward. If the soft top frame has already been installed, just place each tee-bracket at a factory bolt location. If the top has never been installed, attach it with a few screws to hold in in place. The brackets are located as follows:
-
The 4 - 90 degree bend brackets go along the cab roof (brkt C)
- The deluxe kit includes 2 addtional 90 degree brackets for the sides of the cab
- The 6 offset bend brackets go along the bed rails (3 per side, 1 at the rear, 2 towards the front) (brkt B)
- The 2 - 90 degree bend brackets attach the side rail to the pivot bracket (1 per side) (brkt A)
- The two flat bars reinforce the hinge point and tie it into the two center factory bolt holes
Minor adjustmets to the bent brackets may be needed to line up to the frame.
- Bolt each bracket in place then, mark the location of the rivet holes onto the soft top frame (2 per bracket).
- Center punch and drill 1/8" holes for the pop-rivets.
- Then insert a pop-rivet into the pop-rivet gun, push the rivet through the holes, install a backing washer if needed and squeeze the pop-rivet tool to set the rivet.
- Repeat for each bracket and the flat bar pieces which are riveted to the pivot bracket base with 2-4 rivets.
- The pivot bracket may either be riveted or bolted (1/4" bolt) to the tee bracket.
With this kit, you only have to use about a dozen sheet metal screws to fasten the ends of the soft top brackets to the bed rails. Those holes are all covered by the hard top when it is re-installed. Note that this is only an installtion kit, not a complete soft top, for that you'll need to supply your own.
[return to the top of this page]DIY Bikini Top:
Here's one option:
- Parts needed (part numbers and prices circa 1998):
-
Jeep YJ Bikini Top (Standard Model) BESTOP # BST52508
- Jeep YJ Window Mount Kit (Attachment to the window for the Bikini) STEELHORSE # 910001
- (2) 12"in long Steel or Aluminum angles (L Brackets), approx. 1"x1", 1/16"-1/8" thick
- Available at a hardware store, or on-line.
- Jeep YJ Window Mount Kit (Attachment to the window for the Bikini) STEELHORSE # 910001
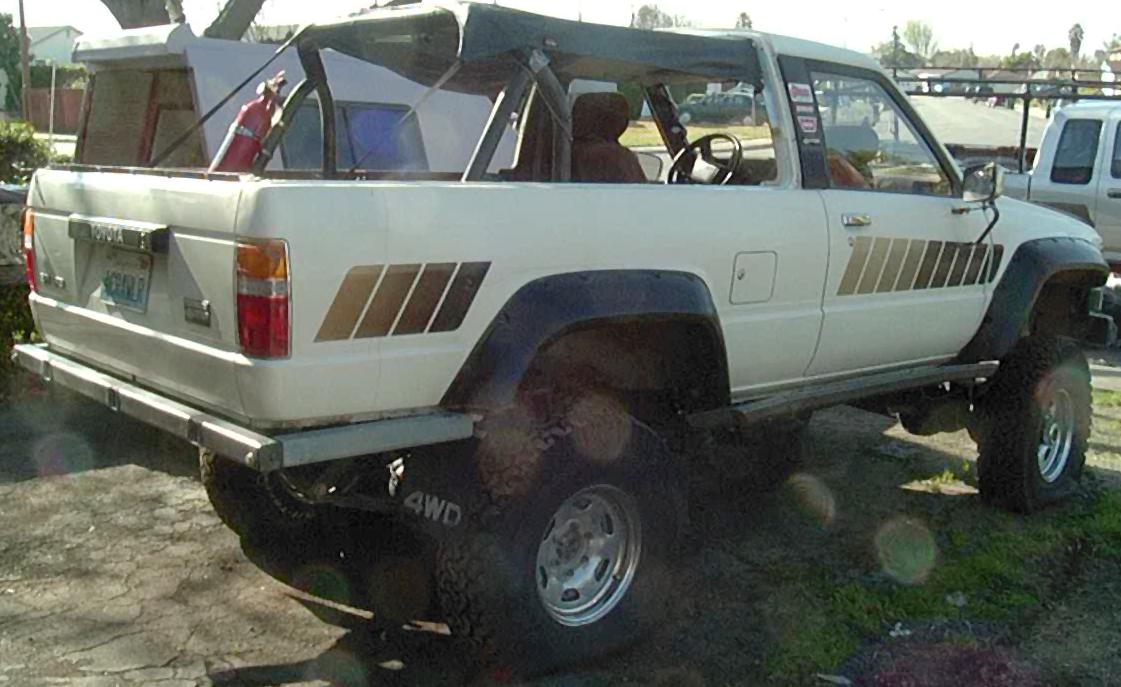 |
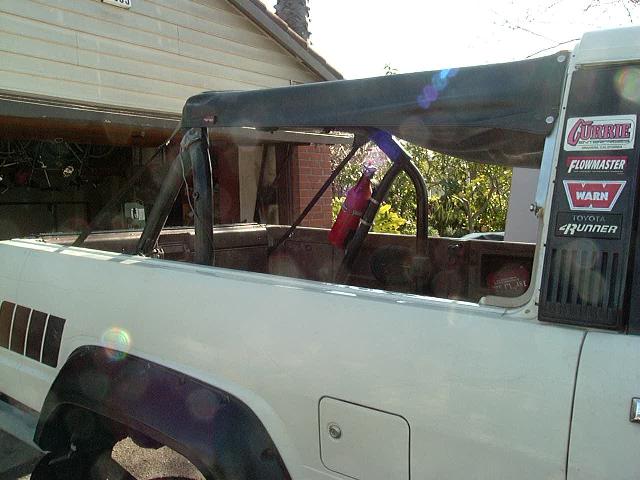 |
| Bikini Top: Rear View | Bikini Top: Front View |
- Remove the 4Runner shell.
- Then take the Jeep window mount strips and tape them together, thus forming (1) piece.
- Place this piece and line it up from Right to Left on the rear Hardtop upper mount area; this is the rear roof area).
- Once you have lined this piece up eyeball the overhang of extra material on each side of the truck. Leave about 1"in of this piece hanging over each side. Cut this extra channel off with a hacksaw.
- After the extra lengths are cut off both of these pieces, place them together again using tape and hold it up to the cab. After cutting this piece it should line up good with the 1" overhangs on each side. Take a self tapping screw and drill each hole in the sheet metal, once complete attach with the supplied screws to the cab of the 4Runner.
- At this point you can slide the Bikini top into the channel that you have just attached. Center the Bikini in the mount.
- Pull the straps over the rear rollbar. At this point you can see what the install is going to look like.
- Included in the Bikini kit should be 2 tie-downs for the rear straps. Make small bends to each piece to better conform to the flat area where the shell mounts on the 4Runner body. At this point place each piece about an 1-1/2" from the taillight (toward the cab) and drill the holes and mount with screws. Complete this on each side.
- With this being completed you can now attach the straps from the Bikini to the strap tie downs. Pull down and cinch up the straps as needed. Leave a little slack as the button near the cab still needs to be installed.
- Next return to the one side of the 4Runner at the rear of the cab. You will notice a stainless button hanging over the side on the Bikini. Now a bracket has to be made out of the 2 pieces of 1" angle to attach the button base and then secure it to the side of the cab. The angle is used to provide a surface flush with the side of the cab on which to attach the bottom corners of the bikini top.
- Each piece of angle will need to be about 12" long. You must first mark and drill a hole for attaching this to the back of the 4Runner cab. If looking at the 4Runner from the side where the shell mounts to the cab this angle will mount to the factory bolt hole located in the middle. Once you drill this hole in the angle, you can fasten it to the cab using one of your factory shell bolts on each side. If needed you can add a sheet metal screw or two to make a more secure fastening.
- With this done, you can pull the excess portion of the Bikini down and mark a good place to drill and mount the button base on this piece of angle. When this is completed snap down your button and your Bikini is installed.
NOTE: 4Crawler Offroad does not sell this bikini top or the mounting components discussed in this article. Check with one of the vendors above or try one of the on-line auction sites (eBay, etc.) for used tops.
[return to the top of this page]
Visitor # 176947 since 02.NOV.2004
[Last updated: 01.January.2025]
Visitor # 176948 since 02.NOV.2004
[Initial creation: 18.MAY.2001]
Copyright© 2001- 2024 Roger Brown - All Rights Reserved, Content of this page may not be reproduced without the permission of the author