Front Wheel Bearing Replacement
Visitor # 35766 since 19.SEP.2001
![]()
Front Wheel Bearing Replacement:
Sooner or later, you'll feel or hear a noise from the front end, usually worse turning left or right. This is a sign of a wheel bearing starting to go. If you can feel play in the wheel grasping it at the 6:00 and 12:00 position, this is another sign of bearing wear. I recently had one bearing go out on my old '81 pickup (heck, it was probably the original bearing, 262,000 miles).
I had been looking for an excuse to pick up a decent hydraulic shop press and this was just the project to test it out on. Luckily, Harbor Freight was having a sale on their 20T press (funny how that always seems to be the case with HF:-) so I grabbed one, along with an inexpensive 3/4" drive metric socket set, driving home with it in my pickup with howling front wheel bearing, picked up a bearing at the parts store then headed home to get going.
After consulting the Bentley shop manual, and having the bearing in hand, I went to the hardware store to see if I could find something to use to press the old bearing out and the new one in. I found a 1" - 1-1/2" galvanized reducing bell pipe fitting that was just the right size for the job. A bit of work on the grinder and I had the larger OD ground to fit the OD of the outer race, the smaller OD fit the inner race.

So, broke the axle retaining nut (30 mm) free by putting the tranny in 4th gear, e-brake on, facing uphill with the front wheel on a ramp. It came loose with a my 3/4" drive socket. Then I jacked up the front corner, removed the wheel, filed a notch in the camber adjusting bolt (it was already there from a previous project), removed the brake caliper, tie rod end, strut bolts and ball joint clamp (remember to remove the clamp bolt all the way, its the shaft of the bolt that interlocks into the ball joint stud). Off with the brake disc and axle nut and the hub and spindle came off fairly easily.
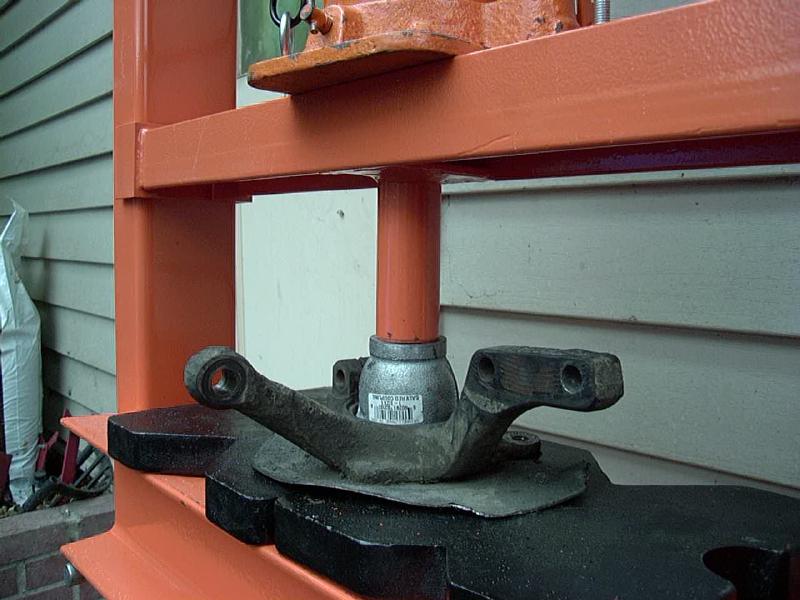
I didn't get photos of the whole process, but Bentley has a good description of it. Be sure to remove the c-clip, I had to make a trip to the parts store to find a pair of snap ring pliers that would compress the clip enough without popping loose like my other ones did. Then you basically follow the Bentley procedure or pressing the hub out of the bearing, then the bearing out of the spindle. I properly supported the correct parts of the bearing as I took it out and found it came out undamaged. The key is to never apply press pressure to the bearings, only to the races. For example, in the photo above, you can see I'm pressing the bearing in or out of the spindle using the large side of my special tool which only contact the outer race. When pressing the hub into the bearing, use the small end to support the inner race while you press the hub into the bearing. I also took care to clean and grease the area where the bearing was going to slide into and it went in very smoothly.

Assembly is the reverse of dis-assembly procedure. You may notice my disc brake shield is trimmed down from the stock setup. The reason I did this was to get it to stop rattling when I hit bumps in the road. I cut it back so that it still shields the CV boots from brake dust and heat, but enough to kill the rattle. I've had no problems with wet brakes or extra brake dust after doing this. Put everything back together, put the wheel back on and then don't forget to re-torque the axle nut (use the new one that came in the bearing kit) to the specified torque. Its probably a good idea to re-check the other fasteners after a few hundred miles of driving and if in doubt, get a front end alignment done.
I didn't do the alignment on mine, as I found that I would find my marks still lined up after taking it to an alignment place, so they must be in the right spot. Anyway, YMMV!
Cost:
 Bearing:      $55 (1 front and 2 rears)
 Special Tool:   2 (a selection of larger sockets also works)
 Shop Press:    100-200 (can be taken to a machine shop, too :)

  Rating:

[return to my Cheap Tricks page]
![]()
 ===>>
===>> 
[Last updated: 26.March.2021]
![]()