 |
 |
 |
 |
 |
||
 |
 |
 |
 |
 |
||
 |
 |
: Small size (in black Delrin) that is 9/16") |
 |
 |
||
 |
 |
 |
 |
|
||
|
|
|
|
|
|
||
|
|
|
 |
 |
 |
||
 |
 |
 |
 |
 |
||
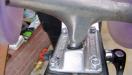
 Santa Cruz Jammer deck, used to have it set up with Independent trucks and Kryptonics 70mm wheels. To set it up better for pumping, I just mounted the trucks at the ends of the existing bolt holes and drilled a new pair of holes one truck length towards the end of the deck. Then also scalloped some wheel wells in the rear to get rid of the minor wheel bite and to keep the deck height as low as possible.") |
 |
 |
 |
 |
||
") |
 |
 |
 |
 |
||
 |
 |
 |
 |
 |
||
 |
 |
 |
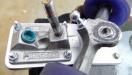
 wheels and the dewedged IndeeSZ truck on the rear G|Bomb bracket. Shown is 22* of wedges and the bracket at around -13*, so 35* total dewedging. That leaves the pivot axis (shown via green line) on the truck at about 10* and it seems to work quite well like this. Added benefit of the wedges is they add a bit of clearance between the wheels and the binding skewer so no wheel bite.") |
 |
||
 |
 |
 |
 |
 |
||
 |
. So stay tuned, this may take a year or more for this") |
 |
 |
 |
||
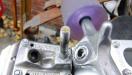
, then driving the slightly oversized cup into the base plate hole will shrink the inner hole diameter a little bit. Likewise, if the hanger fits just right outside but is too tight with the cup installed, reducing the outer diameter of the cup will eliminate the inner diameter change. If you need to make the cup fit loosely in the base plate, you can always use a flexible adhesive to hold the cup in place.") |
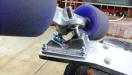
, here is a large dia. (0.780") |
 |
 |
. The idea being that cracks in the steel grow when the steel is under tension as happens on the outside of the bolt when the truck turns to the other side. So will try and get this set up in a truck and give it some test rides to see how it works.") |
||
Here is some information on my battle with the Mountain View, CA. to allow longboarding on their multiple-use trails: MountainViewSkateboarding.shtml. If you have not done so, please sign the on-line petition that is linked there, skateboarding should not be a crime! Here is some information on local trails to skate: Guadalupe River Trail. The photo gallery splits between photo 33 and 34, so return to the index and select the next or previous photo there.
|
|
|
|
|
|
||
|
|
|
|
|
|
||
|
|
|
|
|
|
||
|
|
|
|
|
|
||
|
|
|
|
|
|
||
|
|
|
|
|
|
||
|
|
|
|
|
|
||
|
|
|
|
|
|
||
|
|
|
|
|
|
||
|
|
|
|
|
|
||
|
|
|
|
|
|
||
|
|
|
|
|
|
||
|
|
|
|
|
|
||
|
|
|
|
|
|
||
created with igal2 2.2