This section is initially catered tot he ball joint spacers and torsion bar related topics. It is now being expanded to cover more products.
Good question! There are two main reasons but before getting into them it is important to point out that 1st and 2nd gen idler arms are interchangable. The second gen arms are typically stronger though. Therefore, if you have a 1st gen truck, it make sense to install a 2nd gen arm for the added strength.
First, the most affordable ilder arm is by sheer luck also the best. Initially we assumed that we would want to at the very least produce idler arm bushings for the high-end Napa arm as well as the OEM arm because we assumed they would be the best. After an idler arm spending spree we found some interesting things we'll discuss below.
| Idler Arm | Cost | Shaft Diameter |
| Autozone FA 5040 (McQuay-Norris FA5040) | $60 - $70 | . 786 |
| Napa ATM1032403 (sold for 2WD and 4WD) | $71 | .703 |
| Kragen (Moog) K80536 | $100 | .767 |
| Napa NCP2683702 | $119 | .767 |
| Kragen (Beck Arnley) 1014228 | $125 - $150 | .767 |
| Dealer | $160 - $220 | .767 |
As one can see, the most affordable arm has the largest shaft diameter. Another interesting note is that the Napa 1032403 which has a diameter similar to a 2WD OEM arm is also sold for 4WD trucks even though from a strength standpoint, this arm is below spec.
The second reason to support one arm is cost and the desire to keep it down. The part of the shaft closest to the arm itself wears more than the rest. This means that a bushing that fits snuggly over the lower part of the shaft will not fit at all over the rest of the shaft. Assuming one was to verify that the shaft has a uniform diameter, there is the issue of calibration. My calipers might not measure out like yours. As a result it is difficult to machine the parts to order due to the tight tolerances in this application. To reduce part cost it is necessary to produce many at once and supporting one arm helps us accomplish this goal.
We entertained shipping idler arms in house to do custom bushings but the shipping to and from the customer is about equal the price of a pair of bushings. It costs much more to do one-off jobs so we would have to charge at least 2X the price for the bushings. Between the machine time and shipping, one could purchase the Duralast (FA5040) arm new, with warranty, and order a set of bushings for it.
Given these issues we have decided to support the most affordable yet strongest idler arm.
SDORI does not warranty bearings damaged by bent idler arms, however, there is good news here. If you bend an idler shaft and damage the flange of one of the bearings, you can simply remove the bushings reverse them placing the damaged flange bushing on top with flange loads are very small. If you bend another, rotate the bushing 180 degrees. At this point, if you bend another, you will need to purchase a new pair of bushings and hopefully and idler arm brace too. The good news is that hopefully your more expensive idler arm has been covered under warranty by your local autoparts store.
Nope, they are self lubricating. Grease will not hurt them so there is no need to wipe clean grease off of the housing and/or shaft but there is not need to install a zerk fitting either.
Often we receive questions as to how ball joint spacers impact on-road ride quality, improve off road capability, and interact with other aftermarket parts such as torsion bars. Also, people often simply wonder what the difference is between adding spacers vs. simply adjusting their torsion bars and how this impacts steering component life span. This paper hopes to put some common myths to rest while increasing the reader's understanding of Toyota torsion bar suspension as a whole. The paper is written from a layman’s perspective. If anyone would like to see the physics and more specifically vector calculus behind these conclusions, feel free to email sales@4crawler.com and we can supply them. We love to talk shop.
To summarize the difference from the vehicle driver perspective between 1.5" of ball joint spacer lift and 1.5" of torsion bar adjustment lift one could say that ball joint spacers make for a smoother on road ride with more off-road suspension flex and corresponding capability.
To understand why this is, it is first helpful to understand why it is the vehicle ride becomes harsher the higher one lifts the vehicle via torsion adjusting. The first reason relates to down travel and is very straight forward while the second, relating to the effective radius, is less so.
Quite simply, when one of your wheels encounters a depression in the road such as a pothole, one of two, or a combination of these two things are going to happen. The truck’s wheel will enter the hole while the chassis remains relatively settled. Or, the truck will fall into the hole which will unsettle and jar the chassis (and occupants). For the wheel to travel downwards there must be sufficient down travel to do so. When you adjust your torsion bars for lift, you sacrifice down travel for up-travel. You can absorb a larger bump but if you encounter a pothole type of depression, the vehicle falls into the hole with the front wheel often impacting the upside on its way through. This is very hard on the vehicle and occupants. The results are a poor on road ride.
Get your thinking caps on because this is the most important section of this document. It impacts everything from understanding how spacers help to deciding if you are a candidate for thicker torsion bars. We’ll first discuss what makes a torsion spring flex. We’ll then relate this to you truck and upper control arm. We’ll show how the angle of the upper control arm affects the radius and finally draw our conclusion that in essence, preload goes down, not up, as you increase the vehicle’s height via torsion bar adjusting.
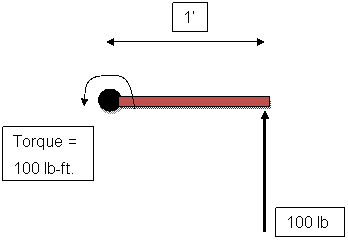
A torsion spring deflects by twisting when torque is applied. What is torque: Torque = force * radius. Here, 100 lb * 1’ = 100 ft-lb.

Let’s apply this to your Toyota truck, we’ll leave the measurements has round numbers to make the math easier but add labels to show what they represent. Assume we are looking at the front of the vehicle driver's side.

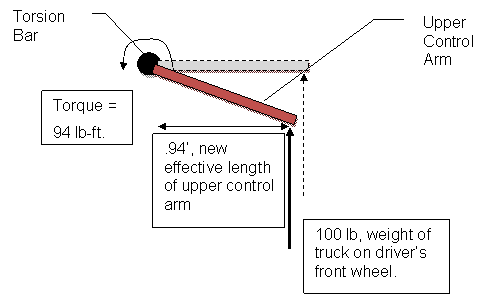
Now, let’s add in a few observations. First, the UCA is not typically horizontal, it angles downwards anywhere from a few degrees to almost 30 degrees at rest. When this angle is increasing, the truck is getting higher. The truck, however, is not getting heavier. Let’s take a look at how this angle changes the torque on the torsion bar.
As one can see, the twisting force is a function of the effective radius that is 90 degrees to the direction of the force. Since we angled the upper control arm downwards, the effective radius got shorter. This means the torque on the torsion bar became less. To find this new radius, we simply multiply the original by the cosin (20˚) or whatever angle your UCA is at when at rest.

As we continue to angle the arm more, the torque continues to decrease. At full droop the UCA is at around 30 degrees and the torque at rest, more commonly referred to as preload, drops to 86.6 lb-ft.
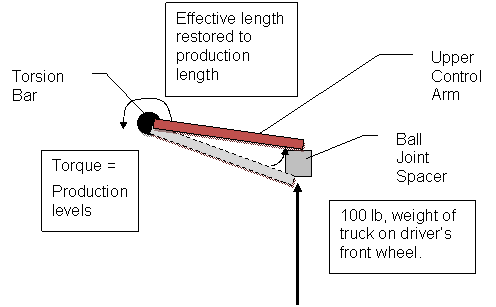
The first improvement ball joint spacers make is that because they increase the overall window of travel 1.5”, the vehicle can gain 1.5” of lift without sacrificing down travel. The other reason is that they increase the effective radius thus increasing suspension compliance.

All impacts have a reduced torque when the arm is at an angle to the pavement. As a result, steep a-arm angles mean the torsion bar deflects less which forces the chassis to move more. This jars the chassis, occupants, and the on the trail encourages the truck to lift a wheel sooner thus losing traction. The lower torque translates to reduced tension on the adjusting bolt which means as you increase the height of the truck via torsion bar adjusting; the preload goes down, not up. Therefore, as one can see, one does not need a stiffer torsion bar to “hold” the lift when adjusting torsion bars for increased height.
The spacer by increasing the effective radius increases the torque on the torsion bar. It then deflects more under a given load which means the wheels move more, the chassis less. Occupants experience a smoother ride and the vehicle can tolerate a greater surface unevenness before lifting a wheel. That improves traction, capability, and control.
While most IFS Toyota four wheelers are typically trying increase the flex of their IFS, there are a few cases where one would want to decrease flex. Now, a few things we should get out of the way are these. Stiffer springs decrease flex. There is no relation between the diameter of a torsion bar and preload. Preload as previously discussed is a function the vehicle’s weight and angle of the control arm. If one installs a stiff torsion bar, they will get less deflection for a given amount of load. There are two cases where this is desirable.
The first example has to do with extra front end loading. When one installs an aftermarket front bumper, winch, and cable, hundreds of pounds are added to the front of the truck. To compound this, the front suspension must not only carry that weight but also that of the weight lifted off of the rear. Because the weight is added ahead of the front axle, there is a teeter-totter affect in that it attempts to lift the rear wheels. The total extra load can cause the front suspension to flex excessively leading to a bottoming out condition. Here the lower control arms (LCA) contact their bumpstops often and hard. This is often not good for ride quality.
The second example is in the case of high speed off roading. The forces in high speed situations are much higher than in slow speed crawling conditions. To illustrate, set a 4 lb hammer onto your thumb, it does not hurt. Let it simply fall from 1 foot onto your thumb, it hurts a lot. This is the difference in forces your suspension experiences when jumping or hitting bumps at high speeds. Here, a stiffer spring will absorb more energy which will lessen the impact the LCA makes with the bumpstop.
Thicker torsion bars have their place but it is a good idea to understand your needs before you install them. If you want to get the most flex out of your IFS suspension, use the stock springs. They are quite stiff as they are. If you want less flex, choose a larger spring. Keep in mind that the stiffness of a torsion spring increase with diameter at a rate of the diameter raised to the 4th power. What this means is if you increase the diameter from the production 22.8 mm to say 26 mm, the spring rate will increase by roughly 70%. An increase to 24 mm would be an increase of 23%. Those percentages correspond to a 70% or 23% decrease in flex.
Occasionally the question arises as to how ball joint spacers or torsion bar cranking will affect the torsion bar’s longevity. In theory both should decrease the springs lifespan. However, this has been hard to quantify. While the rare report of a failed torsion bar surfaces, it is very infrequent. Furthermore, these torsion springs are between 13 and 22 years old. They have been subjected to a wide variety of road conditions, temperature swings, and chemical attacks from road salts. Despite these, the springs are lasting decades while their rear leaf and coil counter parts are lasting mere years. As a result, SDORI has come to the conclusion that the torsion spring is under sufficiently low stress as to massively outlast other suspension components and therefore is not a strong consideration when selecting spacers or considering changing to a different torsion bar.
In short, adjusting torsion bar or installing spacers increases the stress on your idler arm and idler arm bushings. The issue has to do with the angle the tie rod makes with the relay (center) rod. The steeper the angle the more upward force is placed on the idler arm. Now, while that is not good, there is hope but first some background.
Bent idler arms have plagued the Toyota torsion style IFS since its debut. Which production 28” tires, the load on the arm is sufficiently small that it typically does not fail and the bushings enjoy long life. With 33” tires the forces increase. Adjusting lift or adding spacers increases the angle exacerbating the situation. Adding a front locker severely increases the forward force and corresponding load on the steering making idler failure very likely. To prevent this a few things can be done.
The installation of an idler brace can vastly prolong the life of an idler arm. It will help to bear the bending loads which cause the arm to bend upwards.
Replacing the production bushings with those of a metal type such as brass or oil impregnated bronze can help. Even with the idler brace, the bushings see all of the load and the plastic ones while inexpensive and easy to fix, will wear quickly in extreme situations. Unfortunately, these bushings are typically special orders and not very affordable. SDORI is currently developing a replacement bushing.
Let the 1.5” spacer be the 1.5” of lift it was designed to be. High does NOT equal more capability. As the reader has probably gathered, up travel is as important as down travel when negotiating a trail. Using up available down travel for more lift might look good but will not help your off road capability. If you choose to drive mainly on road or on mild trails, none of this is an issue; the stresses are well below component threshold so you can lift higher without worry. If you really want to wheel, keep it 1.5” and enjoy the added capability. The only exception would be the high speed desert wheeler, here more compression travel is good and since loads on the steering are low, idler failure is unlikely even with more than 1.5” of lift.
The higher the front is lifted, the more wear is experienced by the CV boot. A well lubricated CV joint should not have any issues with operation within the vehicle’s window of suspension travel even with ball joint spacers installed. To maximize CV boot life, see the section “1.5” of Lift” and consider the following.
Trucks are often running original CV boots when spacers are installed. The rubber pieces have been exposed to the elements, heat, water, salt, and dirt for greater than 13 years. When the angle is increased because of torsion bar adjusting or spacers, they might fail. This does not mean a new set, however, will fail. Boots can be inexpensively replaced at your local auto parts store. Keeping an intact set of boots on your half shafts will extend their life.
If the customer is very concerned about CV boot longevity, a set of manual hubs can have a huge improvement. The CV boots will only turn when locked in 4WD which is usually far less than the miles driven in 2WD.
It is hoped that this has helped the reader better understand their vehicle. With this knowledge readers can make better educated decisions as they build up their vehicles to enjoy the sport of four wheeling.
Frank Falcone
San Diego Off Road Innovations