All About: Tires (and Wheels)
![]()
Contents:
- Introduction
- Tire Construction
- Reading the Sidewall
- Determining Proper Tire Inflation
- Tire Run-out and Balancing
- Wheels
- Mounting and Balancing
- Tire Manufacturers
- Tire Glossary
![]()
INTRODUCTION:
The information on this page was gathered as a result of my own curiosity about automobile wheels and tires. It is all information that was found on the web with search engines. I don't claim to be any sort of tire or wheel expert, but all the information listed below should be verifiable, if you find any mistakes, please let the webmaster know.
Do with it as you please. If you find other useful bits of wheel and tire related information, feel free to pass on a link to be added to the page.
[Return to the top of this page]TIRE CONSTRUCTION:
-
DIAGONAL (BIAS-PLY) TIRES
-
These tires have body plies which cross at a substantial angle to the
centerline of the tread and which strengthens both the sidewall and the
tread area. Bias ply tires will almost always have an even number of
body plies because using an odd number of plies causes a pull. Bias ply
tires are usually constructed from nylon cord. Nylon has a wonderful
property in that it shrinks when heated, but it also has an unfortunate
tendency to take a set when statically loaded, especially when cold,
resulting in a flat spot, the "square tire" syndrome. A flat
spot will typically work itself out at the tires heat up after a few
miles of driving.
- A bias ply tire often won't have much sidewall bulge, even at low inflation pressures.
- At extremely low inflation pressures, a bias ply sidewall can wrinkle, similar to a drag racing slick.
- Another common feature of bias ply tires is that the tread can wrap around and up the sidewall of the tire in an uninterrupted fashion. Since there is no transition from a circumferential belt to radial sidewall (the bias ply runs from bead to bead) this will not cause flex-induced heating.
-
These tires have body plies which cross at a substantial angle to the
centerline of the tread and which strengthens both the sidewall and the
tread area. Bias ply tires will almost always have an even number of
body plies because using an odd number of plies causes a pull. Bias ply
tires are usually constructed from nylon cord. Nylon has a wonderful
property in that it shrinks when heated, but it also has an unfortunate
tendency to take a set when statically loaded, especially when cold,
resulting in a flat spot, the "square tire" syndrome. A flat
spot will typically work itself out at the tires heat up after a few
miles of driving.
-
RADIAL TIRES
-
The body cords run across the tire perpendicular to the beads. Radial
tires have belt plies which run about 15° to the circumferential
direction, under the tread, to stiffen, stabilize and strengthen the
tread area. This results in less tread movement during contact with the
road, so the belt plies improve tread life. Radial tires are usually
constructed with polyester cords, which resist flat-spotting common in
nylon cord.
- A radial tire concentrated sidewall bulge at the tire contact point, even with proper inflation. It is difficult to determine if a radial tire is underinflated just by looking.
- While some radial tires may have "tread" on the sidewall, it usually has a break at the sidewall transition and the sidewall tread is very thin to minimize heat buildup from radial sidewall flexing.
-
The body cords run across the tire perpendicular to the beads. Radial
tires have belt plies which run about 15° to the circumferential
direction, under the tread, to stiffen, stabilize and strengthen the
tread area. This results in less tread movement during contact with the
road, so the belt plies improve tread life. Radial tires are usually
constructed with polyester cords, which resist flat-spotting common in
nylon cord.
-
STEEL BELTS
-
Either kind of tire can be constructed with additional belting under
the tread, usually in the form of steel or aramid fibers for increased
tread life and puncture resistance. The belts are always made of a bias
ply material. In a radial tire, this causes a discontinuity where the
sidewall and tread meet, thus the reason you never see radial tires
with substantial sidewall tread. On a bias ply tire, the belting can
help keep the tread face flatter to the road and since the tread and
sidewall construction are the same, tread can be wrapped around and up
the sidewalls for extra traction and protection.
-
The average steel-belted radial tire is made up of:
- 28% Carbon Black
- 27% Synthetic Rubber
- 14% Natural Rubber
- 10% Steel Wire
- 10% Extender Oil
- 4% Organic Fiber
- 4% Other Petroleum Products
-
3% (S, ZnO, Ti02, etc...)
![]()
READING THE SIDEWALL:
Everything you ever wanted to know about a tire is written on the sidewall.
-
One has to wonder if these sizing systems were defined by committee:
- First a tread with in mm (metric)
- Then a dimension-less ratio or perccentage
- And ending in a wheel diameter in inches (imperial)
-
Passenger car tires:
-
P-metric is a metric tire-sizing system, for example: P215/65/R/15
- P stands for passenger
- 215 represents the section width of the tire in millimeters
-
65 is aspect ratio; the ratio of height to width;
this tire's height is 65% of it's width
- If the aspect ratio is not listed, it is assumed to be the "standard aspect ratio" of 82%
-
R means radial.
- B in place of the "R" means the tire is belted bias construction
- D in place of the "R" means diagonal bias construction
- 15 is the diameter of the wheel in inches
-
XL/RF designates a, Extra Load or Reinforced tire
- In not specified, Standard Load is assumed and will usually not be labeled as such
- M+S designates a tire rated for mud and snow use
-
P-metric is a metric tire-sizing system, for example: P215/65/R/15
-
Light Truck tires:
-
Light Truck tires also use a metric tire-sizing system, for example: LT235/75R16
- LT stands for Light Truck
- 235 represents the section width of the tire in millimeters
-
85 is aspect ratio; the ratio of height to width;
this tire's height is 75% of it's width
- If the aspect ratio is not listed, it is assumed to be the "standard aspect ratio" of 82%
-
R means radial
- B in place of the "R" means the tire is belted bias construction
- D in place of the "R" means diagonal bias construction
- 16 is the diameter of the wheel in inches
-
"LOAD RANGE D" identifies the load and inflation limits:
-
A = 2 Ply Rating -
B = 4 Ply Rating = 35 psi max. load inflation -
C = 6 Ply Rating = 50 psi max. load inflation -
D = 8 Ply Rating = 65 psi max. load inflation -
E = 10 Ply Rating= 80 psi max. load inflation -
F = 12 Ply Rating= 95 psi max. load inflation -
G = 14 Ply Rating -
H = 16 Ply Rating -
J = 18 Ply Rating -
L = 20 Ply Rating -
M = 22 Ply Rating -
N = 24 Ply Rating -
XL= Extra Load -
REIN= Reinforced- The Load Range rating is gradually replacing the older Ply Rating (as in 2PR) system
- Ply rating at one time indicated the actual number of bias (fabric) plies making up the tire, but with the new radial tires, you often only have 2 or perhaps 3 plies making up the tire carcass with some additional circumferential plies under the tread. So a tire labeled "8PR" or "6PR" will likely not have 8 or 6 plies in the tire, but the "8PR" tire will be stronger than the "6PR" tire.
-
- "RADIAL" indicates that the tire has a radial construction
- "MAX LOAD SINGLE 2623 lbs. at 65 psi COLD" indicates the maximum load rating of the tire and corresponding minimum cold inflation pressure when used in a dual configuration.
- M+S designates a tire rated for mud and snow use
- Note that P and LT tires are often rated slightly different. If P-rated tire is used in an LT application, you need to de-rate the sidewall load capacity by 9% - 10% according to many tire makers (Firestone and Michelin, for example).
-
Light Truck tires also use a metric tire-sizing system, for example: LT235/75R16
- Euro-Metric Tires:
-
Trailer Tires:
-
Trailer tires are designated with the letters ST
- Trailer tires have extra strong sidewalls to stand up to the side-side motion of a trailer
-
Trailer tires are designated with the letters ST
-
Numeric System:
-
A simple tire size designation used on "flotation tires" uses
the following system, for example: 11-15
- 11 is the approximate section width (in inches)
- 15 is the rim diameter (also in inches)
- There is no real "formula" to calculate the missing tire dimensions independently
-
A variant of this system is the addition of an overall diameter to the
size designation, e.g. 9/34-16LT
- 9 is the approximate section width (in inches)
- 34 is the approximate overall tire diameter (in inches)
- 16 is the rim diameter (also in inches)
- LT designates a Light Truck application
-
A simple tire size designation used on "flotation tires" uses
the following system, for example: 11-15
-
Alpha-numeric System:
-
This load-based system was introduced worldwide in 1968. The
designation takes into account the load carrying capability and aspect
ratio in the alpha character with aspect ratio and wheel diameter also
included, for example: Q78-16
-
Q designates the load and size relationship (with
some typical section widths listed below):
-
Letters for passenger cars range from A - N:
-
A = -
B = -
C = -
D = -
E = -
F = -
G = -
H = -
I = -
J = -
K = -
L78/15 = 30x 9.5 -
N78/15 = 31x 9.5
-
-
Above N indicates truck and severe use duty:
-
O = -
P78/15 = 33x10.0 -
Q78/15 = 36x11.5 -
Q78/16 = 36x10.5 -
R78/15 = 37x12.5 -
R85/16 = 37x12.0 -
S =
-
- If this were a radial, an R would precede the Q
-
Letters for passenger cars range from A - N:
-
78 indicates the series, better described as the
size relationship between the sidewall height (section height) and the
sidewall-to-sidewall width (section
width)
- A 78-series tire has a sidewall height whose measurement is 78% of that of the section width
- 16 indicates wheel diameter
-
There is no real "formula" to calculate the missing tire
dimensions independently
-
One might be tempted to use a formula similar to the P-metric size
designation:
- OD = (2 * (SecWidth) * Aspect) + ID
- This works somewhat for a given series, but tends to fall apart between series, since the letter designation ties in a load and size rating.
- Here is an Excel spreadsheet that does a decent job at finding A/N tire dimensions.
-
One might be tempted to use a formula similar to the P-metric size
designation:
-
Q designates the load and size relationship (with
some typical section widths listed below):
-
This load-based system was introduced worldwide in 1968. The
designation takes into account the load carrying capability and aspect
ratio in the alpha character with aspect ratio and wheel diameter also
included, for example: Q78-16
-
Widths:
-
Tires are usually marked with "section width", this is the
width of the widest part of the tire, as mounted on a specified rim.
- Typically this will be the width from sidewall to sidewall.
-
Some manufacturer's may list a "tread width" on their web
site, this would be the width of the actual tread that is in contact
with the road.
- About the only thing you can say about tread width vs. section width is that tread width is less than section width.
-
Tires are usually marked with "section width", this is the
width of the widest part of the tire, as mounted on a specified rim.
- You may also see other sidewall designations including:
- Other References:
![]()
SPEED RATING:
Tires are rated at the maximum, sustained speed they can safely operate at. The speed rating and load index are usually listed together on the sidewall in a combined alpha-numeric marking, such as 82S. For simplicity, the maximum speed is designated by a letter code as followsL
| SPEED SYMBOL |
SPEED (MPH) |
SPEED (KPH) |
| A1 | 3 | 5 |
| A2 | 6 | 10 |
| A3 | 9 | 15 |
| A4 | 12 | 20 |
| A5 | 16 | 25 |
| A6 | 19 | 30 |
| A7 | 22 | 35 |
| A8 | 25 | 40 |
| B | 31 | 50 |
| C | 37 | 60 |
| D | 40 | 65 |
| E | 43 | 70 |
| F | 50 | 80 |
| G | 56 | 90 |
| J | 62 | 100 |
| K | 68 | 110 |
| L | 75 | 120 |
| M | 81 | 130 |
| N | 87 | 140 |
| P | 93 | 150 |
| Q | 99 | 160 |
| R | 106 | 170 |
| S | 112 | 180 |
| T | 118 | 190 |
| U | 124 | 200 |
| H | 130 | 210 |
| V | 149 | 240 |
| Z | 149+ | 240+ |
One thing to note in the above table is that it seems the speed rating values were likely set up in the metric (KPH) unitsm since they have nice even incrementsm inllike the odd steps in the MPH column. Therefore, the MPH values are likely subject to rounding errors of +/- 1 MPH.
And for ST Trailer Tires, the speed rating is 65 MPH, so be sure to watch that towing speed with a trailer.
[Return to the top of this page]
![]()
UNIFORM TIRE QUALITY GRADING:
Most tires include something called UTQG ratings. The initials stand for Uniform Tire Quality Grading, a quality rating system developed by the Department of Transportation (DOT). The system was designed to provide information to consumers as to the relative performance of passenger tires in the areas of tread wear, traction (wet) and temperature. It applies only to automobile tires with a rim diameter of 13" and larger, but not for snow tires.
The UTQG designation is made up of three attributes of the tire, namely tread wear, traction, and temperature resistance. An example would be:
- Tread wear:160 Traction:A Temperature:B
TREAD WEAR:
A tire with known wear data is used as a control tire, and the results are corrected for a possible shift in testing conditions compared with the point of departure. A tire with marking 160 gives 60% more mileage than a tire marked 100.
- A rating of 100 is roughly defined as a tire lasting 30,000 miles on the designated test course
-
The test course consists of three loops of a total of 400 miles
(644kms) in the geographical vicinity of Goodfellow Air Force Base
(AFB), San Angelo, Texas, U.S.A. and consists of the following
protocol:
-
Run a car with test tires mounted till 6,400 miles (10,300kms) pass.
- The tire is tested in convoy with a "base" tire so as to eliminate the variable of temperature and road surface.
- Measure the tread depth after each 800 miles (1287kms) run.
- Then the projected worn out tire life is calculated, using 30,000 miles (48,279kms) as 100% Index
-
Run a car with test tires mounted till 6,400 miles (10,300kms) pass.
- In real world use, typically you can figure on about 1/2 the life given by the index, or 15,000 miles/100%
TRACTION:
The test should be performed with a special measuring vehicle where the tire is braked with locked wheels on wet asphalt and wet concrete road surfaces.
- A - indicates the best classification in accordance with certain requirements;
- B - is a slightly lower classification;
- C - indicates the worst (or lowest) value.
A tire with value C, therefore, has the poorest wet traction.
The tire to be tested is inflated to 24psi (165KPa) and installed on the test apparatus (instrumented trailer). The tire is loaded to 1,085 pounds (492kg). The trailer is towed over the wetted test area at 40mph (65km/h) and the rotating wheel is locked. The tire is dragged in this locked condition through the test area and the friction created is measured. From these measurements the friction efficiency index of a tire can be calculated using the following formula.
-
U=T/F
- U : Friction Efficiency Index
- T : Pulling Power
- F : Load
TEMPERATURE:
The temperature grades represent the tire's resistance to the generation of heat when tested under controlled conditions on a specified indoor laboratory test wheel.
- Sustained high temperatures can cause the materials of the tire to degenerate and thus reduce tire life
- Excessive temperature build-up can lead to tire failure
- Federal law requires that all tires meet at least the minimal requirements of Grade C
- The temperature grade is established for a tire that is properly inflated and not overloaded
The temperature test protocol consists of running the tire at a series of test speeds for given time intervals. The speed at which the tire exceeds the maximum test temperature is used to determine its temperature grade letter:
| Step | Speed MPH |
Test Time Min. |
UTQG Letter |
| 1 | 50 | 60 | C |
| 2 | 75 | 30 | C |
| 3 | 80 | 30 | C |
| 4 | 85 | 30 | C |
| 5 | 90 | 30 | C |
| 6 | 95 | 30 | C |
| 7 | 100 | 30 | C |
| 8 | 105 | 30 | C |
| 9 | 110 | 30 | B |
| 10 | 115 | 30 | B |
| 11 | 120 | 30 | B |
| 12 | 125 | 30 | B |
| 13 | 130 | 30 | A |
| 14 | 135 | 30 | A |
| 15 | 140 | 30 | A |
| 16 | 145 | 30 | A |
It should be noted that the test speed may exceed the speed rating of the tire which explains why tires may have different temperature ratings.
- For example an S-rated tire (112 MPH) should be able to make a B temperature rating (110 MPH), but may not make it into the A-rating (130 MPH)
- The temperature and speed ratings are somewhat interchangeable in that respect
![]()
DOT MARKINGS:
Another marking found on tires sold in the US includes the Department Of Transportation (or DOT) marking. Essentially the DOT marking serves as the tire's fingerprint. DOT signifies that the tire complies with U.S. Department of Transportation Tire Safety Standards, and is permitted for highway use.
-
For example refer to the following markings: DOT M5H3 459X 064
- The first letter and number following DOT designate the tire's manufacturer and plant code, in this case Michelin plant #5
- The third, fourth and fifth number and letter, 59X, is the tire size code which is an optional manufacturers code that identifies the tire size and other specific characteristics of the tire
- The final three numbers denote when the tire was produced, with the first two indicating the week, and the last number indicating the year (064 indicates the tire was built in the 6th week of 1994)
![]()
LOAD INDEX:
The load index refers to the load carrying capacity of a tire, or how much weight a tire can support. For example, if a tire has a load index of 89, it can support 1,279 pounds (from chart, below) at maximum air pressure. Multiply that by four (4 x 1,279 = 5,116 pounds) to get your maximum load carrying capacity. More correctly, you should take into account the front to rear weight distribution of the vehicle. The load index and speed rating are usually listed in a single alpha-numeric code such as 82S.
Note: It is not recommended to install tires with a lower load index than what came on your car from the factory.
| Index | Load | Index | Load | Index | Load | Index | Load | Index | Load | ||||
| 0 | 99 | 30 | 234 | 60 | 551 | 90 | 1323 | 120 | 3086 | ||||
| 1 | 102 | 31 | 240 | 61 | 567 | 91 | 1356 | 121 | 3197 | ||||
| 2 | 105 | 32 | 247 | 62 | 584 | 92 | 1389 | 122 | 3307 | ||||
| 3 | 107 | 33 | 254 | 63 | 600 | 93 | 1433 | 123 | 3417 | ||||
| 4 | 110 | 34 | 260 | 64 | 617 | 94 | 1477 | 124 | 3527 | ||||
| 5 | 114 | 35 | 267 | 65 | 639 | 95 | 1521 | 125 | 3638 | ||||
| 6 | 117 | 36 | 276 | 66 | 661 | 96 | 1565 | 126 | 3748 | ||||
| 7 | 120 | 37 | 282 | 67 | 677 | 97 | 1609 | 127 | 3858 | ||||
| 8 | 123 | 38 | 291 | 68 | 694 | 98 | 1653 | 128 | 3968 | ||||
| 9 | 128 | 39 | 300 | 69 | 716 | 99 | 1709 | 129 | 4079 | ||||
| 10 | 132 | 40 | 309 | 70 | 739 | 100 | 1764 | 130 | 4189 | ||||
| 11 | 136 | 41 | 320 | 71 | 761 | 101 | 1819 | 131 | 4299 | ||||
| 12 | 139 | 42 | 331 | 72 | 783 | 102 | 1874 | 132 | 4409 | ||||
| 13 | 143 | 43 | 342 | 73 | 805 | 103 | 1929 | 133 | 4541 | ||||
| 14 | 148 | 44 | 353 | 74 | 827 | 104 | 1984 | 134 | 4674 | ||||
| 15 | 152 | 45 | 364 | 75 | 852 | 105 | 2039 | 135 | 4806 | ||||
| 16 | 157 | 46 | 375 | 76 | 882 | 106 | 2094 | 136 | 4938 | ||||
| 17 | 161 | 47 | 386 | 77 | 908 | 107 | 2149 | 137 | 5071 | ||||
| 18 | 165 | 48 | 397 | 78 | 937 | 108 | 2205 | 138 | 5203 | ||||
| 19 | 171 | 49 | 408 | 79 | 963 | 109 | 2271 | 139 | 5357 | ||||
| 20 | 176 | 50 | 419 | 80 | 992 | 110 | 2337 | 140 | 5512 | ||||
| 21 | 182 | 51 | 430 | 81 | 1019 | 111 | 2403 | 141 | 5677 | ||||
| 22 | 187 | 52 | 441 | 82 | 1047 | 112 | 2469 | 142 | 5842 | ||||
| 23 | 193 | 53 | 454 | 83 | 1074 | 113 | 2535 | 143 | 6008 | ||||
| 24 | 198 | 54 | 467 | 84 | 1102 | 114 | 2601 | 144 | 6173 | ||||
| 25 | 204 | 55 | 481 | 85 | 1135 | 115 | 2679 | 145 | 6393 | ||||
| 26 | 209 | 56 | 494 | 86 | 1168 | 116 | 2756 | 146 | 6614 | ||||
| 27 | 215 | 57 | 507 | 87 | 1201 | 117 | 2833 | 147 | 6779 | ||||
| 28 | 220 | 58 | 520 | 88 | 1235 | 118 | 2910 | 148 | 6944 | ||||
| 29 | 227 | 59 | 536 | 89 | 1279 | 119 | 2998 | 149 | 7165 | ||||
| . | . | . | . | . | . | . | . | 150 | 7385 |
Load Index vs. Load Rating?
Essentially, these are two similar ratings for the tire's load carrying capability.
| Load Range | Ply Rating | Load Index | Lbs/tire |
| A | 2 | 92? | 1389? |
| B | 4 | 98? | 1653? |
| C | 6 | 104 | 1984 |
| D | 8 | 110 | 2337 |
| E | 10 | 116 | 2756 |
| F | 12 | 122? | 3307? |
- Notes:
- Italics indicate estimated entries
![]()
PROPER INFLATION:
So how exactly does a pneumatic tires work and what is the purpose of the air?
-
What is a Pneumatic tire?
-
The dictionary defines Pneumatic as:
- Of or pertaining to air or other gases
- Run by or using compressed air
- Filled with air, especially compressed air: a pneumatic tire
-
Most tires manufactured today are pneumatic tires:
- Including bicycle, motorcycle, wheelbarrow, passenger, light truck, medium truck and large heavy equipment tires
-
An exception to the rule could be a child's toy wagon tire or baby
stroller tires
- A lot of them are still solid or hollow rubber (a.k.a. semi-pneumatic)
-
The dictionary defines Pneumatic as:
A tire is a pneumatic system which supports a vehicle's load. It does this by using a compressed gas (usually air) inside to create tension in the carcass plies. It is important to realize that a tire carcass has a high tension strength, but has little or no compression strength. It is the air pressure that creates tension in the carcass and allows the tire to function as a load-carrying device. That's why inflation is so important. In an unloaded tire, the cords pull equally on the bead wire all around the tire.
When a tire is loaded, the tension in the cords between the rim and the ground is relieved by pressure from the ground. The tension in other cords is not changed. Therefore, the cords opposite the ground pull upwards on the bead. This is the mechanism that transmits the pressure from the ground to the rim.
However, a tire's job is more than to hold a load. It must transmit handling (acceleration, braking, cornering) to the road. Cornering forces are transmitted to the rim in a similar manner to load. Acceleration and braking forces rely on the friction between the rim and the bead. Inflation pressure also supplies the clamping force which creates this friction.
A tire also acts as a spring between the rim and the road. This spring characteristic is very important to the vehicle's ride. Too high an inflation pressure causes the tire to transmit shock loads to the suspension and reduces a tire's ability to withstand road impacts. Too low an inflation pressure reduces a tire's ability to support the vehicle's load and transmit cornering, braking, and acceleration forces. Finding the optimum inflation pressure requires extensive engineering efforts on the part of tire and vehicle manufacturers.
Under-inflation can cause many tire related problems. Since a tire's load capacity is largely determined by its inflation pressure, under-inflation results in an overloaded tire. An under-inflated tire operates at high deflection resulting in decreased fuel economy, sluggish handling and excessive shoulder wear. High deflection also causes excessive heat buildup leading to catastrophic tire failure.
There are several issues dealing with tire inflation. Among them are proper inflation for both on-road and off-road use. I've listed some various "formulas" and techniques to use to determine an appropriate tire pressure for a given application. You may find you get conflicting answers, some are more correct and some are less correct.
On-Road:
Every vehicle should have a manufacturer recommended tire inflation value, usually on a sticker on the driver's side door jamb. This figure is determined by the manufacturer based upon the vehicles stock weight distribution, wheel and tire size. This is probably the best value to use if it applies. However, if you have changed wheels, tires, or weight significantly, this number may not be appropriate. Also, it is sometimes unclear as to what were the assumptions used to determine those pressures. For example on a pickup or SUV, they often list a much higher rear than front tire pressure. This is likely a pressure setting at the maximum vehicle load ratingm so on a 1/2 ton pickup, for example, thise would be with approx. 1000 lbs. or cargo in the bed. With little or no bed load, this "factory" tire pressure may be too high, so take those numbers with a grain of salt.
Tires, too, come with manufacturer-specified inflation specifications. These, however, are not vehicle specific, but rather refer to the maximum inflation pressure the tire can handle in relation to its maximum load carrying capacity. For example, assume you have a light truck tire with a 2500 pound maximum load rating at 50 PSI air pressure. Lets say there are four of these tires mounted on a 5000 pound vehicle (with 50/50 weight distribution), so the per-tire load is 1250 pounds (5000/4). Clearly, the tire is nowhere near its maximum load, in fact it is at 1/2 load in this case. A case could be made for inflating the tire to 1/2 its maximum pressure (25 PSI in this case) based upon the load on the tire.
Actually, while there is a fairly linear relationship between a tire's inflation pressure and its load carrying capacity, it is simply not a straight line from 0 to the maximum load. I did a least-squares-fit analysis on some pressure vs. load data for a series of agricultural tires and found that the following factors seem to fit the data quite well:
mL = maximum tire Load (lbs)
mI = maximum tire Inflation (psi)
L = the actual load on the tire (lbs)
L = 0.21*mL + (0.79*mL/mI)*inflation
In other words, at "0" psi, a tire ideally could carry 21% of its maximum load (probably not true - but useful for numerical analysis) and the other 79% of its load capacity is linearly related to its internal pressure. So, from the example above:
mL = 2500
mI =50
L = 1250; solve for inflation = (1250 - (0.21*2500)) / (0.79*2500/50) = (1250-525)/39.5 = 18.3psi
So, 18 is clearly less than 25 (that was obtained with a linear interpolation), the "correct" answer is probably somewhere in between. I can say that I have run extended periods on these tires at 18 psi on pavement at highway speeds without any adverse affects. In fact, before going through these calculations, I had settled on 18psi as my air-down pressure for off-roading where significant periods of high-speed/pavement driving was anticipated. This pressure allowed decent off-road traction and let me safely cover paved sections without stopping to air-up. So I sort of see this number as a minimum safe on-road [pressure for extended driving (for these tires on this vehicle, YMMV:).
Another school of thought is that you should inflate the tire such that it has uniform tread contact with the road. This can be determined in a number of ways. The easiest is to try to slide a thin card under the edge of the tread. Inflate the tire until you can just get the card under the edge a little bit. A more involved check is to place a chalk line across the tread face, drive a short distance straight ahead on a smooth surface and then observe the chalk line. You are looking for it to be evenly worn off the tread. Another variation is to measure the length of the contact patch and make it even front and rear. This works well on vehicle where the rear load can vary, such as a pickup and especially if a recommended pressure is known for the front end. Slip a paper sheet under the tire to stop at the leading and trailing edge of the contact patch, measure the separation of the two sheets (making sure they are parallel). Then set the rear pressure such that the length of its contact patch is the same as the front.
One of the most accurate (and complicated) methods is to measure tread temperatures right after a high speed run. Even temps. across the tread indicate proper inflation. This is how race teams judge tire pressure in their vehicles. A less complicated version of this temperature-base technique is to select a cold tire pressure such that after 15-30 minutes of high speed driving results in a pressure (or temperature) rise of less than 10%. Increased temperature of the air in the tire is the cause of the pressure rise, and a rise in pressure of 3 psi is about 10% of a typical tire inflation pressure (~30 psi) and represents about a 50°F temperature rise. Note that this represents about a 10% temperature change on a absolute scale, noting that absolute 0 is -459°F, so at an air temperature of 41°F, the absolute temperature is 500°F above absolute 0. Thus a temperature change of 50°F is a 10% increase, from 500°F above absolute 0 to 550°F above absolute 0.
Often when you have new tires installed, you'll find that the tire shop has inflated them to their maximum rated pressure. Depending on the vehicle, wheel and tire, this may be good or bad. On a recent set of tires, I decided to conduct an experiment by collecting tread wear data over the life of the tires and I changed the inflation pressure about 1/2 way through the tread life. Here is some data I collected over the life of my Goodyear Invicta GLR tires (175-70R13 mounted on 13x5 rims). I measured tread depths at the inner, middle and outer tread grooves, at each tire rotation, taking the average of all 4 tires:
| Odometer | Miles | Pressure | Outer | Middle | Inner | Wear/Edge | Wear/Middle |
| 232790 | 0 | 32 | 0.22" | 0.27" | 0.22" | 0.000" | 0.000" |
| 237750 | 4960 | 32 | 0.19" | 0.24" | 0.18" | 0.040" | 0.030" |
| 242304 | 9514 | 32 | 0.15" | 0.21" | 0.14" | 0.075" | 0.060" |
| 243000? | 10,000? | 44 | ?" | ?" | ?" | ? | ? |
| 256988 | 24198 | 44 | 0.08" | 0.16" | 0.06" | 0.150" | 0.110" |
So, looking at the above data, it would appear, that even running these tires at their maximum inflation pressure, the edges seem to wear faster then the middle. The tires in this study were rated at 1036 lbs maximum load, I estimate the VW pickup they are mounted on to weigh approx. 2500 lbs, so I am well under the maximum load on the tires. They are mounted on the tire mfg's design width rims, the section width of the tire is 2" over the rim width. Perhaps different tire and rim widths as well as different loading characteristics would change the results. I do drive these tires pretty hard and it looks like I have worn them out in about 25k-30k miles, but what can you expect from an OEM tire? Also, they were used (unknown mileage) when I bought them. They are only rated at 260-tread wear, so I'm not surprised. One interesting item to note, is that normal passenger car tires (standard load) are rated at 36psi and maximum inflations above that value are for meeting special vehicle requirements. There are also "extra load" passenger car tires for higher load capacities, that allow higher maximum inflation pressures (44 psi in my case).
So, answering the question of what is the "correct" tire pressure is not that easy. There are several DIY tests that you can try:
1. The "Business Card Test": On a smooth, hard surface, try inserting a business card between the tire and the pavement. If it goes in less than about 3mm-1/8", the the tire may be under-inflated, if it goes in more than about 6mm-1/4", it may be overinflated.
2. The "Chalk Line Test": Draw a heavy chalk line across all the tread faces. drive slowly forward in a straight line for a few revolutions of the tire. Get out and observe the wear pattern of the chalk. If it has worn away evenly, then the inflation is correct. If either the edge or center of the line is worn first, then the tire is under or over inflated, respectively.
3. The "Water Puddle Test": Similar to test #2, but drive through a puddle of water in a straight line, then get out and observe the wet tire tracks and see if the wet imprint is even, especially as the track starts to dry out after a few revolutions.
4. Heat is the #1 enemy of high-speed tires. The flexing of the tire's sidewalls as the tire rolls under load is the source of the heat. Higher inflation pressures mean less flexing of the sidewall and therefore less heat. Another test for proper inflation pressure is to measure the tire pressure when cold then again after 15 minutes at highway speed. If the pressure rise due to the temperature rise is more than about 3 psi, then the tire may be under-inflated.
And some tire manufacturers recommend maintaining a minimum of 25 psi in on-road tires for adequate bead retention in cornering. Often, you can contact the tire manufacturer and they can supply inflation data for your vehicle/tire combination.
Off-Road:
Just like on-road, there are several schools of thought on choosing the correct off-road tire pressure. Off-road, there are many more variables, such as the type of terrain, the tire and wheel construction which determine the type of problem you are trying to solve. The following solutions should work for 15 and 16" rims with safety beads. Note many 16.5" rims lack safety beads and running lowered pressures is risky. Rims with bead locks are an entirely different issue.
Anyway, why do you want to lower your tire pressure off-road? Several reasons come to mind:
- It softens the tire, making it more flexible to absorb bumps and less likely to get punctured due to sharp objects
-
It increases the contact patch with the ground, increasing traction and
flotation
So, how do you go about picking a pressure to run off-road?
- One rule of thumb is 1/4 of the tires maximum inflation pressure. In the above case of a 50 psi max, 12.5 should be a safe lower limit of off-road pressure.
- A more sophisticated method is to measure the height of the sidewall (from ground to rim) at normal street pressure, then lower the air pressure until your sidewall height drops to 75% of the street height. I tried this with my 33x9.50 BFG M/T tires and found this occurred at 12 psi, which is very close to the 1/4 of max pressure rule.
-
A third method is to pick a pressure where the tires start to bulge out
(assuming radial construction) and beginning to get soft. For me, this
happens in the 15-18 psi range.
In any event, you want to pick a pressure that is low enough to handle the terrain, but high enough to protect the wheel and tire as well as preventing the loss of the bead.
Now for some terrain-specific observations:
-
On hard surfaces, lower is not always better:
- I notice my BFGs begin to get slippery below about 14 psi. I think this is because the tread starts to buckle (33x9.50 mounted on 6" rims) and squirm, reducing traction. Also, below about 15 psi, if a tire is on a rock, it will deflect nearly to the rim, which can lead to sidewall punctures. If you'll be going any distance at higher speeds, then keep the pressures higher. I'll choose 18 or 20 psi if pavement driving is anticipated, otherwise 15. Also, you should correctly observe that as the pressure drops, so does your ground clearance. If clearance is more important, keep the pressure on the high side.
- I notice my Swamper bias ply tires below about 8-10 psi loose their sidewall stiffness and begin to slip off of rocks when the sidewall buckles instead of grabbing on and climbing up the rock.
-
On soft surfaces like sand and snow, lower is better.
-
In fact, I follow these rules in the deep stuff:
-
Air down, way down, then air down some more.
Then,
- if your engine bogs down or overheats, air down
- if your tires dig in, air down
- if you get stuck, air down
-
After running for a while, check the air pressure
- Aired-down tires tend to heat up and raise the internal pressure, if this happens, air down
- If your tire looses a bead, you've aired down just a bit too much :-)
-
Air down, way down, then air down some more.
Then,
-
So how low is low?
- I've been to 6 psi in my 33x9.50 BFGs in the snow. At 10 psi, I was digging in going downhill, at 6 psi, they just floated on top.
- I've been really low in my 33x15.50 Swampers. How low? I don't know, my digital gauge reads down to 2.5 psi, then it says 0.0 (its supposed to go to 1.0, but I guess the mfg. lied). So, I estimate the tires are running 1-2 psi. They get so low that you don't hear air escaping when the valve stem is depressed. In fact, one time, I jacked a wheel up in the air, pulled the valve stem allowing all the air to escape, then I reinstalled the valve stem, lowered the jack and there was enough pressure built up due to the collapsing sidewall to support the vehicle.
Anyway, I think of tire pressure kind of like cross country ski wax. You have to know your tires and vehicle, read the terrain and then choose an air pressure to run. If you err on the high side, you can always go lower if needed. Of course if you have on-board air, its no problem either way.
-
In fact, I follow these rules in the deep stuff:
More information:
- Goodyear has an excellent engineering data section with lots of inflation vs. load information.
- Harry Lewellyn's article on "Tire Pressures for 4-Wheeling" is an excellent primer on the subject.
![]()
RUN-OUT AND BALANCING:
Aside from being inflated for carrying loads, tires need to be round to work properly. Wheels also need to be round. However, due to manufacturing constraints, neither may be, exactly. So, wheel manufacturers tend to place the valve core hole (or some other mark) at the lowest point of the wheel. Tire manufacturers, on the other hand, tend to place a mark, usually a red dot, on the wheel's highest pint. The hope is if you put the highest point of the tire on the lowest point of the wheel, they will cancel out and you'll end up with a round wheel/tire combo.
Chances are these high/low points won't cancel exactly, how close does a wheel/tire have to be to be considered round? Generally, passenger cars are designed to tolerate 0.030" radial or lateral run-out. Trucks and SUV type vehicles (with larger tires) can usually handle 0.060" radial and lateral run-out. Any more than this and it may be possible to re-mount the tire in a different position on the rim or place it on another wheel. If the run-out is not within spec, that tire should probably be replaced. (I didn't know about this and had a pair of bias ply tires that had 0.250-0.375" radial run-out - they were not fun to drive at speed).
Now you have a round wheel/tire, but it needs to be balanced. How close to perfect can you expect the balance to be? The general guideline is within 0.25 oz.
See the section on Mounting and Balancing, below, for details on the interaction of wheels and tires in regards to balancing.
[Return to the top of this page]
![]()
WHEELS:
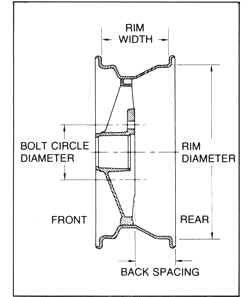
A pneumatic tire without a wheel to mount it on isn't a very useful thing. The wheel provides a number of useful functions, including attaching the tire to the vehicle at the hub, and for tubeless tire, it provided the air-tight seal for the inner circumference of the tire. Wheels have a measuring system that is at first confusing. Interestingly, it remains almost exclusively in the inch system.
(1) (2)
(2)
(3) (4)
(4) (5)
(5)
In the above drawings, you can see a typical wheel with important dimensions shown. Most of the measurements are best thought of from the perspective of the tire. The rim width is the measured at the point where the bead of the tire contacts the wheel, same with the rim diameter.
-
If a tire is already mounted on a wheel, it is hard to measure these
values directly. Luckily, they are usually stamped on the inside of the
rim.
-
For example a rim marked 15x6J indicates:
- 15 is the rim diameter (in inches)
- x6 is the rim width, (in inches)
- J or JJ designates a particular wheel contour (see below)
- If measured on the outside of the rim, I found my 6" rim measured nearly 7.5" wide.
-
Some wheels may include an offset specification along with diameter and
width; for example: 15x7JJ-15, this indicates:
- 15 is the rim diameter (in inches)
- x7 is the rim width, (in inches)
- JJ designates a particular wheel contour (see below)
- -15 indicates the wheel offset (in millimeters), that is how far the wheel mounting surface is offset from the centerline of the wheel
-
For example a rim marked 15x6J indicates:
-
The bolt circle relates to the attachment point for the wheel and hub.
Two figures are important, the diameter of the bolt circle and the
number of bolts.
- For even number of bolts (4, 6, 8, etc) the diameter can be measured across two opposite holes, either center to center or edge to edge, (see images 3 and 5, above).
- For odd number of bolts (like 5) , the diameter can be easily measured across two opposite holes, from the center of one to the outside edge of the other, (see image 4 above).
-
The back spacing measurement is critical in the fitment of the wheel
(and tire) to the vehicle. Since the suspension, brake, steering and
drive systems are typically located behind the wheel, the back spacing
is used to define a volume behind the wheel where these items can
exist.
- A related term is known as offset, which relates the hub mounting surface to the centerline of the rim. A 0 offset indicates the hub mounting surface is at the exact centerline of the rim. In this case, the back spacing would then be equal to 1/2 the rim width (plus the thickness of the bead lip on the rim - see below).
-
Offset is measured such that positive offsets mean the inner lip of the
rim is closer to the vehicle and negative offsets move the rim away
from the vehicle, (see image 2 above).
- Offset is usually measured in millimeters (mm) and often has the designation "ET" preceding the offset, so a 19mm offset may be listed as ET19.
-
Note that offset and backspacing are related but measured at slightly
different points.
- For example, I have a set of 15x8 alloy rims, with a -19mm (3/4") offset and the backspacing measures 3.75". So using the centerline at 4", subtracting 3/4" from that gives 3.25" for the rim mounting surface, which is measured off the inside face of the inside bead. So where doe the extra 1/2" come from (3.75" - 3.25")? Its from the thickness of the lip of the rim, in fact a tape measure shows the distance from the inside face of the bead to the outside of the rim lip to be 1/2".
-
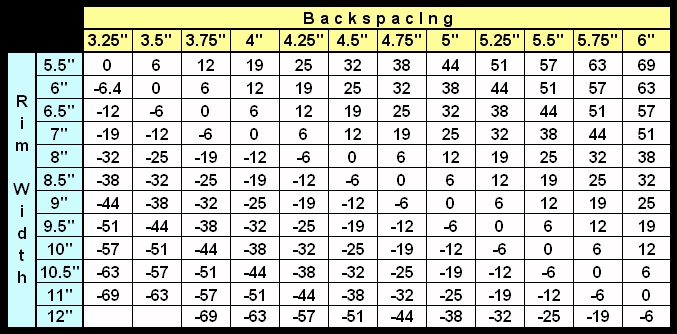
Backspacing and offset are two different measurements of essentially
the same thing:
-
However they are opposite in sign and backspacing is usually measured
in inches and offset it usually measured in millimeters.
- More backspacing means the wheel sits in closer to the axle and that less of the wheel's width will appear outside of the wheel mounting flange, giving a narrower track.
- More offset means the wheel mounting flange is closer to the inside of the wheel some consequently more of the wheel's width is to the outside, giving a wider track.
- Here is a link which goes into detail on this relationship
- And below is a quick chart of offset (in millimeters) given rim width and backspacing (in inches):
-
However they are opposite in sign and backspacing is usually measured
in inches and offset it usually measured in millimeters.
-
Wheels will have a letter designation for their contour or the expected
tire bead and rim shape.
- Some possible contour designations are J, JJ, K, JK, B, P, and D
-
Common (and generally interchangeable) wheel contour designations are J, JJ,
and JK.
- J is the most common type for most automotive rims
- JJ is common on 4x4 vehicles
-
Basically the rim contour and bead profile specify the shapes of the
rim flange and the bead area.
-
You generally want to stick with something the same or close to what
you have, assuming the same tires.
- That is a given tire is made to mount on a certain type of wheel; diameter and contour code being most critical.
- For more information, see: //www.carbibles.com/tyre_bible_pg2.html
-
You generally want to stick with something the same or close to what
you have, assuming the same tires.
Determining Track Width:
If upgrading wheels and/or tires, its relatively easy to determine what affects the various dimensions will have on the tire location with respect to the vehicle compared to the current wheels and tires:
- For each 2" increase in wheel diameter, the outside surface of the tire will be 1" closer to the body (i.e. diameter vs. radius)
- For each 1" less backspacing or 1" increase in offset, the outside of the wheel will be 1" farther out from the vehicle
- For each 1" wider rim, the outside edge of the wheel will be 1" farther out from the vehicle
- For each 2" wider tire, the outside edge of the tire will be 1" farther out from the vehicle, as well, the inner edge of the tire will be 1" closer to the vehicle
As an example, take a vehicle running 31x10.50 tires on 6" wide rims with 3.5" backspacing. It the wheels/tires were change to 33x12.50 tires on 8" wide rims with 2.5" backspacing, you would see the following changes in track width:
- Tire width: 12.50" - 10.50" = 2.0" wider or a 1" increase in track
- Wheel width: 8" - 6" = 2" wider so 2" increase in track
-
Backspace change: 3.5" - 2.5" = 1.0" less so 1"
*increase* in track
- Adding the above 3 changes means the outside edge of the wheel/tire is 1" + 2" + 1" = 4" farther out from the vehicle (on each side) or an 8" increase in track
- On the inside of the tire, you gain 1" of additional clearance with the backspace change but lose 1" of clearance with the additional tire width, so the inside edge of the tire should remain in the same plane as the current tire
- Tire height: 33" - 31" = 2" taller, or a 1" increase in ground clearance and a 1" decrease in tire-fender clearance
So, one might check the tire clearance by making up a block of wood that is 1" tall and 4" wide then move this block around the outside edge of the current tire under various combinations of suspension travel and steering input to check for possible tire/body (and frame) contact.
Finally, wheels will have one (or more) hole(s) drilled in them for the valve stem. Usually the hole for the valve stem is placed at the lowest point on the wheel after it has been manufactured and tested. One other option is that a "dimple" will be embossed on the wheel to indicate the low point. Why this is important will be seen in the next section.
[Return to the top of this page]
![]()
MOUNTING & BALANCING:
On a new set of tires, you'll probably observe various things, including a sticker on the tread and various dots painted on the sidewall. You may ask yourself, what are those dots on the sidewall for? The number and color of the dots may vary by manufacturer, but here is what Yokohama uses, as an example:
The RED dot indicates the high spot on the tire and is to be used as the location for measuring tread wear. "When the indicators show, tires must be replaced."
The YELLOW dot indicates the lightest part of the tire, also known as "maximum force variation." This should be lined up with the heaviest part of the wheel - the valve stem. They call this "phase aligning" the tire.
Actually there are two options for mounting a tire on a wheel:
- One is that the yellow spot (light) should be mounted on the heavy spot (valve stem) on the wheel. In which case the red dot would be the high point on the tire, and wear the fastest, indicating the need for replacement sooner that other places on the tread.
- The other option is to place the red spot (high) should be mounted on the low spot (valve stem) on the wheel, or if the wheel has a separate low spot mark from the valve stem, then trying to match the red high spot with the dimpled low spot and the yellow light spot with the heavy valve stem should produce the best results.
![]()
BREAKING IN NEW TIRES:
When new tires are made, there is a mold release agent applied to the surface of the tire press that allows the cured rubber to release from the mold pattern. This release agent is, by its very nature, very slippery and accounts for the "greasy" feel of a new tire. Its generally recommended to drive approx. 500 easy miles to allow the release agent (and impregnated surface rubber) to wear away, along with the extra rubber bits left from the molding process.
Tire Rack has a good article on Breaking In New Tires.
[Return to the top of this page]
![]()
MANUFACTURERS:
Below are links to tire manufacturers web pages I've found (and I know there are more):
- Bridgestone/Firestone
- Continental
- Cooper
- Denman
- Dunlop
- Goodyear Tire and Rubber
- Hoosier
- Interco
-
Michelin
- B.F. Goodrich Tires
- Kleber
- Uniroyal
- Nitto Tires
- Nokian Tyres
- Pirelli
- Toyo Tires
- Yokohama
GLOSSARY:
Here is some common tire terminology:
- Air Pressure:
- The amount of air inside the tire pressing outward on each square inch of tire; expressed in pounds per square inch (psi) or kiloPascals (kPa), the metric designation for air pressure.
- Alignment:
- The state in which all wheels on a vehicle are pointed in the optimum direction relative to the road and each other.
- All-Season Tires:
- Tires that are designed for use on dry and wet pavement, and also provide traction in snow and ice.
- Alphanumeric:
- A term for describing the size of a tire in which both letters of the alphabet and numbers are used.
- Aramid:
- A synthetic fabric used in some tires that is (pound-for-pound) stronger than steel.
- Aspect Ratio:
- The relationship of a tire's height to its width, expressed as a percent (%).
- Balance:
- The state in which a tire and wheel spin with all their weight distributed equally. This can apply to both static and dynamic balance.
- Bead:
- A round hoop of steel wires, wrapped or reinforced by ply cords, that is shaped to fit the rim; holds the tire onto the rim.
- Belted Bias Tire:
- A pneumatic tire with a body similar to that of bias tires, but which also includes two or more belts under the tread.
- Belt:
- A rubber-coated layer of cords that is located between the plies and the tread. Cords may be made from steel, fiberglass, rayon, nylon, polyester or other fabrics.
- Bias Ply Tire:
- A pneumatic tire in which the plies are laid at alternate angles less than 90 degrees to the center line of the tread. Plies usually run at angles about 30-40 degrees to the center line in a crisscross fashion.
- Carcass:
- The tire body beneath the tread and sidewalls; also called casing.
- Cold Inflation Pressure:
- The amount of air pressure in a tire, measured in pounds per square inch (psi) before a tire has built up heat from driving.
- Cord:
- The strands of fabric forming the plies or layers of the tire. Cords may be made from fiberglass, rayon, nylon, polyester or steel.
- DOT Markings:
- A code molded into the sidewall of a tire signifying that the tire complies with U.S. Department of Transportation motor vehicle safety standards. The DOT code includes an alphanumeric designator which can also identify the tire's manufacturer, production plant, date of production and brand.
- Footprint:
- That portion of the tread that contacts the road.
- Friction:
- The force between the tires and the road surface which causes the tire to grip the road.
- Groove:
- The space between two adjacent tread ribs; also called tread grooves.
- Highway Tires:
- Also called summer tires; designed for wet-and-dry weather driving, but not for use on snow and ice.
- Hydroplaning:
- A skimming effect caused by tires losing contact with a surface covered with water.
- Innerliner:
- The innermost layer of a tubeless tire. The innerliner prevents air from permeating through the tire.
- Kilopascal:
- (kPa) The metric unit for air pressure. There are 6.9 kPa's to one psi.
- Loaded section height:
- The height of the section of the tire that is making contact with the road.
- Load Index:
- An assigned number ranging from 0 to 279 that corresponds to the load carrying capacity of a tire.
- Maximum Inflation Pressure:
- The maximum air pressure to which a cold tire may be inflated; found molded onto the sidewall.
- Nominal rim diameter:
- The diameter of a tire rim, given in nearest whole numbers (e.g. 15")
- Overall diameter:
- The diameter of the inflated tire, without any load.
- Overall width:
- the distance between the outside of the two sidewalls, including lettering and designs.
- P-Metric:
- Uniform designation of tire sizes, in metric measurements originally introduced by American tire manufacturers in 1977; commonly called "P-metric series." A typical P-metric tire is P205/70R14 93S.
- Plus-Sizing:
- An option allowing drivers to customize their vehicle by mounting low-profile tires on wider rims of one or two inches greater diameter, usually enhancing vehicle appearance, handling and performance.
- Ply:
- A rubber-coated layer of fabric containing cords that run parallel to each other; extends from bead to bead and goes between the innerliner and belts or tread.
- Pneumatic Tire:
- A tire designed to be filled with air (see Tire).
- PSI:
- An abbreviation for pounds per square inch (psi).
- Radial Ply Tire:
- A type of tire with plies arranged so cords in the body run at 90 degree angles to the center line of the tread.
- Rim:
- A metal support for a tubeless tire or a tire and tube assembly upon which the tire beads are seated.
- Rim width:
- Distance between the two opposite inside edges of the rim flanges.
- Rolling Resistance:
- The force required to keep a tire moving at a uniform speed. The lower the rolling resistance, the less energy needed to keep a tire moving.
- Rotation:
- The changing of tires from front to rear or from side-to-side on a vehicle according to a set pattern; provides even tread wear. Section height: The height of the tire, measured from rim to the outer tread.
- Section width:
- The distance between outside of sidewalls, not including any lettering or designs.
- Series:
- Tires with the same aspect ratio, or relationship of height to width inside the tire.
- Shimmy:
- Wobbling of wheels from side-to-side on a vehicle. Shimmying can be caused by a variety of factors, including improperly balanced tires, poor alignment and bent wheels.
- Shoulder:
- The area of a tire where the tread and sidewall meet.
- Sidewall:
- That portion of a tire between the tread and the bead.
- Sipes:
- Special slits within a tread that increase wet and snow traction.
- Siping:
- The process of introducing sipes (or slits) into the tread.
- Size:
- The combination of tire width, construction type, aspect ratio and rim size used in differentiating tires.
- Skid:
- To slip or slide on the road when tires lose their rolling grip.
- Snow Tire:
- Sometimes called winter tire; a special type of tire with a tread and compound that gives better traction in snow; identified by the M+S, M&S, or M/S on the sidewalls. All-season tires must also include these designations on the sidewall.
- Speed Rating:
- An alphabetical code (A-Z) assigned to a tire indicating the range of speeds at which the tire can carry a load under specified service conditions.
- Tire:
- A precisely engineered assembly of rubber, chemicals, fabric and metal designed to provide traction, cushion road shock and carry a load under varying conditions.
- Tire Designation:
- An alphanumeric code molded into the sidewall of the tire that describes the tire's size, including width, aspect ratio, rim diameter, load index and speed rating. Most designations use the P-Metric system.
- Tire Placard:
- A metal or paper tag permanently affixed to a vehicle which indicates the appropriate tire size and inflation pressures for the vehicle.
- Tramping:
- A state in which a vehicle bounces up and down abnormally.
- Tread:
- That portion of a tire that comes into contact with the road. It is distinguished by the design of its ribs and grooves.
- Tread Rib:
- The tread section that runs around the circumference of the tire, separated by the tread grooves.
- Tread wear Indicator:
- Narrow bands, sometimes called "wear bars," that appear across the tread of the tire when only 2/32 inch of tread remains.
- Tread width:
- The width of a tire's tread.
- Traction:
- The friction between the tires and the road surface; the amount of grip provided.
- UTQGS:
- (Uniform Tire Quality Grading Standards) A tire information system that provides consumers with ratings (from A to C) for a tire's traction and temperature. Tread wear is normally rated from 60 to 620. Ratings are determined by tire manufacturers using government-prescribed test procedures, and are molded into the sidewall of the tire.
- Valve:
- A device that lets air in or out of a tire. Fitted with a valve cap to keep out dirt and moisture and a valve core to prevent air from escaping.
- Wear Bars:
- See Tread wear Indicator.
![]()
 ===>>
===>> 
Visitor # since 28.AUG.2001
[Last updated: 15.May.2025]