USE OF THESE INSTRUCTIONS IS AT YOUR OWN RISK
When installing this product, the installer is the final manufacturer of his or her vehicle.
Installation and use of this product is at the risk of the installer. SDORI assumes no
responsibility for any damages, to person, property, or any other sort incurred as a result of
the use, mis-use, misunderstanding, inaccuracy or incompleteness of these Instructions, taken
in whole or in part, or the products to which they may directly
or indirectly pertain. The liability of San Diego Off-Road Innovations, LLC, its affiliates,
members and employees is solely limited to the providing a product of accurate dimension. What
the buyer, installer, user, or any other person Does with product purchased from San Diego Off
Road Innovations, LLC is done at their own risk and responsibility. Furthermore, San Diego Off
Road Innovations, LLC does not guarantee the completeness or accuracy of the instructions
contained herein.
- Place truck on jackstands and remove wheels.
- Remove the original ball joint hardware.
Knock the studs out of the joint with a small hammer.
This is done most easily if the joint is pressed
against the arm with a floor jack.
- Unbolt the upper shock hardware.
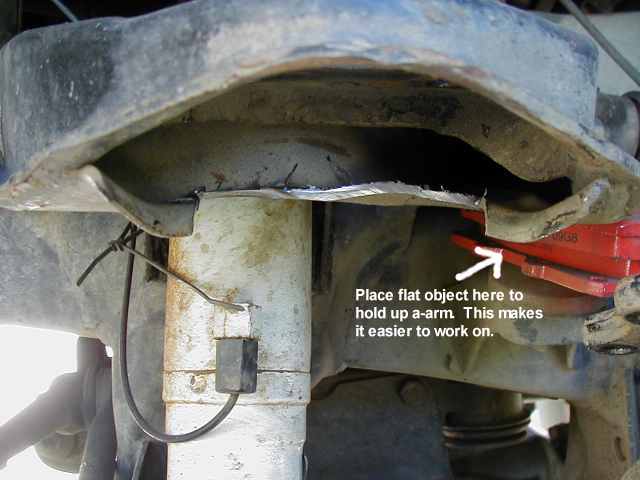
- Trim the lip as depicted in the above picture.
An angle grinder or 4" cuttoff wheel is highly recommended.
- Put the spacer in place, NOTCH FACING DOWNWARD
and, using a floor jack to control arm height,
align the ball joint and install the hardware.
- Tighten ball joint hardware to 30 fl*lb or 40 N*m.
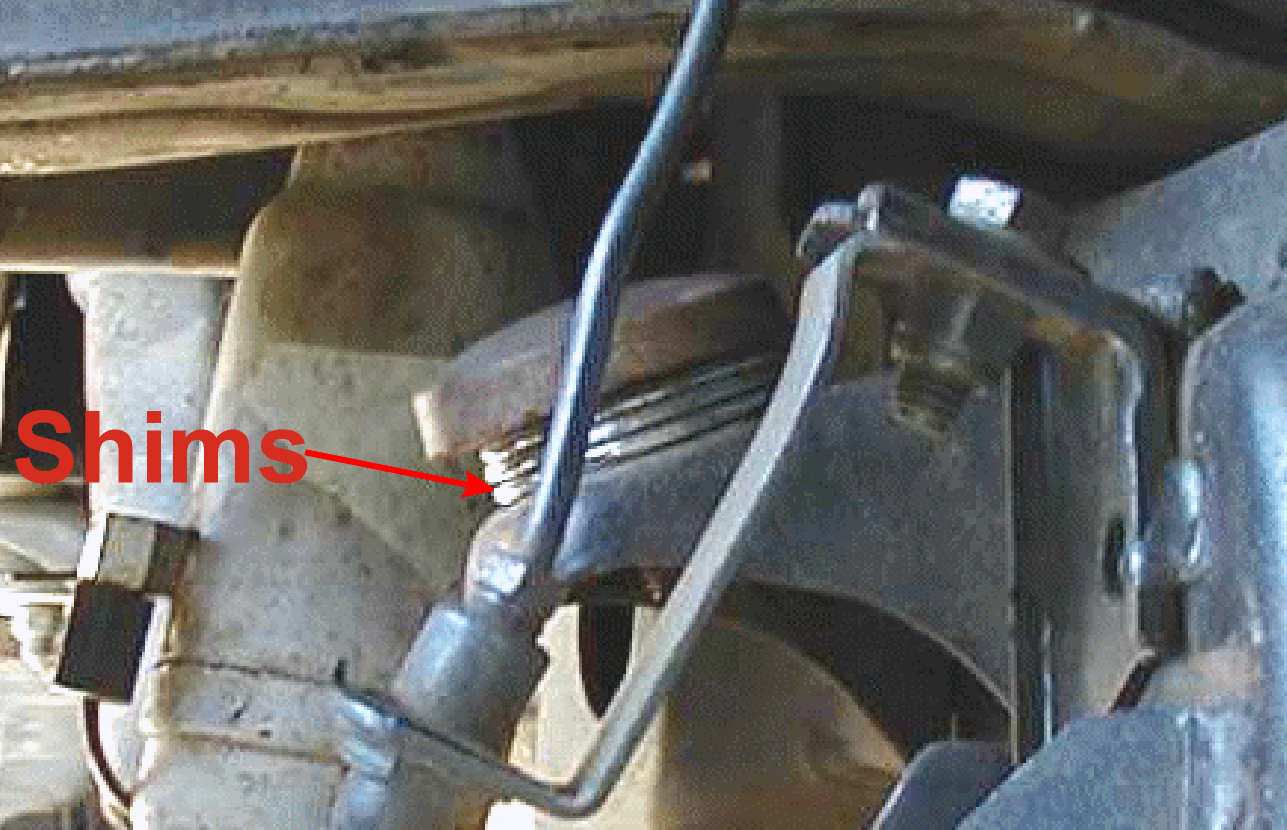
- Extend the shock to see if it needs shimming.
it likely will) Place the appropriate number
of washers to ensure the shock does not limit
down travel.
- Tighten shock hardware.
- Repeat for other side.
- Re-install the wheels.
- Put the vehicle back on the ground.
- For low pro bumpstops only: Shim them .5" with some
washers or use stock bumpstops. Failure to do so could result in
damage to CV joints, shocks, or other components.
13. Re-adjust torsion bars. There
good instructions here.
In short:
Spray
the t-bar hardware with a penetrating lubricant.
-
Wipe
all debris off of the threads.
-
Spray
them again.
-
Jack
up the front to unload the bars.
-
Adjust them with a
22mm wrench.
-
Lower the truck.
-
Bounce the front
end and roll the truck back and forth at least 10 feet.
-
Repeat
until the front is level and at desired height. The measurement between the
fender lip and edge of rim should be about 15-15.5".
14. Get an alignment or save dough by
following these
instructions.
- It has been observed that some driveway alignment adjusting is
beneficial and easy to do. Following these simple steps will make
life easier for the alignment tech who, to be honest, might not be
prepared for a vehicle that is any other than bone stock and only
slightly out of alignment.
- 1st set the ride height in step 12.
- Loosen the adjustment cams on the lower a-arms making a note of
each bolt's orientation.
- Move the lower arms outwards until two things happen. (It
will likely be necessary to lift the front end while adjusting and roll
the truck forward and backward after each adjustment.) One, the tires
appear vertical. Two, all cams are adjusted to mirror those on
the opposing arm and in a position *closely* relative to where they
started. (It is more important that the tires be vertical than the
hardware be exactly relative to it's originating position) For
example, if the driver's side front cam is pointing straight up and the
driver's side rear cam is pointing outwards, the passenger side front
cam should be straight up and rear outwards. If, before
adjustment, say the rears were angles outwards 30 degrees more than the
front, after adjustment the rears should still be outwards about 30
degrees. (again this is not as critical as trying to get the tires
vert.)
- Adjust the toe by loosening the adjusters and rotating.
It's a good idea to lock the steering wheel in a straight
position. What you adjust to one side, do to the other. Typically
about .5-.25" of toe is fine. If you have trouble measuring,
simply attempt to get them straight or angling in slightly.
- You'd be surprised how close one can get these measurements with
just the eye. However, perfection is not necessary, this will
simply get you in the ball part and help to avoid the "blank stare"
when an alignment tech sees his numbers are out and doesn't know
which nut to turn which way. (you'd be surprised how often this happens
with 4X4's)
- You should recheck the height after this. If you find you
adjust the height severely, which is unlikely, and the tires are
clearly off (by the eye), repeat these steps.
14. Re-check hardware torque in 2 weeks.
USE OF THESE INSTRUCTIONS IS AT YOUR OWN RISK
When installing this product, the installer is the final manufacturer of his or her vehicle.
Installation and use of this product is at the risk of the installer. SDORI assumes no
responsibility for any damages, to person, property, or any other sort incurred as a result of
the use, mis-use, misunderstanding, inaccuracy or incompleteness of these Instructions, taken
in whole or in part, or the products to which they may directly
or indirectly pertain. The liability of San Diego Off-Road Innovations, LLC, its affiliates,
members and employees is solely limited to the providing a product of accurate dimension. What
the buyer, installer, user, or any other person Does with product purchased from San Diego Off
Road Innovations, LLC is done at their own risk and responsibility. Furthermore, San Diego Off
Road Innovations, LLC does not guarantee the completeness or accuracy of the instructions
contained herein.
|