![]()

1st Gen. 4Runner Rear Bumper
and Tire Carrier
a division of Visual Diagnostics LLC
Visitor # 83248 since 04.DEC.2002
After 25 years in operation, it's time to close up shop and move on to other adventures. Thanks to all the loyal customers over the years that helped to make this all possible. The web site will remain live.
![]()
Contents:
[Return to the main 4Crawler Offroad page]
![]()
Introduction:
After running an aftermarket rear bumper + tire carrier for a number of years, I wanted to design a rear bumper that maximized departure angle, had more side/corner protection and had a more flexible setup for attaching tow straps, hitch receivers, etc. I used 1/4" wall, 2-1/2" square tubing as the basic building block for the bumper, as that is the size that a standard 2" high receiver fits inside. The bumper was also built to bolt on, using only stock bolt holes and is adaptable to varying degrees of body lift from stock height to 3". This is what I came up with:
 |
 |
 |
 |
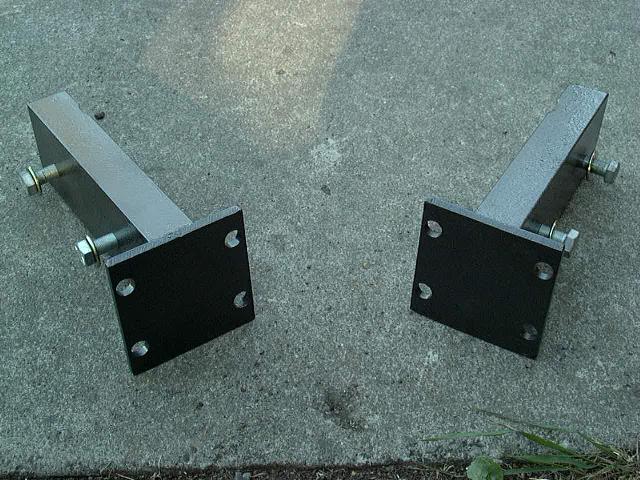
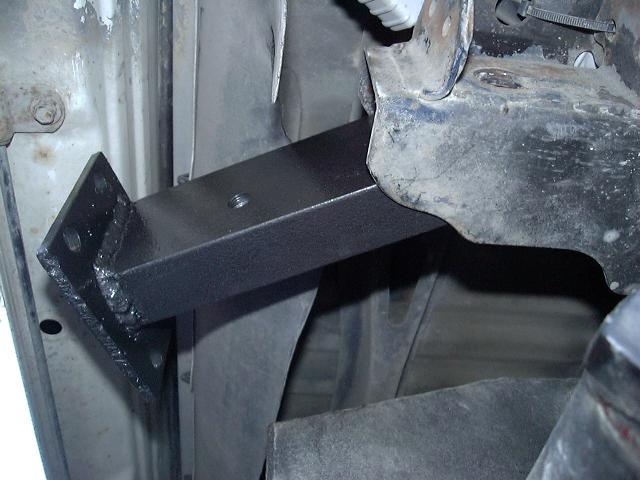
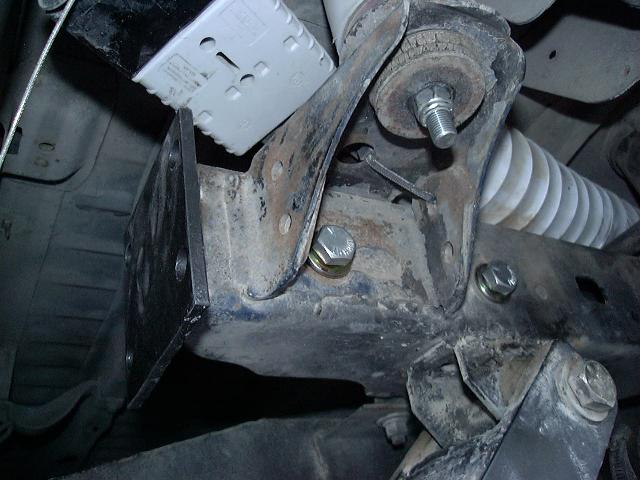
| Frame Brackets | Bracket Installation | Stock Bolt Holes | Bumper Installed |
Here's a detail of the frame mounting system. The brackets are designed to fit the stock frame channel and bolt securely to the existing holes, no drilling or welding required. The bracket swings into the frame channel, the bolts are attached then the rear bumper tube attaches to the frame brackets. The brackets shown are for a 3" body lift, but versions for 0-3" body lift are easily fabricated.
 |
 |
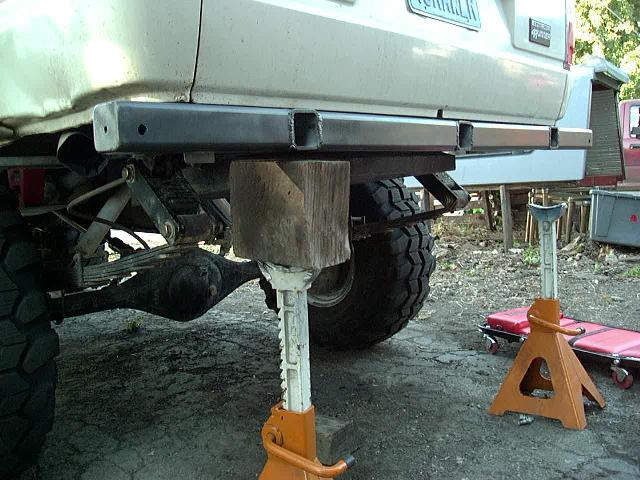
| Receiver Lifting Test | Bumper tucked up high and close to the body |
Installation:
Easy installation is one nice feature of this design, but if its not strong, it won't work. The three 2" hitch receivers are not just for looks. The two outer ones come straight off the frame rail and offer the ultimate in strength for pulling stuck vehicles, ot installing a HiLift jack and the receiver tube prevents the jack from sliding off the bumper. The center receiver is set up for normal towing where a centered load is desired. In the test above, I was able to lift the back end of the truck up using just one frame bracket without any of the supporting bumper. I measured about 1/4" of flex, most of this seemed to be in the frame/body itself.
 |
 |
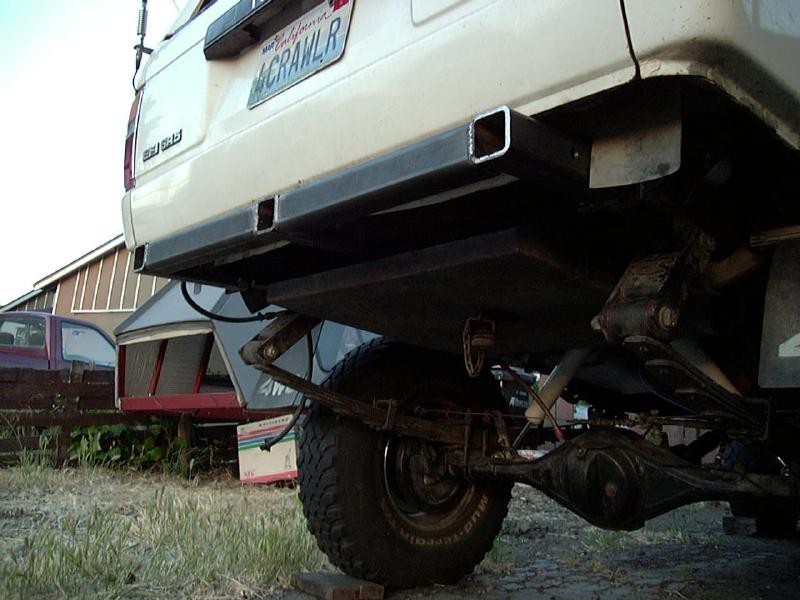
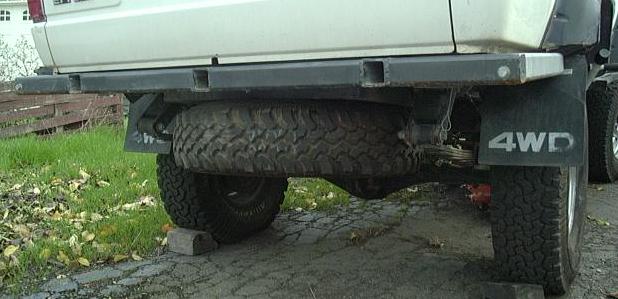
| Bumper and Side Skids | Underneath Bumper View |
Pictured above are some shots of the basic bumper and wrap around side protection. For reference, this is pictured on my '85 4Runner w/ a 3" body lift and with the rear tire (33x9.50) on the stock spare tire carrier. I am running a rear auxiliary gas tank which lowers the spare approx. 4" below the stock location, which explains why the tire is so low. In the above left image, you can see the 3 - 2" receiver points for attaching recovery shackles, hitches or other receiver mounted accessories. As an option, I can replace the two outer receiver locations with welded on tabs for attaching recovery shackles. I do not like D-rings hanging off my bumper, they rattle and clank on the trail and they can get hung up when you try to back up with the bumper near the ground. In the above right image, you can see the clearance of the spare tire and the bumper. A 33" spare will fit, but with less body lift or no gas tank in back, you may not be able to get the hitch receiver inset into the bumper. One could probably be attached below the bumper tube or it could be set to project out in the rear. I set my own bumper up for maximum clearance and departure angle, nothing hangs down any farther than needed, nothing sticks out any farther than needed. As witnessed by the heavy scrapes and scratches, it still takes some abuse, but I have yet to get hung up on it on the trail in 2 seasons of use.
[Return to the top of this page]Bumper Kit Pricing:
- We've sold out of the rear bumper and bracket kits.
 |
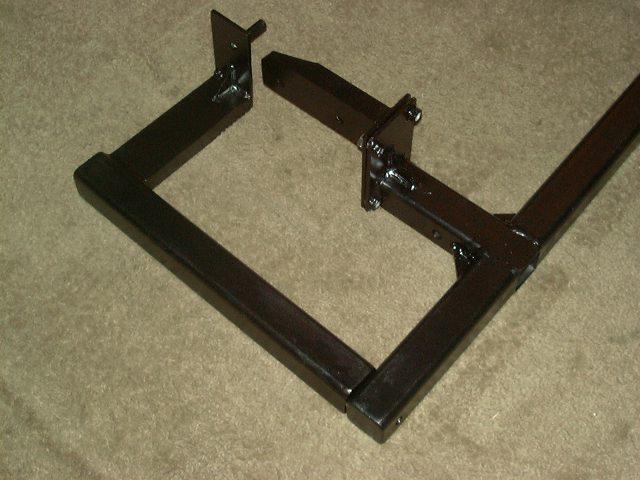 |
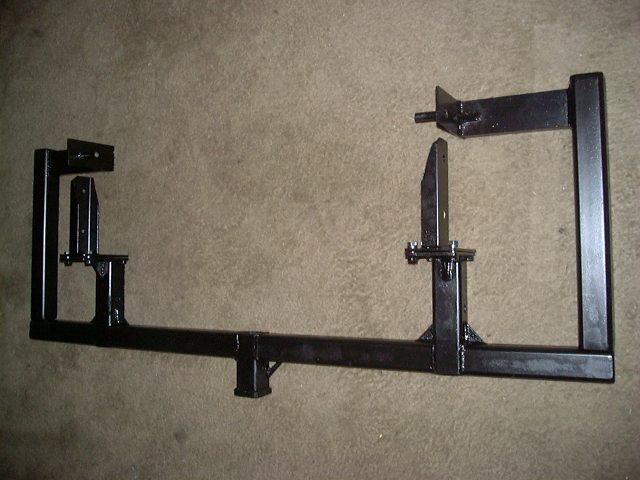
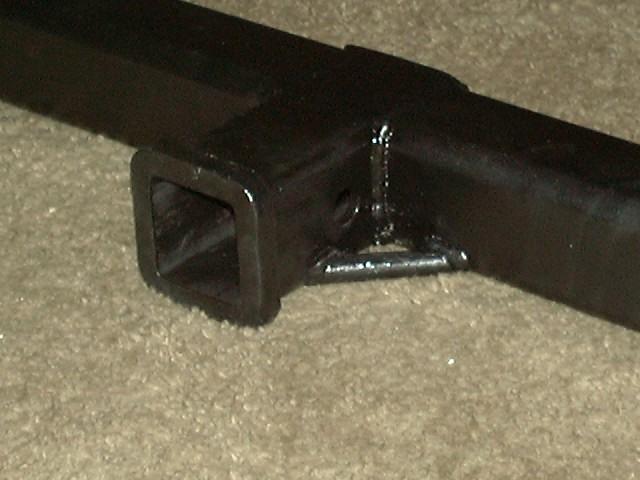
| A: Stock Height Finished Bumper | B: Mounting Bracket Detail |
 |
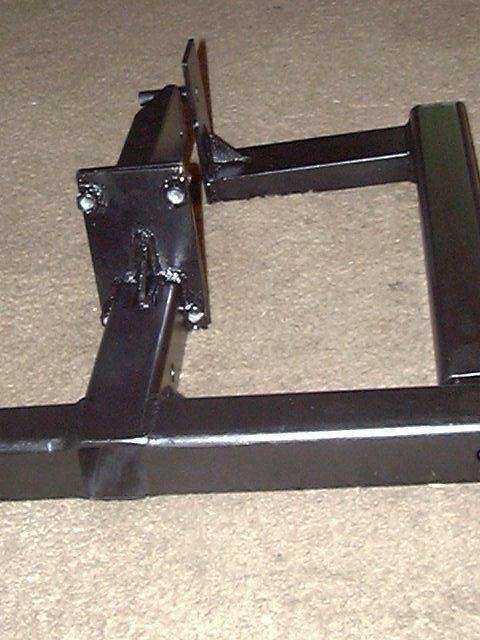 |
| C: Extended Hitch Receiver | D: Another Bracket Closeup |
Above are pictures of a finished bumper, built for no body lift. In order to be able to use the stock spare tire winch with a 33" spare, the hitch receiver was extended out to the rear and supporting rings and safety chain loops were added.
[Return to the top of this page]DIY Bumper Bracket Kits:
We've sold out of the rear bumper bracket kits.
[Return to the top of this page]Kit Welding:
Below are some general guidelines for welding up the bumper kits above. Since you'll be using these kits to attach to and mount your own bumper, these instructions are somewhat general and may or may not apply in all situations. So the idea with the bumper brackets are that there are pieces that bolt into the frame and then provide attachment points for the brackets attached to the bumper to mount to.
On the frame brackets (mini-kit), you will weld the U channel piece to the 1/4" flat plate, centered side top side and flush to the top of the bracket. Note that depending on how tight the fit is in your rear frame rails, you may need to grind or notch the sides of the U channel to allow it to fit into the frame rails. So be sure to check and adjust this fit before completing your welding. The size of the notches, if needed will vary with the amount of body lift and the exact shape and location of the inside face of the frame rails. Basically, you need enough clearance to insert the bracket at an angle and push it back into the frame rail as shown in this image. Simply tack the 1/4" plate to the C-channel and then test fit it, mark any contact point and then grind away material on the C-channel sides until you can rotate the bracket back into the frame rail. More body lift will will typically lead to less grinding. Alternately, you can trim out a bit of the inner face of the frame rail if that works for you.
On the brackets that bolt to the frame bracket (full bracket kit), you'll want to weld the square tube centered sode-side and flush to the bottom of the plate. Likewise, any plain nuts in the kit that sit close to the tube will also need to be welded to the plate. Note that the mating plates will have "witness" marks ground on one side to make sure the holes are lined up. Best to install all the bolts and nuts, then tack weld the nuts that will be welded in place, then remove the bolts and finish welding. The nuts must be welded since they end up too close to the tube to be able to get a wrench on, plus the additional welding adds strength. You can also add gussetting between the square tube and the plate, depending on the body lift.Then you will weld the ends of the square tubes to your bumper. With the flush mount kit, you'll butt weld the tubes to your bumper. With the receiver kit, you'll inset the tubes into your bumper.
On the side brackets, the steel tube is welded to the back side of the hole to act as a sleeve inside the frame. Be sure to check the fit of the weld bead inside the hole on the frame and grind it as needed to get a flush fit of the bracket into the side of the frame. Then weld the U channel to the bottom of the plate to clear under the side of the body. You can put the U either up or down as you prefer. Then attach the outer end of the U channel to your bumper. You can also gussett from the U channel to the plate if you wish for added strength.
Tire carrier kit can be welded up in sections. First weld the two hinge tubes into the holes in the ends of the two long cross pieces. Then mark locations for the 4 vertical support pieces as you prefer. As shown, we laid out the positions to just clear the tail lights on either end and to line up with the tail gate handle area, but you can put the supports anywhere you like. Just be sure to keep the carrier flat and square.
The bolt the vertical posts in place on the end of the main rear bumper tube and weld the square tube inside the section of angle. Then you can tack the hinge plates on each side and place the swing out section in place to line up the hing hole on whichever side you prefer. Then tack in the other hinge plates on each side (one aboe and one below each carrier tube) using the supplied Teflon washers as spacers. Once everything is lined up, you can weld the hinge plates to the vertical posts. And if desired, you may also want to cut out the section of the angle steel between the hinge plates for added tail light visibility. Finally you can install threaded inserts on the side opposite the hinges for the toggle clamps or you can simply weld the toggle clamps in place, your choice.
Then the side supports are attached to the vertical post and to the side rails. The two short offset angle pieces come up off the side rail, the front one in line with the top support tube. Then the rear piece can be placed so that the diagonal support piece fits in between it and the front post as you prefer. There is no exact position for any of these parts, you can use the pictures on the page as a guideline but it is your bumper and you can make it look like you want. Finally weld caps on all the exposed sections of tubing and do whatever grinding of welds you prefer prior to painting.
[Return to the top of this page]
Tire Carrier Rack Kits:
 |
 |
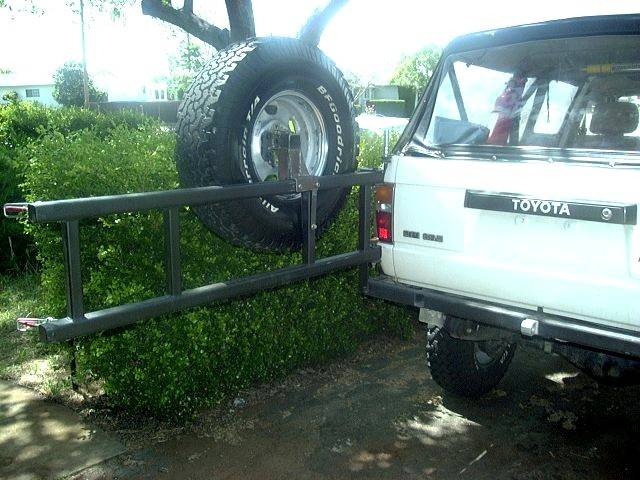 |
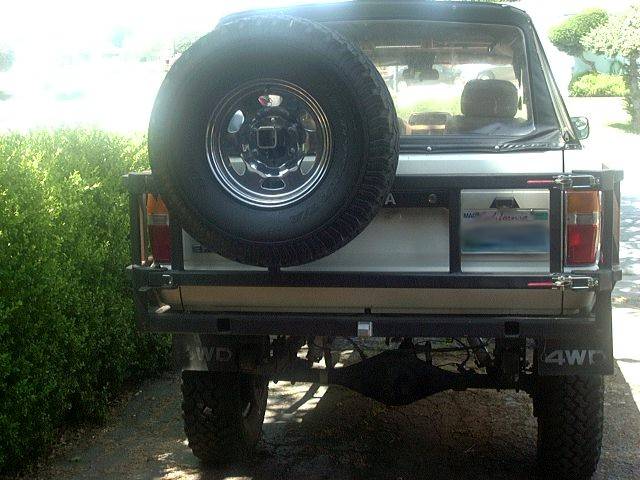
| A: Tire Carrier: Rear View | B: Tire Carrier: Side View | C: Tire Carrier: Swung Out |
Here is the optional tire carrier. Also pictured here (photo B) are the side protection rails that attach to the wrap-around side bumper up to the height of the tail lights to tie into the tire carrier frame. The tire carrier frame is easily removed and has a top and bottom, double-shear pivot points for added strength. Locked in place with two toggle clamps, it will serve to tie the two side protection frames together, protecting the rear quarter panels, tail lights and the tail gate. Also note that the tail lights are not blocked. The actual tire mount will be located off the top of the frame, offset to the driver or passenger side as desired, This will let the license plate be visible from behind and also ensure that large tires will be high off the ground. A 38" tire should extend up to about the roof line in this configuration.
This tire carrier is not just an add-on component to the bumper, rather it is an integrated part of it. When locked into place, it ties the two side protection rails together into a single unit. Also, the carrier is built for strength and redundancy. There are two pivot points and two latch points and each of those points is fully caged to allow motion in only one direction. On the pivots, the hinge bolts are in fully sleeved holes and mounted in a double shear configuration. This way, even if one pivot or latch were to fail (very unlikely) , there is still another one to get you back home. Teflon washers are used for smooth opening of the carrier and the bolt tension can be adjusted to fine tune the way the carrier swings. I prefer to adjust mine for a rather tight operation, this way it'll stay where I leave it, if parked slightly off-camber. Likewise, there are two toggle clamp style latches that hold the opposite side of the carrier in place. So even if one were to accidentally open, there is a second latch holding the swing out gate in place. The toggle clamp style latch also has the action of pulling the tail gate into tight contact with the side bracket. So unlike the more common pin-type latch which just uses a pin fitting into a hole to keep things in place, the toggle clamp pulls the two parts into tight contact with approx. 500 lbs. of clamping force per latch. And if that is not enough it is also possible to add a secondary locking pin to hold the carrier i place even if both toggle clamps fail. This pin has a spring loaded ball bearing in the tip to hold it in place and a convenient D-handle to make for easy removal and installation.
In several years of field testing, there have been no rattles or vibration noted in the carrier. This includes many hundreds of miles of high speed driving on the washboard roads in Death Valley, CA.
A number or additonal capabilities have been designed into the tire carrier rack. The center of the spare tire mount can accomodate a 2" hitch receiver tube and would allow for items such as a removeable shovel/axe carrier or bike rack or similar accessories to had attached easily. The empty area on the rack opposite the spare tire can be used to attach gas or water can carriers. A HiLift jack can be attached to the top of the rack, behind the spare tire.
- Currently, the rear bumper and tire carrier are only offered in kit form.
Pricing:
- The tire carrier and side protection will add $350.00 to the basic bumper cost.
-
Add $30.00 for a set of threaded inserts (RivNuts) and installation
tool for installing the toggle clamps:
- Allows for a bolt-on installation of the clamps vs. welding them on.
-
Add $35.00 for a license plate relocation kit:
- Includes licence plate frame and illuminating lamp.
-
Add $25.00 for a spring loaded lock open pin (visible at the lower left
corner of photos A and C above).
- This pin will hold the swing out gate open on side hills.
- Add $20.00 for a secondary latch pin to hold the swing out gate in place even if both toggle clamps fail.
- Add $20.00 for a 2" hitch receiver tube for the center of the spare tire carrier for accessory mounting, etc.
- Shipping weight approx. 100 lbs.
The tire carrier portion may be ordered separately for addition to existing 4Crawler Offroad rear bumpers. A small amount of welding will be required to attach the side protection rails to the side wrap around bars. The vertical posts on each corner bolt to the rear bumper main tube and the two side upports weld to the wrap around side rails on each side. This way the bumper is still removeable in sections:
- First remove the two hinge bolts on the pivot side and remove the swing out tire carrier.
- Then unbolt the vertical posts on each side of the main tube and then unbolt the side tube mount through the frame and remove each side.
- Then you can remove the 4 bolts on each frame bracket to remove the rear bumper section.
- And finally you can remove the 2 bolts that hold each frame bracket into the frame rail to remove those.
If interested in more information on the rear bumper and/or tire carrier, feel free to contact 4Crawler Offroad.
[Return to the top of this page](Contact 4Crawler Offroad if interested in more information on any of these items)
Now accepting orders via PayPal
[Return to the main 4Crawler Offroad page]
[Last updated: 31.December.2024]
![]()