
3rd Gen 4Runner Body Lift Installation
Author: Adam Fertig
Edited and Updated: Roger Brown
Click here to download an Adobe PDF file of these instructions
Contents:
- Introduction
- Installation
- Results
- Updates for Taller Lifts
- Spare Tire Carrier use with body lifts - IMPORTANT INFORMATION
- Main body lift installation information:
Introduction:
I chose to go with a 1" body lift for several reasons. First being that my 285's rubbed off-road a little. I couldn't go any higher suspension wise. I chose to go only 1" because I didn't want to have to extend all kinds of stuff, and I don't really like the look of a huge body lift. With the 1" it is barely noticeable, but I now clear my tires easily, so far. I bought the parts from 4Crawler Offroad. Very high quality stuff, and a really friendly guy to deal with. The only setback to doing this lift, is 2 reasons. First, there are no commercially available body lift kits made for the 1996-2002 4runner models. Why? Well, for the 1997-current I have no clue. But for the 1996, I can tell you why. Second reason. 1996 4Runner only has 8 body mounts, where the 1997 and up have 10. Its like the guys who were responsible for putting the mounts on the truck were on a smoke break and forgot to put the 9th and 10th mount on. The hole in the body is there, but no mount on the frame. Very odd. Also the bolt head and nut aren't metric. Every other bolt on the truck is. Even more odd. There is even a little rubber boot to plug the holes. I am dumbfounded by this. So, in order to safely lift the vehicle, I needed to put 2 new body mounts on myself. I will tell you about how I did the mounts here in a few days. Check back. I had a friend come down to give me a hand. Josh from the outdoor wire Toyota forums. I will explain to you how I did the lift.
[Return to the top of this page]Installation Overview:
First thing to do is soak the body mount bolts in some rust penetrant, like PB blaster. That will make things much easier.
Second thing to do, which we mistakenly forgot to do, is loosen the steering shaft clamp at the rag joint, and loosen the nut on the transmission shifter. See below for pictures of each. It can be done after you do the lift, but it will be a lot easier if you go ahead and do it before you install the lift. Trust me!
Next you need to remove the front bumper. It is held on by 6 bolts, 3 on each side. 2 on brackets on the frame, and 1 by the wheel well. You will need to remove this for 2 reasons. One, you cannot access the 2 body mounts with it on, and two, you will need to re-mount it with the supplied bracket. The rear bumper is body mounted :( so it does not need to be removed.
Next you need to take the door panel plates to access the body mount bolts inside the truck. Just look under the truck at for the bolts, and carefully pull back the carpet to reveal the black plastic covers. Take those off and you will see the bolts. In back, you'll need to remove the rear hatch kick plate and pull the plastic trim away from each side to allow access to the body mount bolts. Then take a socket to the nut, and loosen up all of the body mounts. Don't completely remove the nut, just leave a few threads on. You don't even really need to hold the top of the bolt inside the rig because of the way the bolt head is designed. Just loosen the nut, and then grab the top of the bolt with your hand. Then take one side of the body mount bolts completely off, including one side of the front and rear bumpers. Physically take the bolts out of the hole, and have the new, longer bolts on standby. Also you are going to want to re-use the washers on top of the bolts. They have little notches on them to keep them from turning while you are tightening or loosening the nut from the bottom. I learned a little trick from Josh that worked well. Get yourself a socket, maybe a 17 or 19mm, and put the bolt head inside it, letting the washer stop it. Then hit the bolt with a hammer until the washer breaks free. More information on this important installation step here...

Keep track of which factory bolt was removed from which body mount location. This way you can see what length bolt goes there. In general, on the 3rd gen 4Runners, the front bolts are the longest, the rear bolts the shortest and the middle mounts get the middle length bolts. With '96 4Runners, the missing body mounts will have bolts supplied with them and for kits ordered with poly body mount bushings, those kits will have the bolts labeled with their locations.
After you have one side off, you will have to find a way to lift the body of the truck up. This can be done several ways, the most popular way being a high lift jack. Only problem with that is a high lift jack will not work very well without some aftermarket bumper or other way to safely get the jack on the body.. What I did was used a wooden block under the pinch weld on the body. This worked ok, but not very stable. Make sure you position the block like this:
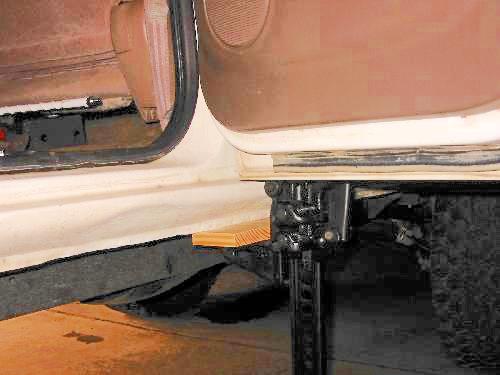
with the block on the pinch weld. The first time I did it, I laid the wood block flat on the rocker, and put a nice little dent on it. Oh well, the other side (pictured above) has a unrelated matching dent.
- Note:
- Depending on your body and suspension setup, you may find you need to raise the body a considerable distance before the suspension unloads (due to removing the weight of the body from it) and the body finally separates from the frame. If you find you are running out of jack travel and can't lift the body high enough, consider using a chain or strap around the axle and frame to keep the suspension from unloading so far.
- IMPORTANT!
- When lifting the body, be VERY careful not to force anything. The body should come up easily and if it doesn't, STOP and find out why. Check for hidden bolts on bumpers, trim, etc. Check for wires, hoses, and other mechanical parts that are holding things up. You want to raise one whole side if possible, rather than a corner at a time. Why? Its more likely to twist the body if lifting one corner only and you may go so far as to crack a window.
Jack up the truck enough so that you can slide the blocks in between the body mount bushing and the body. After you have put all the blocks on, line them up and slide in your new bolts, making sure you re-use the stock washers. Then tighten the nuts about half way. Note that the replacement bolts do not have the special "teeth" under the head like the stock bolts do (that type of bolt is extremely difficult to source) so the factory tabbed washers have nothing to "bite" into and will therefore spin. A pair of locking pliers works well to hold the head of the bolt from turning while you tighten the nut from below, if you are working alone.
- Note:
- On some 3rd gen 4Runners, there may be 2 or 4 bolts supplied with the lift kit that may "bottom out", that is the nut will hit the end of the threaded part of the bolt before the its fully tight. This usually occurs on the 1" lift kits and an easy option is to re-use 2 or 4 of the stock bolts of the right length to fit. They have more thread than commercial bolts do. Another option is to add a few washers under the nut before tightening to take up the excess bolt length. Or, 4Crawler Offroad may be able to supply slightly shorter bolt(s) if you can advise us of the exact length needed.
Once you have this done, you can now lower the vehicle down off the jack. Go around and make sure everything is alright, and proceed to the next side. Just do exactly what you did to the first side. Once everything is all done, go back and tighten up the body mount bolts to about 20 ft.lbs. torque.
[Return to the top of this page]Body Mount Brackets:
Also, now is a good time to install the missing B-pillar body mount brackets if you have a '96 4Runner. These instructions also apply for installing body mount brackets on other models. If replacing a damaged body/cab mount bracket, you'll first have to cut and grind away the old bracket. If installing the weld-on version of the bracket, clear an area on the sides and top, approx. 3"/75mm in each dimension to weld the replaceent bracket to. For the bolt-on bracket, you'll need to clear the entire area of the frame to give a flat surface to bolt the bracket mounting plate to.
Best way to locate the bracket on the frame is to drop a bolt down through the holes in the floor, after removing the plugs. Then, install the body lift block (if installing a lift), the large flat washer, then the bracket with poly bushings installed, then the lower washer and a nut. Tighten the bolt up like the other body mounts and mark the location of the mounting holes on the frame.
If welding the bracket on, tack weld it in place, remove the poly bushing finish welding the top and bottom edges to the frame.
If bolting on the bracket, remove the bracket, then center punch and pre-drill the mounting holes to 5/16". As you'll notice, there are 3 bolt holes in the bracket and only 2 self-tapping bolts per bracket. You want to install one bolt in the bottom hole and one bolt in one of the two upper holes. Which hole to use is immaterial, as long as the pilot hole can be drilled without running into an existing cutout or hole in the frame. Lubricate the self tapping bolts, and carefully thread them into the frame. Apply firm pressure to force them to bite into the frame and once they start forming the threads, slowly crank them in. If the bolt gets too tight to turn, back it off 1/4 to 1/2 turn and then try going in farther. Use each bolt to tap its own hole and then attach the bracket to the frame. Install the bushings, lift block and drop the bolt down and tighten it with the rest of the mounts:
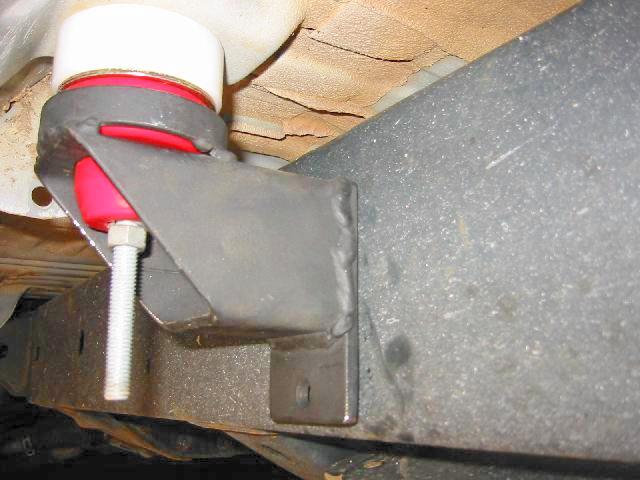
This is our original body mount bracket design.

This is our new universal mount body mount bracket design.
For the new bracket, two installation options are weld-on (left) and bolt-on (right). This bracket is set up to handle frame - body mount bolt measurements of 2.5" (62mm) to 3.5" (88mm) in the basic form. By adding a plate to the back side, the bracket can be moved outward to handle wider body mount bolt spacings. All you need to do is let the body mount bushing to fit somewhere within the slotted hole. For the weld-on installation, one popular technique is to remove most of the original body mount bracket. Then cut a plate of the desired thickness steel to fit inside the old body mount bracket welds. Then weld that new plate to the frame along the old bracket welds. This gives you a nice clean piece of steel to weld the new bracket to and it avoids the need to grind the frame flat. This also helps to reinforce the frame in case there's internal rust damage.
Be sure to recheck all the bolts after a few hundred miles of driving.
- Note:
-
If you have welded on rock sliders on the frame, you may also need to
weld on the body mount brackets if there is insufficient room to gain
access for installation. If space will be tight, a special low profile
right angle drill and bit can be used.
- Also, due to variations in the body and frame angles, you may find the bracket does not fit flush to the frame. If this is the case, it is no problem to shim it out for a tighter fit with washers of thin pieces of metal before attaching the bracket to the frame. The poly body mount bushing will also accommodate a good amount of mis-alignment, so you do not need to worry about achieving a perfect fit.
Front Bumper Bracket:
Now that you have the lift installed, you need to take care of a few other things. First is the front bumper. Supplied with my kit was a 1" bracket to bring the bumper up so that it would look normal. First you need to bolt the bracket to the bumper mount on the frame, like so:
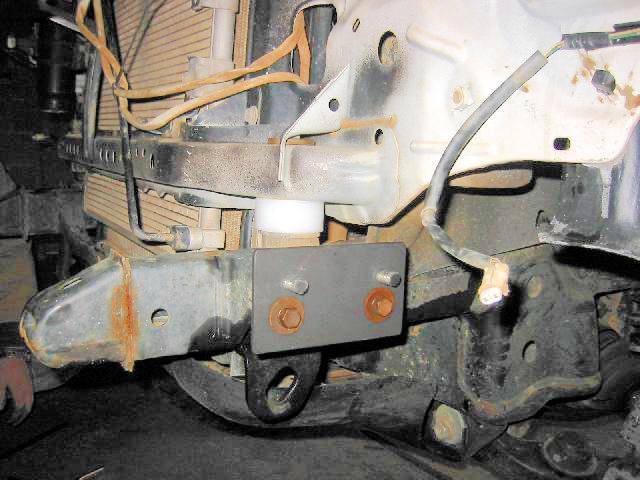
Then you need to bolt the bumper to the new bracket. The easiest way I found was to remove the 2 brackets that attach the bumper to the frame. They are held on by 2 - 12mm bolts. Once you have the brackets off, bolt them to the new raised brackets on the frame. I had a little problem with this. The brackets from the bumper had a rounded bottom to them, which came in contact with the washers on the original bolts, pictured above, in the rusted red color. I might have been able to just bolt them on and it would work, but I had an angle grinder handy, so I just rounded them off, and they fit perfectly. Now you just need to align the bumper with the bracket, and bolt the bumper back up. Don't forget the bolts in the wheel well.
- On the 2000-2002 4Runners, the factory bumper bracket was changed to use a 3rd bolt hole down lower and one of the upper holes was not used. Luckily, the hole is still present in the frame for the old hole, so in order to make use of the bracket, drill a 1/2" hole in the stock bracket to accept the bolt-on bumper raising bracket, before proceeding with the above steps. Or another option (that costs nothing) is pictured below, simply relocate the bracket on the back side of the front bumper to match the lift. At 1" (pictured), you'll need to drill one new hole per side to raise the bumper. At 2", one of the existing holes should line up for re-use. At 3", you may again need to drill one new per side:
You'll find some additonal information on bumper relocation here...
[Return to the top of this page]Steering Shaft Extension:
After that you need to take care of the steering shaft. Another strange thing with my 1996, that I don't think applies to the 1997 and up 4Runners, is there is not enough splines on the shaft to accommodate the 1" lift. I have been told that other 4Runners and Tacomas have no problems with a 1" lift. That was with 1997 and up vehicles. Well, remember I told you I forgot to loosen the steering clamp BEFORE I lifted it? Well, I got the lift finished, and began to pull out of the garage. But the steering was TIGHT. I mean so tight that I could not turn the wheel. When I went under there and loosened the shaft clamp, the shaft popped out of the clamp and did not have enough length to go back in. Great. I thought I was going to have to park it and order a steering shaft extension like on the Tacomas. After some web searching on TTORA and outdoor wire message boards, a guy from TTORA suggested I simply use a bunch of washers under the shaft clamp where it bolts to the rag joint, and some longer bolts. It worked beautifully! And saved the day! Here's a picture of it: BEFORE:

That may not appear to be the safest setup in the world, but there is very little twisting force on that joint, so I'm not all that worried. I can very easily turn it with my hand. But I am now working on a solid spacer and longer bolts from 4Crawler Offroad, so it will be done right. More details to come.
It's OK to add a few washers here, but you want to keep the 2 studs sticking up the bottom of the rag joint within the 2 slots in the upper part of the shaft. These slots prevent the rubber rag joint from over-twisting. Likewise, on the splined clamp at the top of the shaft, you can slide that in or out to adjust the shaft length. You can safely pull it out until the end of the male part of the shaft moves out past the area of the clamp bolt.
I got the spacer worked out from 4Crawler Offroad. To install it, remove the 2 M8x25mm bolts that attach the upper end of the steering shaft to the rubber rag joint. Insert the splined end of the steering shaft back into the upper clamp if it has pulled free then insert the aluminum spacer on top of the studs in the rag joint (if the spacer has a larger hole in one end, place the larger hole facing down), then install the longer bolts supplied with the kit and tighten to factory specifications. Here's what it looks like installed (1" extension shown):
![]()
Important note:
You need to secure the steering wheel to prevent it from turning on it's own before disconnecting the steering shaft. This is to prevent it from rotating too far and damaging the "clock spring" inside the steering shaft.
[Return to the top of this page]Automatic Transmission Linkage:
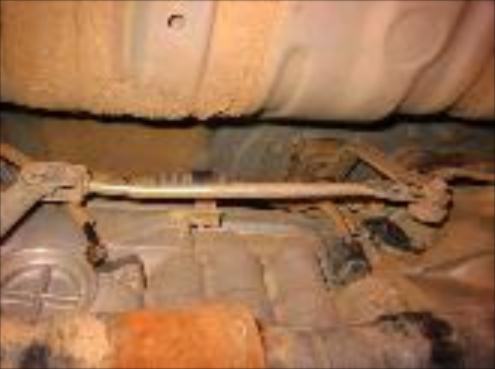
Now you have to deal with the transmission shifter. I have an automatic, so I can only speak of that, not the 5 speed. If you look under your rig, right where your front body mount is on the cab, you will see an arm that connects the shifter to the transmission. There is a little adjustment bolt that you need to loosen. Once loosened, you need to put the truck in park, and move the bolt a little bit to the left, toward the transmission. I initially moved it to the right, and made things worse. Here's some pics:
The RIGHT WAY

The WRONG WAY
You can clearly see how much the bolt was adjusted it by the markings on the arm. And yes, the arm is supposed to be bent like that. That threw me off a bit too!
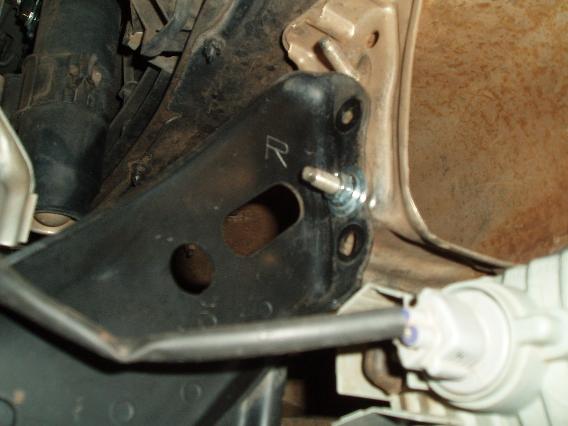
[Return to the top of this page]Poly Body Mount Bushings:
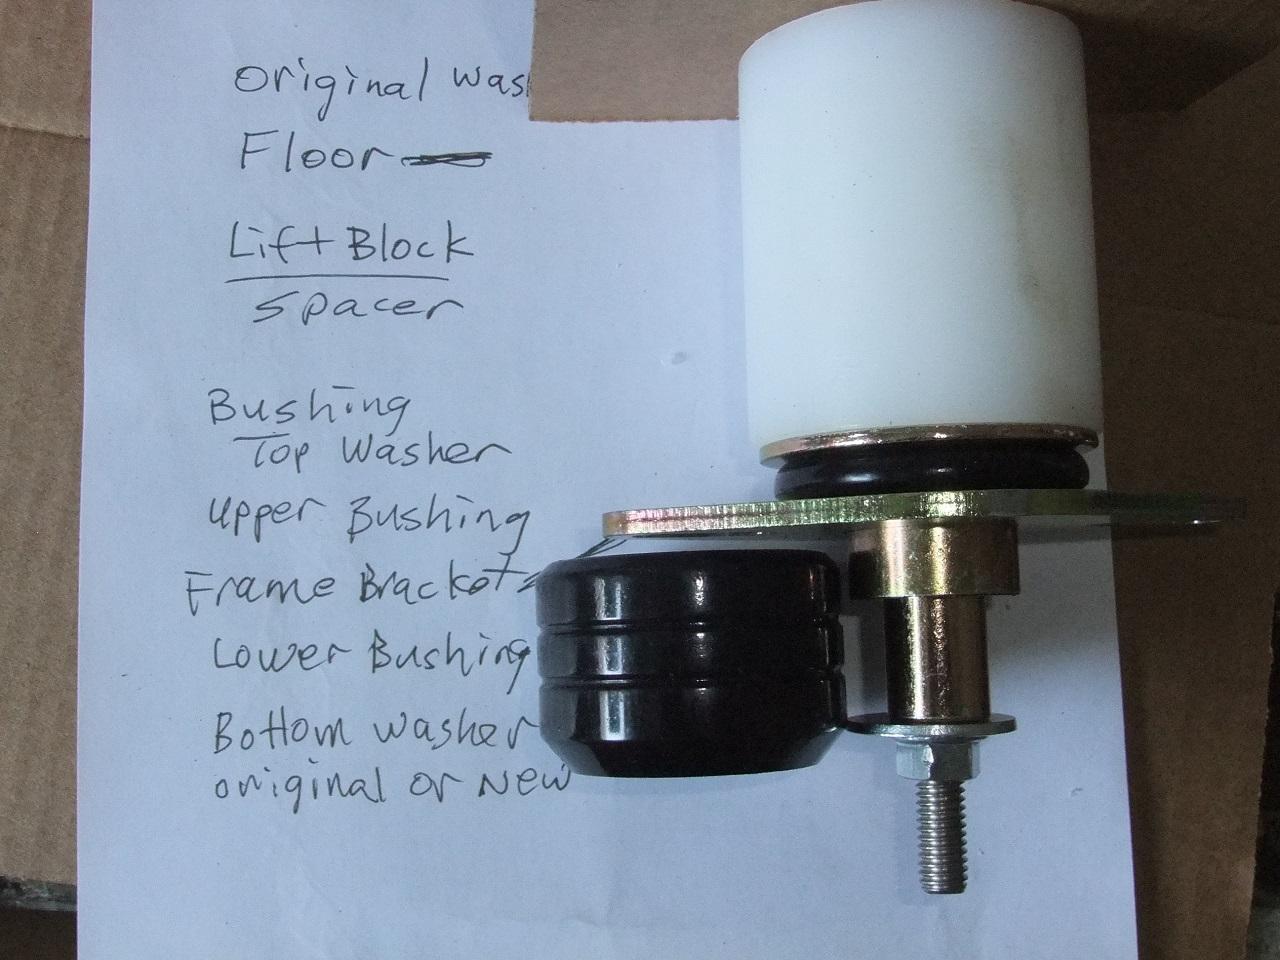
Poly body mount bushings, if ordered, are installed in place of the OEM rubber parts. The factory bushings are typically all one or two pieces with a steel washer on top and steel sleeve inside, all bonded together. The poly bushing kit is all separate pieces, with top and bottom half bushings, sleeve, top washer and for some applications a UHMW spacer to make up the difference in height of the poly and rubber bushings. If ordered with a body lift, the lift blocks may be differing heights. The spacers or added heights vary by year, but can range from 11mm to 22mm.
The bushing kit may included some instructions from the original bushing supplier. Use this as reference for how to assemble/stack up the bushing components. The supplied instructions typically won't apply to vehicle-specific details, such as which bushing goes in which position. Instead. that is covered below, as those pre-printed instructions are for different vehicles. And unlike poly suspension bushings, no need to apply lubricant to poly body mount bushings to prevent squeaking. As there is no relative mootion between the body and the bushings, there's nothing to cause squeaking to happen in the first place.
All the parts will be labeled as follows:
- F=Front
- A=A-pillar
- B=B-pillar
- C=C-pillar
- R=Rear
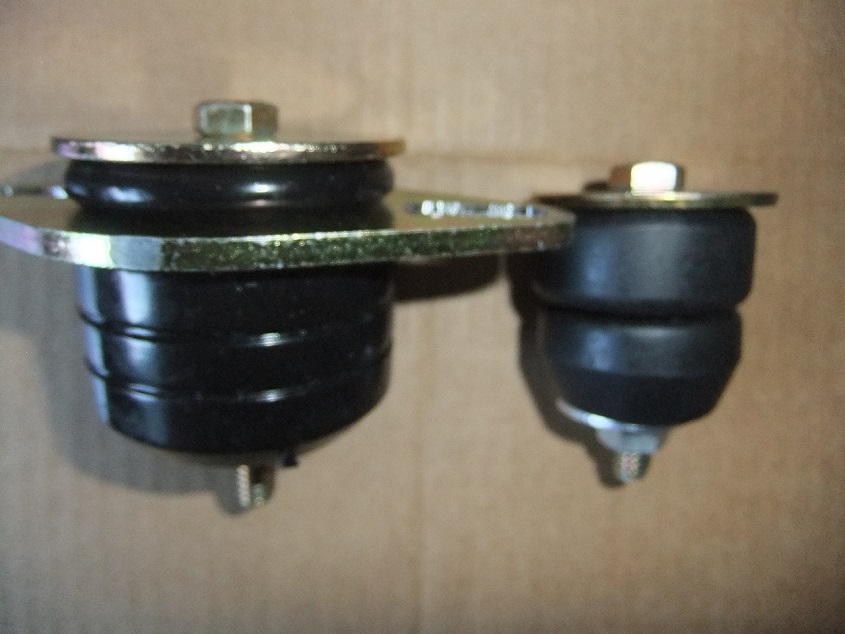
Assemble the 2-piece bushings by putting the large diameter bushing half on top, small diameter bushing half below, insert the steel sleeve into the pair of bushings, then add the steel washer on top and if you have a separate spacer, that sits on top of the washer. The 1-piece bushings add a bracket that replaces the factory frame bracket (the old one is unbolted from the frame and the old frame bolts get re-used) and the shorter bushing half goes on top and the taller bushing half goes below the bracket. We normally label all the upper bushing sections (F-A-B-C-R as noted above) and those labeled parts should be installed so they sit between the body and the frame. The unlabeled parts should go below the frame brackets. Here is a photo of an installed 1-piece bushing. On the P1 kits, there will be one pair of these 1-piece bushings, typically located at the rear of the frame. In the P2 kits, there will be 2 pair of the 1-piece bushings, typically one pair in back and the other pair typically under the A-pillar. The bushings will come with washers. The smaller gold colored washers sit atop the smaller front bushings. The larger gold colored washers sit atop the larger bushings under the rest of the body. If a hardware kit was ordered, there will be smaller washers to go under the nut on the bottom of the bushings. The HDwash upgrade, insludes oversized, hardened washers for the bottom of the bushings.
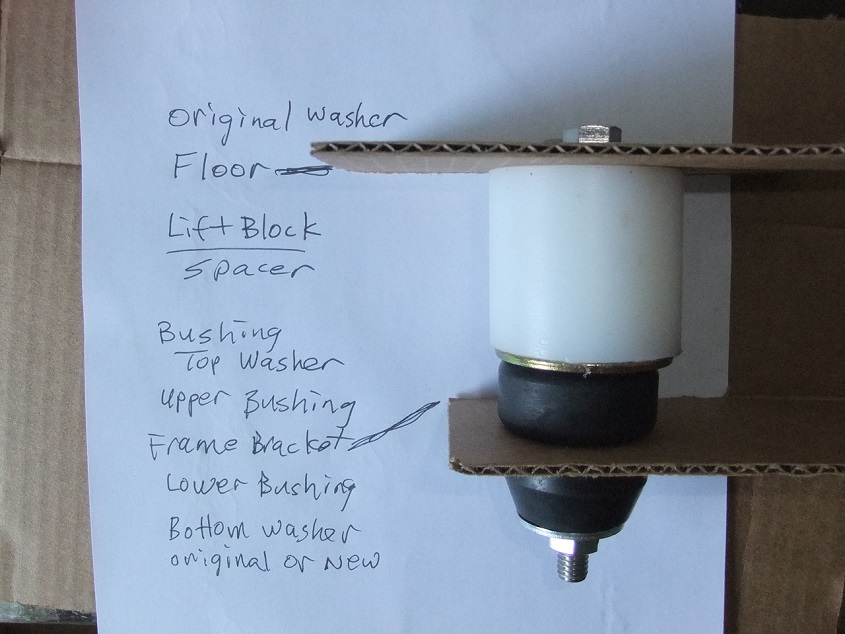
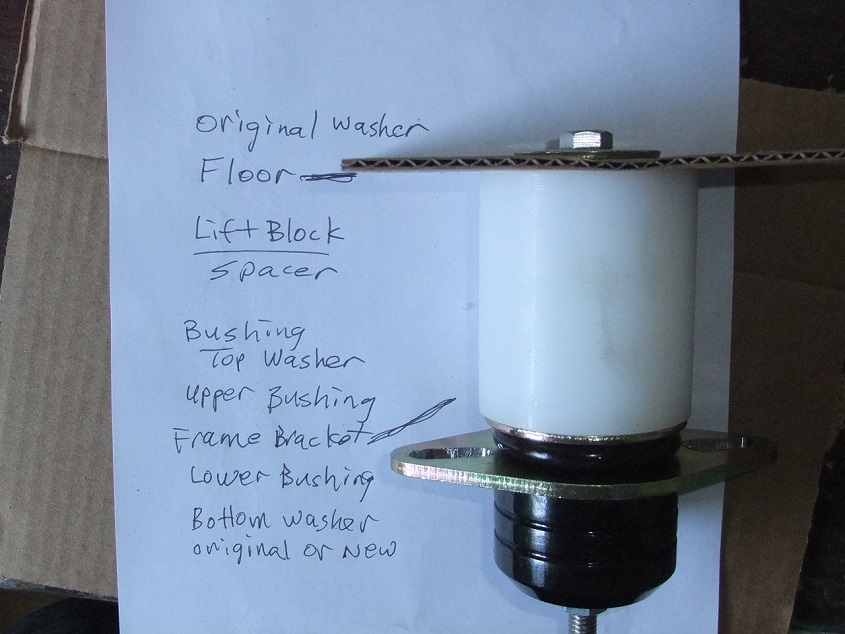
Installing the bushings is just like installing a body lift, even if you are only replacing the stock bushings without adding any lift. The spacers (or additional body lift block height) is simply needed to make up the difference in height of the taller OEM bushings and the shorter poly bushings. You can think of the spacers as a 0" body lift. Important to note that the spacers and/or body lift blocks go on top of the body mount bushing assembly. That bushing usually consists of an upper and lower polyurethane bushing half that fits above and below the frame bracket. Inside that is a steel sleeve and on top a new steel washer and below either the original or a new steel washer. Those two washers compress the bushing halves until the sleeve bottoms out, thus setting the proper pre-load or compression on the bushing. Then the spacers sit between the large top washer and the underside of the body.
Note on the labeled bolts/spacers/bushings, the labels represent the positions that are typically used for those various parts. From time to time, we encounter a vehicle where those parts may fit better in a different location. If you run into this situation, feel free to move the parts to the location where they fit better. After all, it is the ultimate fit of the parts that matters and not some arbitrary assembly based upon a typical vehicle. The parts labels seem to work fine for perhaps 90-95% of the vehicles, but in some cases, some swapping parts around for a better fit is needed. For example, on some later model 3rd gens with the P2 kit, you may need to swap the A-pillar and C-pillar spacers or lift blocks and likewise switch the B-pillar and Rear spacers or lift blocks to get an even surface for the body to sit down on top of. Likewise, you may need to swap some of the bolts around for better fitment. So before you tighten down any of the bolts, make sure to install all of them and if any are too short or too long, move them around so that you have exposed threads on all the locations. And if any of the bolts end up being too long, such that you run out of threads tightening down the nuts, simply slip a washer or two as needed on the end of the bolt before screwing on the nut to take up the extra unthreaded length. This will in no way affect the strength of the bolt.
For pictures and more information, see below:
There are 1-piece and 2-piece bushings on the 3rd gen 4Runner. Shown below is the proper assembly order for the various parts. Note that 0"/stock height kits will include spacers of varying heights and lift kits will include blocks or varying heights (the round white blocks below). The bushing components go together as shown. The 2-piece bushings sit above and below the body mounting brackets on the frame. The 1-piece bushings bolt to the top of the body mounting brackets after removing the OEM rubber bushings. Take care the the bushings have the metal sleeves inside and the large washer on top and a smaller washer on the bottom. As the bolt is tightened, the washers will compress the bushings until they contact the sleeve and that sets the proper pre-load on the bushing (i.e. it's tight). Then the spacer or lift block sits atop the large washer on the bushing and then the underside of the body sits on top of the spacer or block. The bolt is then inserted and that holds it all together. If in doubt, just look at the way the OEM bushings are installed. The poly bushings will look a little different but they work in the same manner.
 |
. |
| 1-Piece and 2-Piece Bushings | . |
 |
 |
| Lift block or spacer and bushing | Lift block or spacer and bushing |
 |
 |
| Lift block or spacer and bushing | Lift block or spacer and bushing |
[Return to the top of this page]
Results:
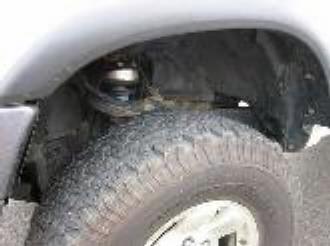
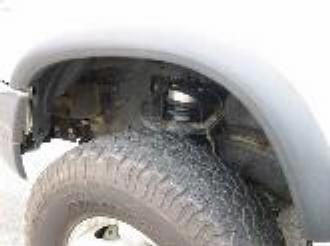
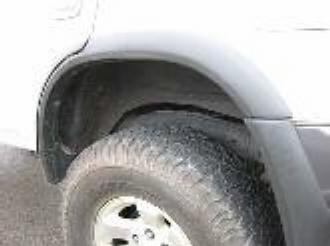
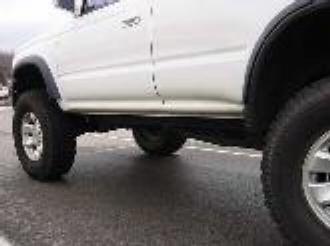
Now, YOU'RE DONE! That's it! Easy huh? I was surprised it was so easy. Doing a 2" or 3" lift would have required several other mods that I won't go into. That's the way I like it, nice and simple! Later on I took the rig out to an impromptu RTI ramp (a mound of mulch) and discovered that I can now clear my 285's without rubbing! Mission complete! So far so good. No difference than before, as far as I can tell. Except I'm 1" higher! It looks really good. You can hardly see the gap in the wheel well. I will take some pictures of it for you to see. I don't really need any gap guards either. Overall I'm really happy with it, and recommend it to anyone who needs that extra lift to clear his/her tires. Here's the finished product, she's a beast!
 |
 |
 |
| A | B | C |
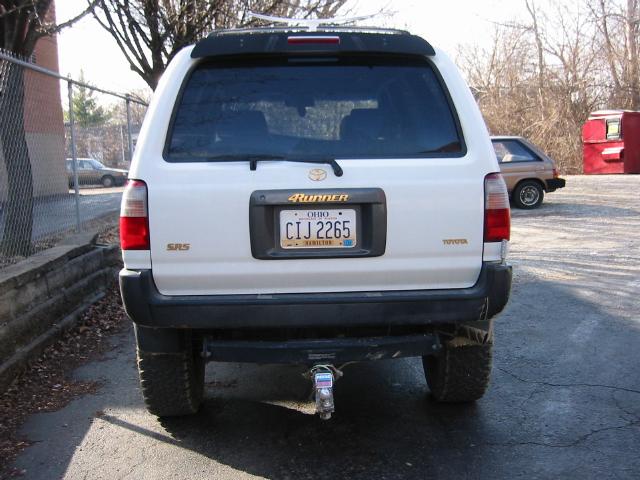
And here are some pictures of the gaps on the front, rear, frame, and trailer hitch because of the lift. I think they are just fine. The trailer hitch kinda looks funny, but that will be fixed with a new rear bumper!
 |
 |
 |
| E | F | G |
 |
 |
 |
| H | I | J |
Updates for Taller Lifts:
One item to consider with a body lift on the 3rd gen 4Runner is the stock tire carrier winch. At a 1" lift, you should still be able to access the winch using the factory tool, possibly by removing the plastic fitting that the tool goes into above the bumper. Above 1" and its unlikely that you can use the factory access method, since the rear bumper is lifted with the body. If you are planning to install a larger tire than will fit under the truck, then just be sure to lower the small spare before lifting. Other options would include drilling a new access hole for the winch tool to pass through the now higher bumper, or come up with a shorter version of the tool to access the winch from below.
Here are some issues that may be encounters when installing a 2" - 3" body lift on a 3rd generation 4Runner ('96-'02) as provided by Mike Lee:
-
Steering column needs an extension (obviously).
- The 2" and 3" lift steering extensions (SE) handle this issue.
-
The wire harness that connects to the fuel pump is the exact length for
a 3" lift. No slack at all, but there is no chance it will pull
out either.
- Can solder in an extension if desired.
- On the early 3rd gens (1996 for sure), the A/C hose in the engine compartment is a bit on the short side, so when the body is lifted, just like with the wire for the fuel pump, there is no slack at all. There is no problem with the hose pulling out once the lift is in, but when your jacking up the body, you have to take everything nice and easy or else there is the possibility that it could get detached. You could definitely see the hose pulling out if you take things too fast, but gently lifting up the body so that the hose and metal fitting have time to bend down a bit should present no problem. Again, only on early 3rd gens.
- No problems with the fuel hoses.
- You need to detach the brackets that hold the hard lines for the front brakes to the frame. With a 2" lift, those lines can stretch enough where you don't have to do this, but with 3", you may have to fabricate up an extension for these brackets or re-attach them in a different location.
- There is some brackets on the driver's side wheel well inside the engine compartment that holds a wire harness of some sort. With a 2" lift, there is no problem with this bracket, but with a 3" lift, the hole the bracket screws into is off by a 1/8". This bracket needs to be unscrewed.
-
Radiator drop brackets need to be installed (RAD). You can run without
a radiator drop, and it works, but the drop brackets help center the
fan in the shroud for better cooling and also keeps the hose on the
bottom of the radiator from getting kinked.
- You can also use existing bolt holes to drop the radiator approx. 2", see: /4x4/ForSale/Docs/BodyLift_HowTo.shtml#LaterModelToyotaRadiators
- At 1.5", you may not need to install the radiator drop brackets. and instead do one of the other radiator modification steps listed on the main install page.
- An extension for the transfer case shifter may need to be welded in or screwed on (screw on extension applies to shifter with simple screw on knobs only). I don't know about the 2" lift, but with a 3" the column needs about 1/8" - 1/4" of clearance on the left side of the opening to go through the shifting pattern properly. If more clearance is needed, trim or adjust the shifter base as needed.
- The stick for an automatic transmission has no problems at all. For a manual, I'm sure you would have to weld in or screw on a 3" extension.
-
Gap guards need to be detached
- Some folks have made use of the radiator brackets to reattach the factory gap guards in place or you can obtain ones made for up to a 3" body lift from http://www.liftlips.com/
- There is a hard line for the rear brakes on the inside of the drivers side of the frame. this needs to be detached.
- The valence on the front bumper rides on top of the ends of the frame that stick out. No big deal, it squishes the valence a little bit, but that's all.
-
In summary, and as noted on the main body lift page, as you lift the
body higher off the frame, the more likely you are to run into issues
that need to be addressed.
- None of these issues, as noted above, are typically "show stoppers", they are simply things that can be addressed with the steps listed above.
-
And it is hard to give an exact list of X" lift = Issue 1 and
Y" lift = Issue 2. Rather it is more of a probability in that the
higher you lift a particular vehicle, the more likely you will be to
encounter a given issue and need to deal with it. It also depends on
the owner of the vehicle and how "perfect" they want the lift
to be done.
- So, at 1" or 1.5", you may only need to pull the lower half of the radiator shroud and at 2" you may need to lower the radiator itself. But there is nothing preventing you from installing radiator drop brackets at 1" or 1.5", nor is there a hard and fast rule that the radiator drop brackets must be used at 2", there are other options as noted on the main installation notes page.
- So it still comes down to "lift as much as you need but as little as possible". And if you, as the kit purchaser/installer feel that lifting 2" might cause issues and while 1" may not (but may not be enough lift for your needs), then by all means go with a 1.5" lift if that makes you feel better. There have literally been hundreds of 1", 1.5", 2" and 3" 3rd gen 4Runner 4Crawler Offroad body lift kits installed over the many years they have been available and all have been successfully installed.
These are the most major things to be concerned with when lifting a 3rd gen up 3". Other than that, its pretty much a piece of cake. Its sure as a heck of a lot easier than for a Tacoma!
[Return to the top of this page]Spare Tire Carrier use with body lifts:
Since the spare tire carrier is attached to the frame and the access hole in the rear bumper for the spare tire winch crank handle rises with the body lift (i.e. the rear bumper is attached to the body), the alignment between the hole in the bumper and the winch is affected. The more the lift the more mis-alignment there is. At 1". access may still be acceptable, or at most, remove the plastic cover under the bumper to gain more access room. If one of your goals of installing the body lift is to fit taller tires, and you plan to run a full sized spare tire, then you may find that the stock spare tire carrier will no longer hold the larger tire. If this is the case, then be sure to lower and remove the factory spare tire before installing a body lift over 1", as it may be difficult to do after installing the lift.
In any event, you should decide what you want to do with the spare tire carrier/winch while you install the body lift. It is much better to work out your plans for this now that on some dark, rainy night when you have a flat tire out in the middle of nowhere!
See below for some ideas on dealing with the spare tire carrier on lift heights over 1":
-
Remove the spare tire.
- Remove the tire carrier if you no longer plan to use it.
-
Bend the carrier to allow access:
- On a suitable/stable surface (I used a steel "I" beam and a 4lb. hammer), pound the front flanges (side w/ hoist yoke) of the carrier DOWN a few degrees.
- Turn the carrier over and pound the rear flanges of the tire carrier an equal amount in the opposite direction or UP. (This allows the carriers threaded flange holes to remain parallel with the cross member bolts after the angle is changed.)
- Purchase two longer M8-1.25 bolts, two M8 lock washers, and at least six 3/8" SAE hardened washers (6 was required for a 1½". More/less may be needed for higher/lower body lifts).
- Re-use two OEM bolts to re-secure the front threaded flanges (loosely).
- Use the two longer M8 bolts and lock washers to re-secure the rear threaded flanges, placing a number of 3/8" hardened washers between the cross member and each side of the now angled rear flanges of the tire carrier.
- Tighten all bolts and check the spare tire crank for alignment/fitment.
- If the crank does not enter the carrier yoke somewhat easily, additional washers and/or flange angle adjustment may be necessary.
- Enlarge the hole just enough to ease tension on the crank handle. Thanks Swede!
Here is a thread on Yotatech with more info:
If you have a thread, write-up, photos or video of your installation, feel free to send us a link and we'll be happy to add it to these instructions.
[Return to the top of this page]
Questions or suggestions:  ===>>
===>> 
[Last updated: 15.February.2022 ]
Visitor # since 11.APR.2017