
4Crawler Offroad - Custom Leaf Spring Shackles
and other leaf spring and shackle related items
 Designed and manufactured in
the USA by Visual Diagnostics LLC
Designed and manufactured in
the USA by Visual Diagnostics LLC
After 25 years in operation, it's time to close up shop and move on to other adventures. Thanks to all the loyal customers over the years that helped to make this all possible. The web site will remain live. If you have any Toyota or 4x4 related questions, feel free to drop me an e-mail and I'll try to answer.
We have a limited stock of items such as:
- Steering Extensions
- Driveshaft Spacers
- Upper Control Arm braces for 2WD Toyota pickups
- Weld-on Cab / Body Mount brackets
- Seat Lift kits
- Starter Solenoid Contacts
- Bilstein Shocks for VW pickups
- H4 switched power headlight relay harness
-
Some customers have reported issues with the Paypal order buttons while using the Safari web browser on an iPhone.
- If so, try a different browser and see if that works better.
| 4Crawler Offroad contact link | MissingLinkZ contact link |
Check out our growing collection of on-line design information so that you can make your own parts. Maybe you have a neighbor or acquanitance that can help or check out a local maker space or adult education machining class. Or engage a local or on-line machine shop to make them for you. Before you ask, no, we're not making any more of these items, rather we wanted to empower YOU to be able to make your OWN custom parts.
You'll find designs for body lift, suspension components and more, below:
- Thingiverse
- Printables
- Cults3D
- Maker World/BambuLab
-
GitHub
-
Includes RockSliderz and IFS Frame Brace designs
There's a wide selection of on-line 3D Printing and Machine Shop services available today. A few that we've heard of:
- Xometry.com, ProtoLabs.com, Mfg.com, eMachineShop.com, Hubs.com, RapidDirect.com, RenovoCNC.com, PartsBadger.com, ProtoTek.com, FicTiv.com, Jlc3DP.com, PCBWay.com, SendCutSend.com, etc.
-
Many of our model files use OpenSCAD and if you need to convert those to other CAD formats, use FreeCAD.
- Simply import the OpenSCAD file into FreeCAD then export it in the desired CAD format the on-line shop requires.
Contents:
- Introduction
- Custom Length Spring Shackles
- Ordering Information
- Frequently Asked Questions
- Installation Instructions
- Check out this album for more photos and details on shackles, bushings and bolts
- Contact Info.
After 25 years in operation, it's time to close up shop and move on to other adventures. Thanks to all the loyal customers over the years that helped to make this all possible. The web site will remain live. If you have any Toyota or 4x4 related questions, feel free to drop me an e-mail and I'll try to answer.
Introduction:
Doesn't it seem strange that most places only offer 3" longer spring shackles? For example, most stock Toyota 4Runner (and mini-truck) spring shackles measure approximately 3.5" center to center (T-100 shackles are approx. 4.5"). I wanted longer shackles but not 3" longer, so I decided to make my own. The first ones I made involved buying a 3" longer "Rubicon" shackle from Downey Offroad, redrilling one hole in the desired location and cutting off the excess. While this worked fine for shorter shackles, it was somewhat expensive and time consuming.
The old Downey Rubicon shackle design used two, unbraced side plates with straight 18mm through bolts and nylon lock nuts to hold the shackle together. This design allows the side plates to move independently, which reduces stress on the suspension and allows for greater articulation. However, I found the Downey design has one fatal flaw, that is that the bolt tends to remain fixed inside the spring/frame bushing, thereby forcing the shackle side plate to rotate on the bolt. Over time this metal-to-metal contact leads to wear, opening up the hole in the side plate, leading to sloppy handling on the road. But worse yet, the back and forth rotation of the side plate under the nut can cause it to work its way loose, ultimately leading to a loss of the nut (I know, it happened to me) and possibly the entire shackle.
In fact, if you run the Downey Rubicon shackles, be sure to check the tightness of the nuts periodically!
One nice feature of the Rubicon shackle design that I do like is that removal is very easy, since you can pull each bolt out separately. If you've ever struggled with trying to pull out a one-piece shackle out of the frame and the spring at the same time, you can appreciate this advantage.
In light of the above problems, I decided I could make a better shackle, taking the good features of the Rubicon design, and correcting the weaknesses. My first attempt was to tack weld the bolt head to the side plate. It worked for a while, but it made shackle removal difficult as now you could not pull one bolt at a time. So, I ground out the welds and decided to come up with a better solution.
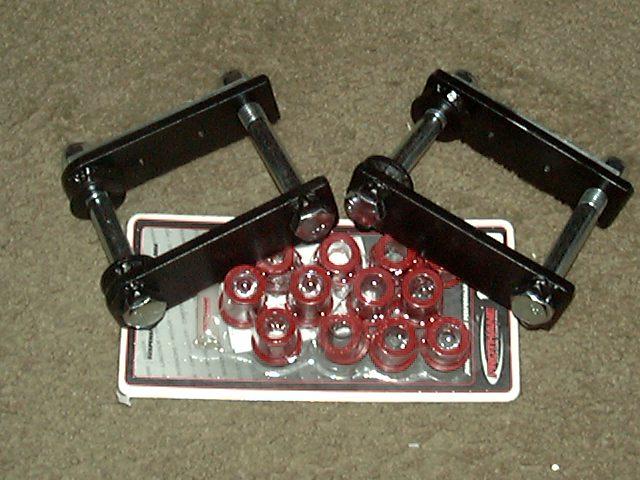
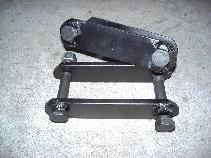
I then came up with a retainer (photo above) to hold the bolt (and thus the nut) fixed to the side plate without restricting the inherent flexibility of the design. While this retainer works well it takes a fair amount of time to make and I figured there had to be an even better solution.
My final solution was even simpler, I basically combined the two previous ideas into one. By welding tabs on the shackle to prevent the bolt from turning, yet still allowing it to move independently, I think I've solved all the problems with the original Downey Rubicon shackle design and I've given up none of the benefits. Also, as an unexpected side benefit, the tabs help to protect the head of the lower shackle bolt from damage scraping over rocks. The tabs take most of the abuse and leave the head of the bolt fairly unscathed.
For the shackle side plates themselves, to ensure perfect alignment between the bolt holes, all 4 shackle side plates are tack welded together prior to drilling. After the holes are drilled, through all 4 side plates, to the proper size for the bolts, the side plates are separated and then any final work such as bending or welding in bracing is done. For unbraced shackles, you can use the "witness marks" on the side of the plates to put the plates back together as they were drilled. THe plates will have from 1 to 4 dots stamped into the side, and if you keep 1 next to 2 and 3 next to 4, the plates for each shackle will be next to the one they were drilled with.
[Return to the top of this page]Custom Length Spring Shackles:
The shackles use stock size hardware to provide the proper fit in the stock Toyota spring and frame bushings. Since the side plates are cut from lengths of 3/8" x 2" steel flat bar, any length shackle from stock length to 3.5" over stock length can be made to suite your needs. Pictured below are some examples of custom 4Crawler spring shackles for Toyota pickups (2WD and 4WD), 4Runner, T-100, Tacoma, etc.:
 |
 |
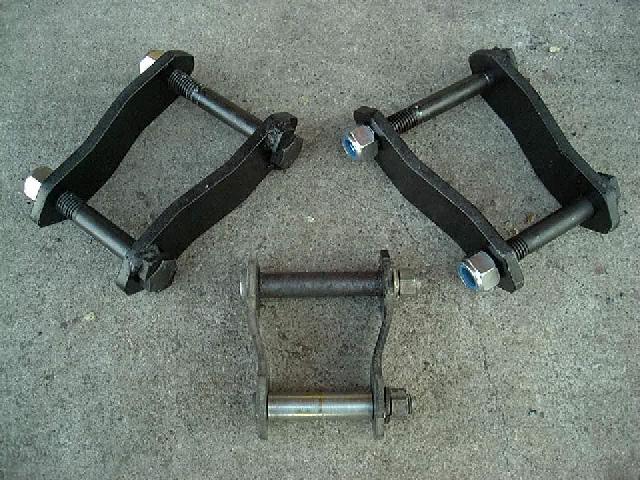 |
| (A) 3" longer rear shackle '84-89 4Runner, '79-'88 Pickup Available in stock length on up |
(B) 2" longer wide body shackle '84-85 pickup/4Runner'89-95 Pickup, Available in stock length on up |
(C) 2" longer '89-'95 Pickup w/ stock shackle for reference Available in stock length on up |
 |
|
 |
| (D) Wide body unbraced front shackle, 2" over stock length, 3/4" hardware w/ drilled polyurethane spring bushings |
(E) Wide body braced shackle 3.5" over stock length w/ 18mm hardware for stock bushings |
(F) Braced rear (3rd gen p/u) 5.5" over stock length (9" c-c) For a rear Chevy spring install |
 |
 |
|
| (G) Tacoma Rear Shackle '95.5-'04 models |
(H) Tacoma Shackle Installed Note: The shackles match the factory offsets on inner and outer plates |
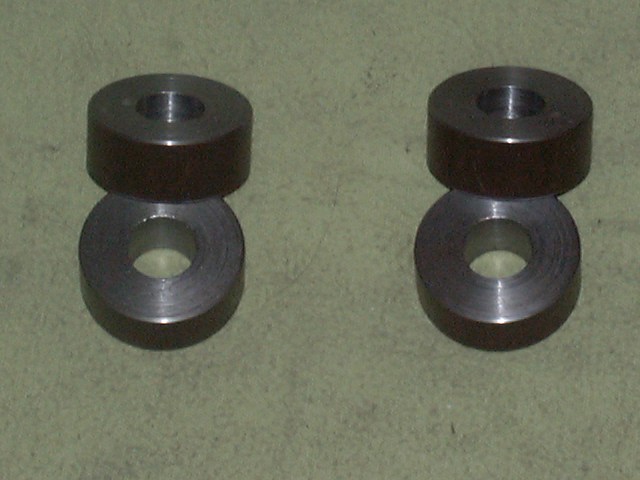
(I) Shackle Spacers to make your own wide body shackles, thickness/hole made to order |
 |
. |
. |
| (J) Greaseable Shackle Bolts | (K) Load Sensing Prop Valve Bracket - For Toyota/Leaf Spring |
(L) Load Sensing Prop Valve Bracket - For Toyota/Coil Spring |
Note that the 2nd generation Pickups ('89-'95) have a shackle hanger that is wider than the spring itself. We offer two options for this, one is a wide body shackle (A) with welded-in-place spacers, or a stepped-down shackle similar to stock (B). You can compare the size of the stock shackle to the longer units. Note, with stock rubber spring bushings, it is necessary to remove the steel sleeve in the spring eye to install the 18mm bolt directly. It is also possible to get the shackles set up with a bolt to fit inside the stock steel spacer if desired.
Also available, custom front shackles. Same basic options as the rear shackles, braced or unbraced, wide body or bent side plates. Also available is custom widths, top and bottom. An example is the Tacoma ('95.5-'04) shackle shown in pictures (G) and (H) above. The factory shackle hanger is not centered directly above the spring for some reason. Instead, the factory shackles have a different offset on the inner and outer shackle plates. By exactly duplicating the factory offsets, the 4Crawler Tacoma shackle ensures that the rear springs are not put under the added stress caused by a symmetrical shackle (as many common shackle designs use) and ensures that the rear axle alignment is preserved.
Also available, custom machined shackle spacers (I) for making your own wide-body shackles. Simplifies shackle fabrication since no bending is required. Common thicknesses are:
- 3D print/CAD files for the spacers
- 0.375" for the '89-'95 Toyota pickup rear shackles
- 0.70" for the '79-'85 Toyota front shackles w/ Toyota leaf springs (60mm width)
- 0.56" for the '79-'85 Toyota front shackles w/ Wrangler leaf springs (67mm width)
- 0.375"/0.50" for the Tacoma rear shackles with Toyota leaf springs (60mm width)
Turned from 1.75" OD billet steel, they cam be made with nearly any thickness and center hole size.
And now available are greaseable shackle bolts (J). Bolts are gun-drilled through the head, cross-drilled with a center groove to allow for grease insertion into the bushings or OrbitEye/Johnny Joint type spring end. Then the hole in the head is tapped for 1/4-28 thread low-profile grease zerks. Use of this size thread allows the zerks to be removed and replaced with a short, flat-headed screw to prevent the zerk from being scraped off by a rock on the trail.
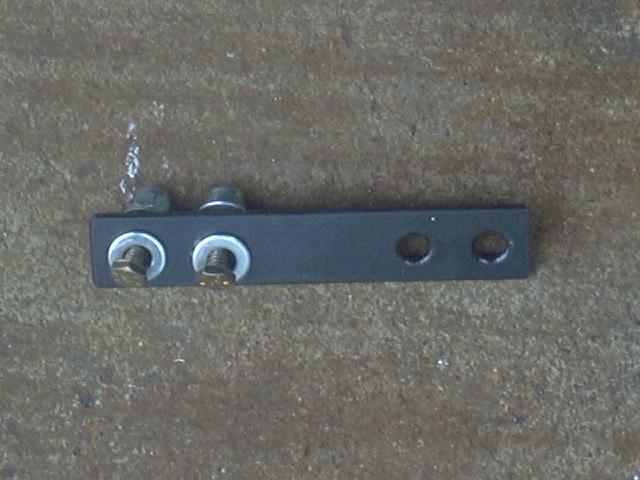
For Toyota pickups and 4Runners, a bracket to raise the sensing rod on the axle for the Load Sensing Proportioning Valve (LSPV-BV) is also available (K, L). Bracket is made to order, it is sized to match the lift.
Also, if looking for shackles to use with non-stock springs, for example, the popular Rancho 44044 springs are 1/4" wider than the stock Toyota springs and therefore cause problems when used with shackles built for the stock width spring. If you can provide the specifications of the spring and hanger setup you are using, 4Crawler Offroad can probably make a shackle to fit your exact needs.
[Return to the top of this page]Ordering Information:
We've sold out of our custom shackles and components
For shackle and hardware dimensions, see the information in the table in this link. We'll use those dimensions as the basis for the custom shackles unless you advise us otherwise. For example if you have aftermarket springs or bushings that use different size hardware, let us know so we can adjust the design for your shackles. Also, some vehicles may have variations in hardware dimensions that may affect the design of your shackles.
- We've released our 3D CAD design for the shackles and optional sleeves so that you can make your own shackles or have a set made for you.
-
Typical compression-style spring shackle, built to order (specify the
length over stock desired, +0" = stock length):
- Priced from $115.00, per pair, unbraced, including hardware
-
or $75.00 per pair, unbraced w/o hardware (i.e. side plates only)
- A pair of shackles includes 2 sets of shackles, one for each spring on one axle
-
Price applies to shackles up to 6.5" long, center-center
(typically 2"-3" longer than stock)
- Toyota Pickup/4Runner stock length is ~3.5", T-100 is ~4.5"
- Be sure to check the default shackle and hardware dimensions in the this table, escpecially for T-100.
- For lengths greater than 6.5", add $10.00/in. (or fraction thereof) over that length
- For shackle side plates only, indicate the bolt hole sizes for the shackles and whether you want the bolt head tabs welded in place, as they are designed to fit the bolt head sizes that we use. We can also send you the loose tabs that you can weld on yourself to exactly match your bolt heads.
-
Shackles can be built braced or unbraced
- Recommend unbraced up to about 3" over stock and braced for longer shackles
- Add $20.00/pr. for braced shackles.
-
For greater installation flexibility, shackles are available with
additional sets of bolt holes pre-drilled
- Add $15.00 for each set of additional bolt holes
- Minimum offset for the extra holes is approx. 1.5" for 18mm / 3/4" hardware and 1" for the 14mm / 9/16" hardware
-
Prices above are per pair (i.e. two shackles, one for each side of a
given axle)
- Single shackles are also available, starting at $60.00/ea. w/ hardware.
-
If you want to build your own shackle plates or replace existing
shackle or spring hanger bolts, replacement bolts are available:
-
Grade 8.8 M18x120/130mm or 150mm bolts and M14 or 9/16" bolts with
nylock nuts are available separately:
- $12.00 ea. or $45.00 for a set of 4 (includes nylock nuts)
- Bolts have ~2"/50mm of threaded length and can be cut down to shorter lengths is needed.
- Spare nylon lock nuts are available separately for $3.00/ea.
- Also available at the same cost are the 14mm or 9/16" bolts often used for the forward spring hanger bolts or for later model sleeved spring eye bushings, 100mm/4" or 125mm/5" long. Same cost as noted above.
- Spring hanger bolts with a flange that bolts to the frame are not available.
-
Grade 8.8 M18x120/130mm or 150mm bolts and M14 or 9/16" bolts with
nylock nuts are available separately:
- Greaseable shackle bolts
-
A wide-body front shackle design (as shown in image D above) for use on
the front axle 4Runners and pickups
- The wide body allows the shackle to fit around the frame without interference
- Add $35.00/pair for wide body shackles
- Or, if you want to make your own wide body shackles, spacers are available below.
-
Polyurethane bushings are also available:
- In either stock size of pre-drilled (for 3/4" ID)
-
Two sizes of bushings are common on Toyota
trucks, 30mm OD and 40mm OD.
- YouTube video on how to measure the spring eye inner diameter
-
The small 30mm OD bushings are used in the shackle hangers and rear
springs eyes on the early trucks
- These are plain bushings, no sleeve, inside or outside, 18mm (or 3/4") ID
-
Cost, per pair of bushings (as in two bushings - each bushing comes in
2 halves) enough to do two spring eyes or two shackle hangers - i.e.
one per side of the truck, is:
- $16.00/pr. for the narrow bushings (can be used in the spring eye or rear shackle hanger)
- $22.00/pr. for the wider front "through-the-frame" shackle hanger bushing or the wider 3rd gen pickup or Tacoma shackle hangers. Bushings may need trimming to length.
- Add $8.00/pr. for bushing drilled to accept 3/4" hardware
-
The large 40mm OD bushings are used in some spring eyes on the later
trucks
- In OEM form, these bushings have an inner and outer sleeve and are pressed into the spring eye and need to be cut or pressed out to replace.
-
The bushings have a removable inner sleeve to allow use of either 14mm
(9/16") or 19mm (3/4") hardware.
- For a tighter 18mm bolt fit, like with the OEM front spring hanger pins, we can supply a heat shrink sleeve (PVC) for the pin ($2/sleeve), that you can heat shrink over the OEM spring pin to bring it's OD up from 18mm to 19mm to better fit a 40mm spring eye bushing w/o the internal sleeve. This lets you re-use the stock solid axle spring hanger pin (which is not a normal bolt) by putting the heat shrink tubing over the 18mm section of the pin.
- Cost is $25.00/pr.
-
T-100 pickups use the long 30mm OD bushings on the rear frame hanger
(see above). The spring eyes may use a 36mm OD / 18mm ID bushing or they may use a 30mm OD / 18mm ID
bushing, similar to the earlier pickups. The bushings are typically
not sleeved and instead make use of an 18mm dia. pin with a 14mm dia.
shoulder that is threaded. We now have a poly bushing solutions for both these sizes
vehicle, with several options, depending on application. All the options are
equally good, it all depends on what you want as a finished solution.
- For OEM replacement, we can machine custom 36mm OD spring eye bushings, which normally come with a 19mm OD / 14mm ID steel sleeve. That sleeve can't be used with the OEM 18mm shackle pin or spring hanger bolt. Instead we can supply a heat shrink sleeve that can fit over the 18mm pin and fill up the 1mm space inside the poly bushing. This option costs $54.00/pair of bushings + heat shrink sleeves, enough to replace one spring eye on each side. Order two sets if you want to replace both pairs of spring eye bushings on both sides.
- For 30mm OD spring eye bushings, just order the 30mm / narrow bushings. We can also build spring shackles for this size bushing that use 18mm dia. bolts top and bottom.
- For replacement spring shackle + bushing applications, we can supply the 36mm dia. bushing with the 19mm dia sleeve and then make the shackles with a 14mm dia. lower bolt to fit inside the steel sleeve that fits the bushings. This bushing setup (for the rear spring eye only) costs $50.00 for the pair. This is how the pickup and Tacoma shackle bushings are setup.
- For the forward spring eye, the 36mm OD. bushing needs the heat shrink sleeve if you're planning to use the factory spring hanger and 18mm bolt. Another option is to drill out the holes in the spring hanger on the frame to 3/4" or 19mm and then use that size hanger bolt. We can supply that bolt in both greaseable and non-greasable versions, let us know the approximate length of the existing bolt so we can try to match that length. This should not be too hard to do if you have access to a 1/2" low speed drill and a suitable stepped down, Silver-Deming type drill bit with 1/2" shank and 3/4" cutting diameters. Drill bit link. The existing holes will guide the drill bit and you're only taking out a small amount of metal.
- Sorry the T-100 bushing options are so complicated. Blame Toyota for using one-of-a-kind bushings on the T-100 springs. For decades before and after, they used either 30mm or 40mm OD bushings, then out of the blue, they use 36mm for this one model. Unfortunately, with this small market size, aftermarket bushing mfgs. don't see enough volume to justify the cost of tooling up to make a special size bushing. Also, 36mm doesn't match any imperial size bushing, like 1-1/2" which is commonly used on domestic trucks.
- On the T100 shackles, we can build the shackles as pictured here. By adding a pair of sleeves, either 18mm or 19mm outer diameter, this setup can work with the stock bushings (18mm) ID or the 36mm poly bushings if you later decide to swap to those. Simply add a pair of steel sleeves to the shackle order and let us know which diameter sleeve you want.
- Which poly urethane bushings do I need for my Toyota pickup or 4Runner?
-
Steel bushing sleeves are available to step the 18mm or 3/4"
bushings down to accept 14mm or 9/16":
-
Cost is US$7.50/sleeve:
- Specify length and Outer Diameter and Inner Diameter of sleeve(s) needed.
- Standard size for Toyota Pickup/4Runner/Tacoma spring eyes is 14mm ID, 18mm OD and 70mm (2.75") length.
- T-100 uses 18mm bolts in most cases
- For OME springs/bushings, we can supply the sleeves for the 18mm ID bushings to step them down to fit stock size 14mm or 9/16" hanger bolts. OME doesn't seem to supply new sleeves with their bushings and expect that you'll be re-using the original ones, so be advised.
- We can also supply sleeves in 19mm or 3/4" OD which fits into many aftermarket poly spring bushings. Energy Suspension bushings will often have a 19mm or 3/4" ID on the bushings and that needs a similar sized sleeve if you want to run a 14mm or 9/16" bolt.
-
We can also supply a complete shackle/bushing/sleeve setup if you want
to replace an unsleeved shackle setup with a sleeved setup, or vice
versa.
- Just let us know what you currently have and what you want to end up with and we can help you do that.
-
Cost is US$7.50/sleeve:
-
Ordering/payment options below - We've sold out of these items:
- Shipping is additional, based upon weight and destination
-
- Add 9.0% sales tax for shipments to a California address:
- Automatically added if using the Buy Now buttons below
- If your billing address is outside of California, no sales tax applies
- US Delivery: $16.00 for regular or $18.00 for insured Priority Mail shipping on shackles, or $9.25 for smaller items like bushings or bolts
- International shipping options
Make a custom relocating bracket for the Load Sensing Proportioning Valve with this 3D printable CAD model.
- Need more flexibility, an adjustable LSPV Bracket is also available
- Built to raise the LSPV sensing arm to match the lift
-
Here's how to modify the stock LSPV-BV w/o installing a bracket.
- YouTube video on how the LSPV brackets are made:
-
Two styles available:
-
Vertical bolt style for leaf-sprung Toyota rear axles (1st gen
4Runner/Surf, Pickup and T-100 w/ ~24mm bolt hole spacing))
- Due to the factory bolt hole spacing, the minimum height bracket is approx. 1-3/4" in this style.
- Horizontal bolt style for coil-sprung Toyota rear axles typical on the '90-'95 4Runners.
-
Vertical bolt style for leaf-sprung Toyota rear axles (1st gen
4Runner/Surf, Pickup and T-100 w/ ~24mm bolt hole spacing))
-
Order the size bracket to match your rear axle lift, so for a 2"
lift, order a 2" bracket, etc.
-
How much lift do I have?
- Well, if lifting a stock truck, measure the stock height, say from the top of the wheel to the fender before and after the lift, difference = suspension lift height.
- And you want to judge the lift from stock height if at all possible as the stock LSPV rod attachment was designed for the factory height, so if your rear end was sagging 2" below stock height before you lifted the truck and you ended up 2" above stock height, you only need a bracket to handle the 2" above stock height, not the full 4" of lift.
-
Forgot to measure the "before" height, well then make an
educated "guess" at the lift.
- For an estimate on stock height on '86-'95 pickups and 4Runners, the stock height up front is 13.5" - 14" from the top of a 15" wheel to the highest point of the wheel well arch (with no body lift). If a body lift is installed, adjust that distance for the height of the lift. Then to translate that to height at the rear axle, measure up from the ground to the frame rails, behind the front wheels and in front of the rear wheels. Select a flat area of the frame as far apart as possible. Then take the difference in those two heights and multiply by the wheel base divided by the distance between the two point you measured the frame heights at. Then add/subtract that number from the front height determined above. So for example, if you measured 15" wheel-fender height this says you have about 1"-1.5" of lift over stock. Then if you measure two points on the frame 52" apart and find the rear of the frame is 1/2" higher than the front and assuming a 104" wheel base, you have 1/2" x 104 / 52 = 1" higher in the back then the front. So adding 1" - 1-1/2" front lift and 1" higher in back you have about 2" - 2-1/2" of rear lift, so order an LSPV bracket in that size range. The exact size bracket is up to you, if you expect the lift to settle a bit over time (i.e. you installed new springs), then go for the shorter size, if you installed some used springs from another vehicle, then they may not settle much, so order the taller size bracket.
- One other option is to unbolt the LSPV rod from the axle and lift it up until the sensing rod at the LSPV valve on the frame is approx. in the center of it's up-down range, then measure the distance between the bolt holes on the sensing rod and the bracket on the axle.
- Since the sensing rod is adjustable, no need to get the LSPV bracket measurement to the nearest 0.001", just to the nearest 1/2" or so is fine.
- Note that a body lift or taller than stock tires make no difference in LSPV bracket size, it is only the rear suspension lift height that matters.
-
How much lift do I have?
- SOLD OUT
 |
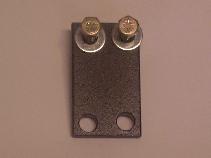 |
| Leaf Spring type LSPV bracket | Coil Spring type LSPV bracket |
| Add LSPV bracket to SOLD OUT |
Order LSPV bracket SOLD OUT |
Order LSPV bracket SOLD OUT |
Order LSPV bracket SOLD OUT |
Adjustable LSPV Bracket: You can use the above CAD file to build LSPV brackets with multiple holes to allow for adjustability. The series of holes can be spaced at about 1" increments from about 1" up to the maximum lift you specify, so a 3" bracket would have holes for 1" and 2" and 3" of lift, while a 4" bracket would have holes for approx. 1", 2", 3", 4" lifts. This is a good option if you have just installed new springs and/or are unsure of the total lift you have. New springs will tend to settle with time and use, so your 2" lift springs may start out with 4" or more of lift then settle down to the 2" height after a year or so, as they settle, lower the LSPV sensing rod on the bracket to compensate.
To do this, download and 3D print the above CAD model at the lowest desired height. Then use that as a drilling guide to drill the first 2 pair of holes. Then slide up the guide by the desired height increment and mark/drill another pair of holes. Repeat until you've got as many sets of holes as desired.
- SOLD OUT
| Add adj. LSPV bracket to SOLD OUT |
Adj. LSPV bracket SOLD OUT |
Adj. LSPV bracket SOLD OUT |
Adj. LSPV bracket SOLD OUT |
[Return to the top of this page]
Frequently Asked Question:
At this point, you may have questions about spring shackles:
- What are spring shackles for anyway?
- Why do I need longer shackles?
- How long should a spring shackle be?
- How much lift will I get?
- What's the difference between the wide body and bent side plate shackles?
- Don't other companies make spring shackles?
- Greaseable shackle bolts?
- What problems might I run into with a shackle lift?
- What vehicles do you make shackles for?
- What about shackles for other applications?
- Braced vs. unbraced, what's the difference?
- Are there any drawbacks to using a longer spring shackle?
- How long does it take to make a set of shackles?
- Lift options: Shackles, blocks, add-a-leaves, or new springs? What is best for me?
- Can I re-use my factory shackle hardware with the new shackle side plates?
- What shackle and spring bushings do I need for my vehicle?
- How many shackles are needed?
- What options are available for the 2WD B-series Mazda pickups?
And here are the answers:
- 1. What are spring shackles for anyway?
-
Spring shackles are designed to accommodate the lengthening and
shorting of a semi-elliptical leaf spring as it compresses and relaxes.
Leaf springs have a built-in arch and when relaxed have a certain
eye-eye distance then is somewhat less than the eye-eye distance when
they are flattened out. In geometrical terms, this is the chord length
vs. the circumferential length of the arc (a.k.a. arc length). So, the
shackle is designed to rotate back and forth to make up the difference
between the fixed distance from the front to back spring mounting
points on the frame and the variable distance between the spring eyes.
If you want to get really technical, James Stevenson has an excellent
analysis of Shackle
Tech. One approach to setting shackle length is to shoot for a
vertical shackle with the springs at full droop and about a 45°
angle at full compression. Here
is an article on how to mathematically determine a good shackle length
for a given spring.
- Note that by installing a longer shackle, you'll be transferring a bit more of the vehicle's weight to the axle where the shackle is installed. Its similar to the way the stock car racers "jack" or "add wedge to" one corner of the car to change the weight distribution. This added weight will tend to cause the leaf spring to flatten a bit more. If the spring was already close to its load limit, you may find you need to beef up the springs a little with an add-a-leaf spring. You can use a commercial kit (be sure to get one with one or more long, thin leaves, not a short, thick leaf) or pick up a set of similar springs at a junkyard and use one or more of those leaves to add to your spring pack.
- And, if all you are interested in is replacing the stock shackles, we are more than happy to make you a set of heavy duty, stock length spring shackles.
- Note that by installing a longer shackle, you'll be transferring a bit more of the vehicle's weight to the axle where the shackle is installed. Its similar to the way the stock car racers "jack" or "add wedge to" one corner of the car to change the weight distribution. This added weight will tend to cause the leaf spring to flatten a bit more. If the spring was already close to its load limit, you may find you need to beef up the springs a little with an add-a-leaf spring. You can use a commercial kit (be sure to get one with one or more long, thin leaves, not a short, thick leaf) or pick up a set of similar springs at a junkyard and use one or more of those leaves to add to your spring pack.
- 2. Why do I need longer shackles?
-
If you assume that the vehicle's engineers/designers spent a lot of
time designing the stock shackles to work well with the stock springs,
then this makes a good baseline on which to work from.
- If you keep the stock springs and only want longer shackles for more lift, see information on that topic below.
- When an aftermarket spring manufacturer builds a new spring (usually a lift spring) for a vehicle, there are a couple of basic design strategies that can be used:
- 1. Keep the stock spring geometry and just use thicker and stiffer leaves to gain lift.
- This does give the desired lift but the ride quality is reduced and suspension compliance is reduced.
- 2. Retain the stock arc-length (see above) but use more free arch to gain lift (an arched leaf will be stiffer than a similar flat leaf).
- The advantage of this design is that it will work fine with stock spring shackles.
- 3. Keep the stock chord length and instead use a longer free-arch which results in a longer arc-length.
- For this type of spring, you must use a longer spring shackle or else you may find the stock length shackle will bottom out on the frame and cause excessive stress.
- For example I had problem #3 with the NWOR 3.5" lift front springs, but did not with the same maker's rear springs, which used a combination of options #1 and #2 above.
- A good rule of thumb is to add 1" of extra shackle length for each extra inch of arc-length. For example, when I installed 47" long rear springs in place of my 45" long front springs, I used a 2" longer (5.5" overall) shackle and it works perfectly. Note this rule of thumb applies if you are retaining the stock spring and shackle hanger locations. If you move those, adjust the shackle length as needed. And you still need a shackle long enough to accommodate the length change in the spring as it flattens.
- If you keep the stock springs and only want longer shackles for more lift, see information on that topic below.
- 3. How long should a spring shackle be?
-
Basic rule is they should be long enough to accommodate the change in
length of the spring. Ideally, a shackle should swing from about
vertical at full droop to kicked back 30-45° at full compression.
A shackle that is longer than necessary won't move as far and can lead
to a less supple suspension. I found the following on-line calculator
handy for working out shackle lengths:
- http://www.saltire.com/applets/triangles/tri3s_executable/tri3s.htm
- Just measure the spacing of the spring mounts, the length of the spring and shackle and work out the angles. It'll help if you enter your data such that it somewhat matches the on-screen diagram. So make A be the shackle hanger location, C be the spring hanger and B the bottom end of the shackle. So A-B is the shackle length, A-C is the straight line distance between A and C and B-C is the flattener length of your spring.
- Or see James's Shackle Tech page for the nitty gritty details.
- http://www.saltire.com/applets/triangles/tri3s_executable/tri3s.htm
- 4. How much lift will I get?
-
If you want to skip to the "Executive Summary", do so now.
- Otherwise, here is the explanation, and realize there is no exact answer to this question... Given a spring with the axle located about midway on the leaf, every 2" of extra shackle will equate to 1" extra height at the axle. Usually, you'll get a bit more than that, since the longer shackle won't be kicked back as far. So, for a rule of thumb, figure between 1/2 and 2/3 of the extra shackle length will be seen as lift at the axle. Why is this? Look at the springs, one end is fixed to the frame, the axle is connected to the spring about in the middle and the shackle is connected to the spring at the other end. So every 1" of change at the shackle, make 1/2" of change at the axle and 0" change at the fixed hanger. And since it is frame to axle separation that defines suspension lift, you only see about 1/2 of the additional shackle length in the form of suspension lift. If in doubt, draw a simple sketch of a triangle with the shackle being the short end. Make one version with a short shackle and one with a long one. See how the axle moves away from the frame as the shackle length changes.
- As an aside, the following will illustrate some of the pitfalls people make in measuring spring shackles (a compression shackle assumed in the following discussion). So, I was once contacted to make a 7" lift shackle like the person saw on another truck! I replied that this would be a very long shackle (see above) and was the person sure it was 7" of lift? Yes, was the reply, that shackle is 7" long! Ah, I replied, and how is the length being measured? I found out that the shackle side plate length was being measured, from one end to the other. Since the only dimension that matters on a shackle is the center to center distance between the two bolts, one must ignore the ends of the shackle, so assuming 1" overhang on each end, the 7" long shackle is actually only 5" center to center (7-1-1=5). So then is this a 5" lift shackle? No, see above note, so then this is a 2.5" lift shackle, right? Wrong again, lift and length is measured relative to something, you can't have a 0" shackle, see FAQ #1. So what is the shackle length measured relative to? Logically, if you want to describe a lift relative to stock vehicle height, you should also measure the shackle length relative to the stock length. So, assuming a stock Toyota spring shackle in the above discussion (which is ~3.5" center to center) the above shackle is actually 1.5" longer than stock (5-3.5=1.5) or a simply a 1.5" longer shackle. And referring to the beginning of this FAQ answer, we see that a 1.5" longer shackle gives between 3/4" and 1" (1/2 of 1.5"=3/4", 2/3 or 1.5" = 1") of lift. So the point of this rather long discussion was to illustrate how measuring and interpreting the wrong dimensions can make someone believe a 1" lift shackle is a 7" lift shackle!
- So, back to the original question, how much lift will I get? Assuming the spring is a simple rigid beam and the axle is locate mid-way along its length, then the above rule of thumb applies, 1" of extra shackle length = 1/2" of lift. However, a number of factors can complicate the issue. First, the axle may not be at the center of the spring. If its located closer to the fixed end, the lift/length ratio is reduced, if closer to the shackle end, it is increased accordingly. Then the spring is not a rigid beam, its a flexible member. So the lift gained will be influenced by the weight distribution on the vehicle (front to rear) and the relative spring rates at both ends. If the longer shackle is placed on a relatively light end of a vehicle or on the end with a relatively stiff spring, you may see more that the simple lift/length ratio of lift, since after all, the end of the spring attached to the shackle is pushed down the full amount of the added length so in the limit, you may see up to that much lift at that end of the vehicle then proportionately less as you move to the other end. To further complicate matters, you also need to account for the relative stiffness of the leaf spring in terms of front and rear halves. If the spring is not perfectly symmetric, you'll find that the longer side is softer than the shorter side.
- Anyway, given all the above, there is really no 100% accurate way to predict how much lift a given shackle will provide. If you find some place selling "2 in.lift shackles", you should really ask them if they can guarantee that lift. The only thing 4Crawler Offoad can guarantee is that the shackle will be so many inches longer than stock, your lift may vary. When we make a set of shackles, we start by taking a piece of steel and measure out so many inches of length and make a cut there. We have yet to find a "lift" tape measure, all the ones we have found just measure length. Also, realize that any lift you get will be off what height your suspension currently is at. So it you are starting 1" below stock (due to sagging springs), you would need 1" of lift just to get back to stock. Likewise, if you already have some sort of suspension lift, say from lift springs, your height change would be based off of your current suspension lift height.
- So what length shackle should I choose?
- Using the above rule of thumb, figure the lift you want will be about 1/2 to 2/3 the additional shackle length. So you'll need to decide that if the lift comes out more or less than you wanted, which way would you "be happy"? That is, if you want at most 1.5" lift, then choose a shackle in the 2"-2.5" longer range. If you want at least 1.5" lift, then go for a shackle in the 3" longer range. Why might this matter? Well, maybe you need to fit your vehicle into a garage and the garage door opening might limit the overall height. Or you may want to level the vehicle, especially one with an IFS type front end. So if, for example, the front is lifted 1.5", then you would want the rear lifted at least 1.5" and a little more is OK.
- Otherwise, here is the explanation, and realize there is no exact answer to this question... Given a spring with the axle located about midway on the leaf, every 2" of extra shackle will equate to 1" extra height at the axle. Usually, you'll get a bit more than that, since the longer shackle won't be kicked back as far. So, for a rule of thumb, figure between 1/2 and 2/3 of the extra shackle length will be seen as lift at the axle. Why is this? Look at the springs, one end is fixed to the frame, the axle is connected to the spring about in the middle and the shackle is connected to the spring at the other end. So every 1" of change at the shackle, make 1/2" of change at the axle and 0" change at the fixed hanger. And since it is frame to axle separation that defines suspension lift, you only see about 1/2 of the additional shackle length in the form of suspension lift. If in doubt, draw a simple sketch of a triangle with the shackle being the short end. Make one version with a short shackle and one with a long one. See how the axle moves away from the frame as the shackle length changes.
- 5. What's the difference between the wide body and bent side plate shackles?
- The basic difference is the wide body shackle maintains the width of the widest bushing and uses two long bolts, while the bent side plate tries to duplicate the stock shackle design and configuration. Wide body shackles work well in the front, where they provide enough clearance to avoid hitting the frame under compression. For applications where clearance is not an issue the bent side plates are fine.
- 6. Don't other companies make spring shackles?
- Sure, many do and often for less money, too. If they have what you need, length and design wise, then by all means get the lower cost shackle. Although do your research, too often inexpensive shackles will use SAE style hardware that won't fit the metric bushings used on standard Toyota leaf springs. If you do get a set of these shackles, I can supply bushings to fit them. Also, if you are looking at an unbraced shackle design, be aware of the problem of having the nuts back off the shackle bolts. Make sure the shackle has a design feature to prevent this from happening.
- 7. Greaseable shackle bolts?
-
Here's a link to a potential source for greaseable bolts.
- Greaseable bolts are "gun-drilled" from the head end to the middle, then cross-drilled to allow the grease to exit the bolt. The bolt head is tapped for a 1/4-28 thread zerk.
- This allows the zerk to be replaced with a 1/4-28 screw for use on the trail, preventing the problem of a rock or log scraping the zerk off the shackle bolt.
- A couple of things to consider with greaseable bolts:
- 1. You need to replace stock rubber bushings with polyurethane, since petroleum-based grease will attack rubber. Also note that with stock rubber bushings, grease is really not needed anyway. The carbon black in rubber helps to lubricate the bolt and often rubber bushings have steel sleeves bonded inside and there is thus no sliding contact that needs grease anyway. Simple rule of thumb: poly=grease, rubber=no grease.
- 2. For maximum effectiveness, the bushings should not have a steel sleeve installed, since the idea of the greaseable bolt is to get grease in between the bolt and the bushing. If a sleeve is present then the grease can't get out of the sleeve.
- 3. For example, on Toyota bushings, the sleeves have an ID of 14mm and an OD of 18mm and in the poly bushings, the sleeve is easily removable. So, if you want a greaseable bolt in a normally sleeved bushing, simply order the poly replacement bushing, omit the sleeve when installing it and specify that the bolt for the shackle be made in 18mm instead of the stock 14mm size.
- Greaseable bolts are "gun-drilled" from the head end to the middle, then cross-drilled to allow the grease to exit the bolt. The bolt head is tapped for a 1/4-28 thread zerk.
- 8. What problems might I run into with a shackle lift?
-
The biggest issue with adding a shackle lift is that you are working
with a triangle. One side is the frame, the 2nd side is the spring and
the 3rd side is the shackle. The frame stays the same and if the
shackle gets longer, the angle of the spring must therefore tilt. The
axle is attached to the spring and it therefore tilts and since the
differential is attached to the axle, it too tilts, changing the angle
of the pinion flange. On typical Toyota spring lengths (i.e..
48"), you can figure about 1° tilt for each extra inch of
shackle, more or less. So, adding a 3" longer shackle can tilt the
pinion flange of the differential up 3° in back or down 3° in
front. But it is hard to give exact figures, best to measure the
angles and then correct
the difference. It is hard to give exact formulas or advice
here, as adding a longer shackle, while changing the pinion flange
angle, also raises the height of the rear pinion (drops the front one),
which in turn lessens (increases) the angle of the driveshaft.
Depending on the style of driveshaft you are running all these changes
may either be good or bad. You may even need
to add shims under the springs to correct the angles.
- Also, while a longer shackle will give your vehicle some lift, it won't make up for an overloaded leaf spring. That is it won't increase the spring rate, so if the springs were sagging because of too much load, they will still be sagging after installing a longer shackle. The only difference is they will be sagging "higher" than before. Also a longer shackle can allow for more negative arch under compression, unless a taller bump stop is used. As such this can contribute to fatiguing a marginal spring pack faster than normal.
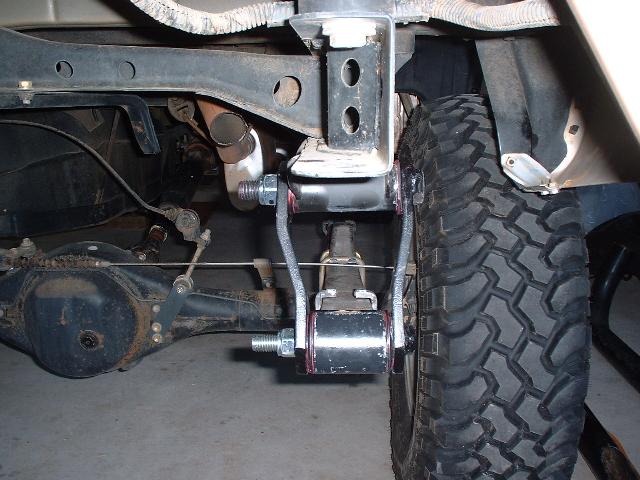
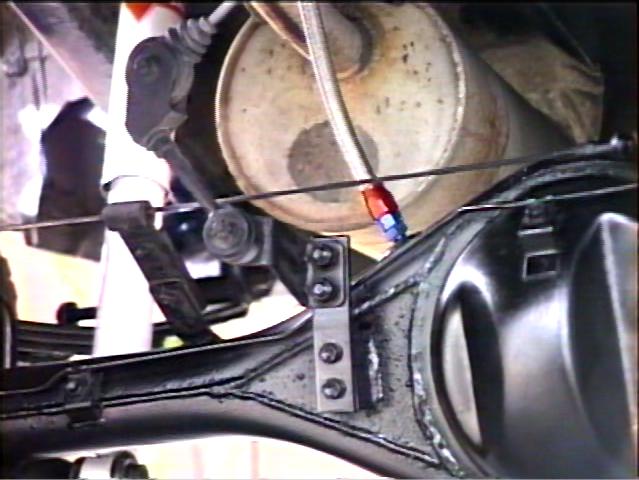
- Finally, on many 4x4 vehicles, like Toyota, the rear axle has a "Load Sensing Proportioning Valve" (LSPV) that attaches to the rear axle to sense the ride height and by inference, the load or weight on the rear axle. It uses this "Load Sense" to adjust the front-rear brake pressure "proportioning" to keep the brakes balanced. With a rear axle shackle lift, for each inch of lift, you'll want to adjust the LSPV upward 1" to compensate for the lift. If not done, the LSPV "thinks" there is less load in the rear of the truck and it reduces the rear brake pressure. A relocating bracket is available for Toyota trucks, or you can make your own.
- Also, while a longer shackle will give your vehicle some lift, it won't make up for an overloaded leaf spring. That is it won't increase the spring rate, so if the springs were sagging because of too much load, they will still be sagging after installing a longer shackle. The only difference is they will be sagging "higher" than before. Also a longer shackle can allow for more negative arch under compression, unless a taller bump stop is used. As such this can contribute to fatiguing a marginal spring pack faster than normal.
- 9. What vehicles do you make shackles for?
-
Currently we have shackle designs for the following vehicles:
- - Front spring shackles for Toyota 4WD pickups and 4Runners, 1979-1985 (and solid axle swap applications)
- - Rear spring shackles for Toyota 2WD/4WD pickups (1979-1995) and 4Runners 1984-1989
- - Rear spring shackles for Toyota 2WD/4WD T100 pickups
- - Rear spring shackles for Toyota Tacoma pickups (1995.5 to 2004 only, 2005+ models apparently use a tension shackle)
- - Mistubishi Montero/Dodge Raider (Gen 1 models w/ rear leaf springs) and Mitsubishi Mighty Max and Dodge D50 pickups
- - Front spring shackles for Toyota 4WD pickups and 4Runners, 1979-1985 (and solid axle swap applications)
- 10. What about shackles for other applications?
-
If you can provide us the dimensions of the shackles, we can take a
look at the specifications and give you an estimate. What 4Crawler
Offroad will need to know are the following:
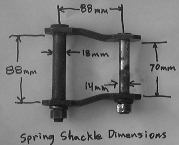
- The length, center to center on the stock shackle bolts (dimension A).
- The inner width of the top (dimension B) and bottom (dimension C) of the stock shackle.
-
The diameters of the shackle bolts, i.e. the ID of the bushings in the
spring eye (dimension E) and shackle hanger (dimension D)
- Note, these dimensions may be different than the size of the nut on the end of the bolt in the case of a shouldered shackle pin or bolt.
- See image below for a typical spring shackle and an illustration of the sort of data that is needed. Note the use of metric dimensions, since it was an import (Toyota pickup) shackle, but 4Crawler Offroad is perfectly capable to work with imperial units as well (in fact, its best to use imperial units when measuring domestic shackles):
- And for example, the leaf-sprung Mitsubishi vehicles use the same size and design shackle as Toyota. So, many Mitsubishi Montero, Pajero, or Dodge Raider or D50 pickup would be included (coil-sprung vehicles excluded). The table below has some typical shackle dimensions for various vehicles that 4Crawler Offroad has specifications for:
Years Vehicle Position A B C D E Sleeve** '79-'85 Toyota Hilux Pickup Front 88mm 122mm 70mm 18mm 18mm No '84-'85 Toyota 4Runner Front 88mm 122mm 70mm 18mm 18mm No '79-'88 Toyota Pickup Hilux Rear 88mm 70mm 70mm 18mm 18mm No '84-'89 Toyota 4Runner Rear 88mm 70mm 70mm 18mm 18mm No '89-'95 *** Toyota Pickup/Hilux Rear 88mm 88mm 70mm 18mm 14mm Yes '95.5-'04 Toyota Tacoma Rear 88mm 102mm* 70mm 18mm 14mm Yes '-' Toyota T100 Rear 113mm 98mm 70mm 18mm 18mm No '-' Mitsubishi Montero, Gen1 Rear 75mm 100mm 75mm 18mm**** 18mm**** No? '-' Mits MityMax, Dodge D50 Rear 75mm 100mm 75mm 16mm**** 16mm**** No? '-' Mazda B-series 2WD Pickup Rear 88mm 88mm 70mm 18mm 18mm No - (*) Offset side plates, ~12mm on the outside and ~20mm on the inside plate
- (**) Bushings with sleeves from the factory
-
(***)
Some later model 2WD pickups will use a 30mm outer/18mm inner diameter spring eye bushing at the rear
of the spring and an 18mm dia. bolt or pin. If you have this arrangement, please let us know when ordering
so that we can build shackles to match.
-
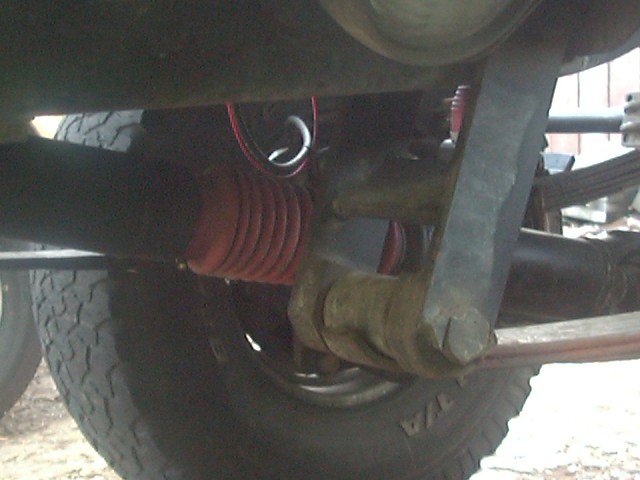
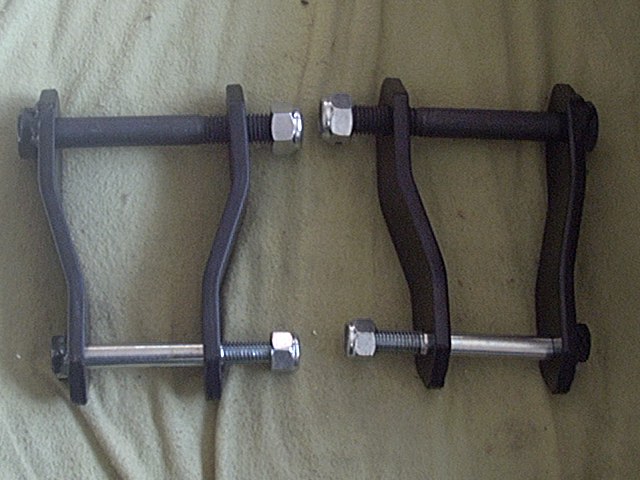
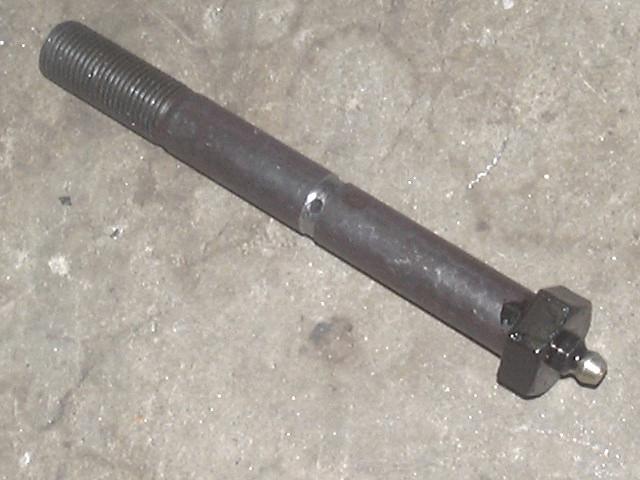
Some T-100 models may use 18mm lower pins stepped down to a 14mm threaded end instead
of 14mm pins with 18mm sleeves, so be sure to check which you have. You can't tell just by the size of the nuts,
as both the stepped down 18mm and the 14mm pins will both have 19mm wrench size nuts, see the above photo.
You may need to remove the nuts and side plate in order to look at the diameter of the pin where it fits in the bushing.
With the stepped down or shouldered bolt, you'll see the bolt with the machined shoulder inside the bushing.
With the bolt + sleeve version, you'll see the sleeve on the outside with the bolt in the middle.
before ordering.
- There also seems to be 2 styles of shackle hanger, one is the standard below the frame type and the other is a through the frame type, let us know which style you have.
-
Thus there are 3 options on the T-100:
- 1. 18mm bolts top and bottom if you know you have 18mm bolts in the spring eye.
- 2. 18mm top and 14mm bottom if you have a sleeved bushing in the spring eye with a 14mm bolt like our poly bushing option.
- 3. If you don't know which you have and want to cover all the bases, specify 14mm bottom bolts and add a pair of 18mm sleeves ($15.00 for the pair) and then you can for with all spring eye bushing combinations.
- We can make the shackles for sleeved or unsleeved pins and can supply sleeves in cases where it's desired to replace a stepped down pins with sleeved bolts.
-
Some T-100 models may use 18mm lower pins stepped down to a 14mm threaded end instead
of 14mm pins with 18mm sleeves, so be sure to check which you have. You can't tell just by the size of the nuts,
as both the stepped down 18mm and the 14mm pins will both have 19mm wrench size nuts, see the above photo.
You may need to remove the nuts and side plate in order to look at the diameter of the pin where it fits in the bushing.
With the stepped down or shouldered bolt, you'll see the bolt with the machined shoulder inside the bushing.
With the bolt + sleeve version, you'll see the sleeve on the outside with the bolt in the middle.
before ordering.
-
(****) May also be 16mm, so best to measure before ordering.
- Usually the 1st gen Monteros use 18mm top and bottom bolts
- The pickup models often use 16mm bolts, best to check what is on your vehicle prior to ordering. Don't just go by the threaded end, shackle pins are ofter stepped down to have a smaller threaded section than the rest of the shank.
- On the Mazda B-series pickups, 1 inch over stock length is a good fix for trucks with lowering springs that are longer than stock. This helps prevent the shackle from inverting up onto the frame. A stock length Toyota T-100 shackle is this dimension.
-
The Toyota shackle pins/bolts will typically have am M14-1.25 thread on
the ends, regardless of bolt diameter.
- That is the 18mm bolts will have a shoulder and smaller diameter on the end that sticks though the inner shackle plate.
-
Also, 4WD Toyota shackle dimensions shown above, but the same vehicle
w/ 2WD will typically have the same sizes, but best to check.
- If different, supply that information along with the shackle order
- For example, some of the 1-ton 2WD pickups use 40mm bushings on both end of the shackle and 14mm bolts.
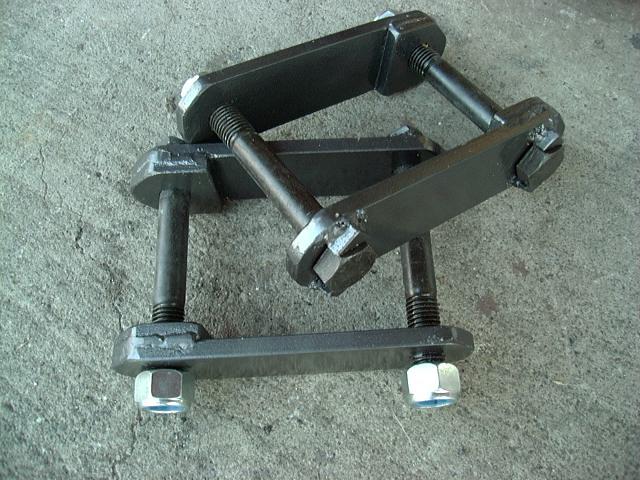
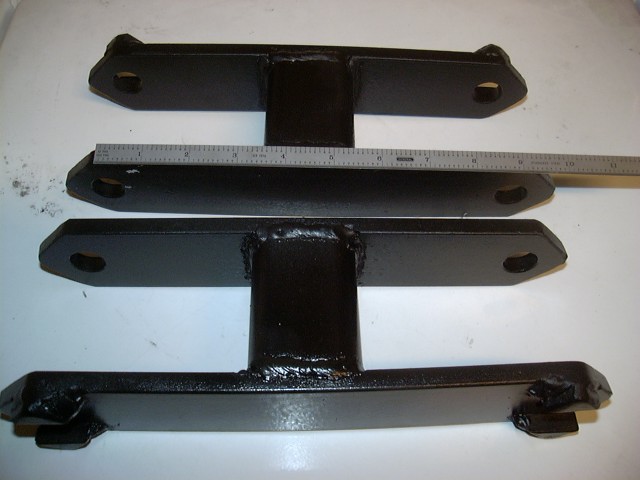
- 11. Braced vs. unbraced, what's the difference?
-
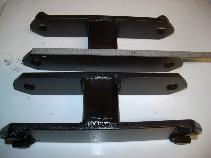
- Pictured above are examples of unbraced and braced shackles. In the braced version, a steel support is welded in between the two side plates to reinforce them. Generally, we find that for more than 2" longer than stock up front and more than 3" longer than stock in back, a braced shackle is a bit more stable on the road. Unbraced has the advantage of increased flex in the springs, since the two side plates can move independently as the spring compress and extend. Your choice, the bracing adds $15 to the cost of the shackles. Due to the size of the bracing material, we typically can't add bracing to shackles that are less than 2" longer than stock. And if you want to add additional bolt holes to the shackle, that may affect the ability to brace the shackles. An alternative to a shackle with a welded in brace is to use sleeved bolts. The sleeves are sized to fit inside the shackle bushings and then use a smaller diameter bolt to fit through the sleeve, typically 18mm OD and 14mm ID on Toyota bushings. When the bolt(s) are tightened down fully, the sleeves are trapped between the shackle side plates. That clamping force adds rigidity to the side plates, helping to keep them lined up with each other.
- 12. Are there any drawbacks to using a longer spring shackle?
- Changing the spring shackle length will change the angle of the springs and anything attached to them such as the axle. One end of the spring is attached to the frame, the other end is attached to the shackle. A triangle is formed by the leaf spring, the shackle and the section of frame between the front and rear attachment points. Since the spring and frame are fixed in length, changing the shackle length will change the angle between the spring and frame. By how much? It depends on the length of the spring and the length of the shackle. Simple trigonometry will give you the answer, divide the added shackle length by the spring length and take the inverse sine function. For example, on a 48" long spring and a 1" longer shackle, the approx. angle change is 1.2°, a 3" longer shackle on the same spring would make a 3.6° change. What this means is that your pinion angle will also change by the same angle. Whether that is an issue depends on what type of driveshaft setup you have and where the angles are currently. I have a full discussion of the ramifications of pinion angle changes on the Driveshaft-101 page. Information on leaf spring degree shims may be found on the 4Crawler Offroad shim page.
- 13. How long does it take to make a set of shackles?
-
All shackles are built to order. Typically allow 1-2 weeks for
fabrication, depending on order backlog and material availability.
Allow a few extra days for greaseable bolts. Once ready to ship, a
tracking number for the shipment will be sent via e-mail.
After 25 years in operation, it's time to close up shop and move on to other adventures. Thanks to all the loyal customers over the years that helped to make this all possible. The web site will remain live. If you have any Toyota or 4x4 related questions, feel free to drop me an e-mail and I'll try to answer.
- 14. Lift options: Shackles, blocks, add-a-leaves, or new springs? What is best for me?
-
All the above options will provide a suspension lift (blocks assume a
spring over axle setup). There are benefits and drawbacks to all the
above lift options.
- Lift blocks are probably the least expensive lift option (again in a spring over axle setup). However, there can be hidden costs with lift bolts, like a new set of u-bolts. Also lift blocks can also lead to increased axle wrap/wheel hop under hard acceleration. Consider a lift block as a "passive" form of lift. You get the added height but no increase in wheel travel or load capacity on the lifted axle. If you are otherwise happy with the current springs and just need a little more height to level a vehicle, then a block is a good option. Note that "lift blocks" only apply to "spring-over-axle (SOA)" suspensions. That is the spring sits atop the axle and thus a block between the axle and the spring would add to the ride height of the vehicle. In a spring-under-axle setup, a block would actually lower the ride height of the vehicle. If considering a lift block, be sure to factor in the cost of new u-bolts, which may be required, depending on the amount of exposed thread on the existing u-bolts. In a coil spring suspension, the equivalent of a "lift block" would be a coil spring spacer. In a torsion bar suspension, an equivalent of a lift block would be something like a "dropped spindle" or a ball joint spacer.
- Spring shackles can provide lift with increase wheel travel to boot, assuming the rest of the suspension will allow that to happen. Down sides are the change in pinion angle that can be corrected with shims. If you are otherwise happy with the current springs and just need a little more height to level a vehicle, then a longer spring shackle is a good option. Spring shackle "lifts" only apply to vehicles with "compression" shackles, that is where the leaf spring pushes up on the spring shackle that in turn pushes up on the frame to support the weight of the vehicle. The other type of spring shackle setup is a tension shackle where spring pulls up on the shackle that in turn pulls up on the frame to support the weight of the vehicle. In a tension shackle setup, a longer shackle actually reduces the vehicle's ride height. A spring shackle lift is a good option when looking for an inch or maybe 2 inches of lift.
- Add-a-leaf springs are a good option to consider if you need to increase the load capacity on a given axle. A good option on the Toyota springs is the Rancho Soft-Ride-AAL kit which has 2 pair of leaves (one long thin pair and one shorter thicker pair) that you can mix-n-match with your existing leaves to make up the ride height and quality you are looking for. With an AAL, avoid kits with just a single pair of short thick leaves, they can damage the existing springs where they rest on the end of the heavy AAL. With an AAL, consider 1"-2" lift about all you will reasonably get. The ride may be a little bit stiffer than before, but if you carry heavy loads frequently, then this is a decent low cost option. And for add-a-leaves, another option to consider is finding some used springs from a vehicle with a similar with and length of spring pack as you have. Might find those at a 4WD shop that installs suspension lifts or a junkyard or you might have a buddy that recently installed a lift. Simply measure your spring width and an approximate length of leaf that would fit your spring pack, forward and back from the center pin location, and start digging through the pile of used springs. Basically you just need a leaf that will fit into your current spring pack and be a little shorter than the leaf on top of it and a little longer than the leaf below it (if there is one). The AAL will generally go between the overload leaf (that is on the bottom) and the first regular thickness (or load) leaf on the spring pack.
- Helper Springs are like the add a leaf spring but often take the form of a coil spring that "helps" the leaf spring carry the load on it. Some are in the form of air-filled shocks that you can adjust the pressure inside to adjust the "spring rate". Others are air bags that sit between the spring and frame to add lift. Others are like small coil springs installed over the shock absorbers. The final type is a coil spring installed between the leaf springs and the frame; here is a write-up on that option.
- Lift springs are of course the best option in terms of performance, but likely the most expensive option as well. There are a wide variety of off-the-shelf lift spring options as well as a wide variety of custom spring mfgs. to consider. With custom springs, best to get your vehicle weighed (each axle separately) and then provide that weight as well as the lift and load requirements to the spring mfg. in order to get exactly what you need.
- So which option is best for you? Depends on your needs and your budget. Also, you may find a combination of several lift options may work for you. For example, if you are looking for 3" of lift, you might try to put on an Add-A-Leaf kit which might net you 2" of lift, then if you need say an inch more lift, add a 2" longer than stock (~1" lift) shackle on the spring. Or you could use a lift spring to get the bulk of the lift and then add a longer shackle to pick up any extra lift height you need or you may find the lift spring needs a longer spring shackle to handle it's added length. Trying to get more than an inch or two of lift from shackles alone is probably not a good idea.
- Lift blocks are probably the least expensive lift option (again in a spring over axle setup). However, there can be hidden costs with lift bolts, like a new set of u-bolts. Also lift blocks can also lead to increased axle wrap/wheel hop under hard acceleration. Consider a lift block as a "passive" form of lift. You get the added height but no increase in wheel travel or load capacity on the lifted axle. If you are otherwise happy with the current springs and just need a little more height to level a vehicle, then a block is a good option. Note that "lift blocks" only apply to "spring-over-axle (SOA)" suspensions. That is the spring sits atop the axle and thus a block between the axle and the spring would add to the ride height of the vehicle. In a spring-under-axle setup, a block would actually lower the ride height of the vehicle. If considering a lift block, be sure to factor in the cost of new u-bolts, which may be required, depending on the amount of exposed thread on the existing u-bolts. In a coil spring suspension, the equivalent of a "lift block" would be a coil spring spacer. In a torsion bar suspension, an equivalent of a lift block would be something like a "dropped spindle" or a ball joint spacer.
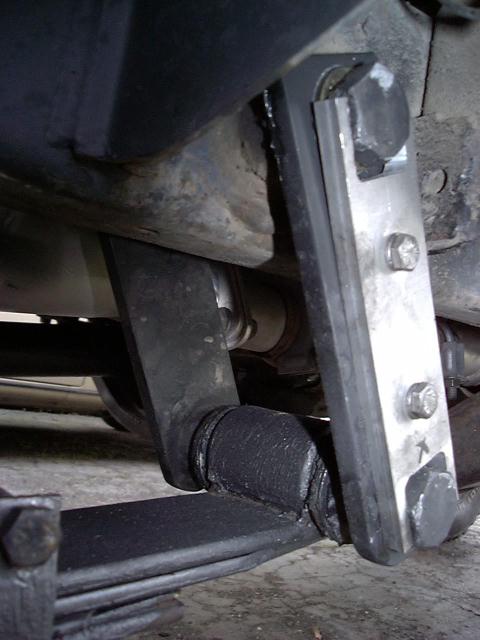
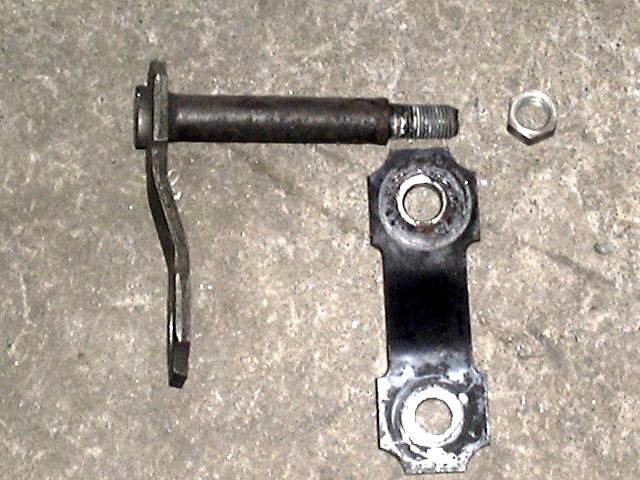
- 15. Can I re-use my factory shackle hardware with the new shackle side plates?
- Typically not. Many stock spring shackles are built with thin side plates and the "pins" are pressed or welded into one side plate. The pins are typically not a proper bolt as they lack a hex head and often have a stepped down shoulder and smaller nut on the other end. And since the 4Crawler shackle side plates are made from 3/8" thick steel, the added thickness likely makes the stock hardware too short to fit. Here is a photo of a typical Toyota shackle pin and side plate to illustrate the above.
- 16. What shackle and spring bushings do I need for my vehicle?
-
Different years of Toyota mini trucks used different sized bushings
(30mm or 40mm OD and narrow or wide) and also these varied by which
spring (F=Front Spring, R=Rear spring) as follows:
Application F/Front Eye F/Rear Eye F/Hanger R/Front Eye R/Rear Eye R/Hanger '79-'83 Pickup 30mm/Narrow 30mm/Narrow 30mm/Wide 30mm/Narrow 30mm/Narrow 30mm/Narrow '84-'85 Pickup/4Runner 30mm/Narrow 30mm/Narrow 30mm/Wide 40mm/Narrow 30mm/Narrow 30mm/Narrow '86-'88 Pickup n/a n/a n/a 40mm/Narrow 30mm/Narrow 30mm/Narrow '86-'89 4Runner n/a n/a n/a 40mm/Narrow 30mm/Narrow 30mm/Narrow '89-'95 Pickup/4WD n/a n/a n/a 40mm/Narrow 40mm/Narrow 30mm/Wide '89-'95 Pickup/2WD * n/a n/a n/a 30mm/Narrow 30mm/Narrow 30mm/Wide '95.5-2004 Tacoma n/a n/a n/a 40mm/Narrow 40mm/Narrow 30mm/Wide T-100 ** n/a n/a n/a 30mm or 36mm/narrow 30mm or 36mm/Narrow 30mm/Wide - (*) On some later model 2WD pickups, the rear spring hanger will be a 30mm inner diameter. Easy way to check is to compare the dia. of the shackle hanger bushing under the frame to that of the spring eye. If both are the same 30mm dia., then you need the 30mm/narrow bushing instead of the 40mm/narrow size.
- (***) On the T-100 bushings, best option is to check the dimensions of your existing bushings before ordering bushings. The T-100s seem to use a variety of bushing sizes. We can supply them all, but the sizes are not interchangeable. Also, front and rear spring eye diameters may be different.
- Of course, with a solid axle swap (SAS) on the later model vehicles, the bushings needed for the front springs will depend on what year vehicle the springs came from and whether the front shackle hanger is OEM style (through-the-frame / 30mm/Wide) or under the frame like the rear springs (i.e. 30mm/Narrow). And by all means, if you want to ensure that you order the proper sized bushings for your vehicle and application, feel free to measure the bushing sizes you need on your vehicle. The bushing outer diameter should of course match the inner diameter of the spring eye or shackle hanger (30mm = ~1-3/16" and 40mm = ~1-9/16"). And the width should match the width of the same; narrow means the bushing is just as wide as the spring is wide (~2-3/8" wide). The wide bushings are of course wider than the width of the spring (typically 3/4" to 1-1/2" wider). It is possible to use a narrow bushing in a wide shackle hanger either as-is, or by cutting the flange off an old bushing and using that to fill the center of the shackle hanger with a new bushing on either side. The center of the bushings really does not do a whole lot to support the shackle bolt, it is mainly the outer ends of the bushings that do all the work. So if you want to save a little money, use the narrow bushings.
- NOTE: Bushings are sold in pairs, as in two bushings (each 2 halves), enough to do two spring eyes or two shackle hangers, as in one per side of the truck.
- YouTube video on how to measure the spring eye inner diameter
- Aftermarket springs:
- The above table is put together listing what size bushings were used on the factory Toyota leaf springs for a given vehicle year.
- Aftermarket springs may or may not follow the Toyota bushing sizing scheme - some may use a different bushing/sleeve setup:
- OME springs often use sleeves in both the 30mm and 40mm bushings, be sure to check before ordering.
- So it is best to measure the ID and OD of the spring eye bushings you have on your vehicle and go with what will fit them. So, if your spring eyes measure 30mm ID, then you need a 30mm OD bushing to fit inside the spring eye.
- Spring eyes will always be of the narrow variety, as that is what defines the narrowest component in the system.
- The spring hangers will either be the same width as the spring eyes, or they will be wider.
- SuperLift springs tend to use 30mm ID spring eyes and bushings
- OME springs can use a mix of 30mm and 40mm ID spring eyes and bushings, so be sure to check with you need.
- Rancho springs will use a different diameter spring eye bushing that the OEM springs do, and they typically require use of Rancho-specific spring bushings.
- Spring and shackle bushings in all the above sizes are available here.
If all this is too confusing, 4Crawler Offroad would be more than happy to consult with you on your specific application. With a few simple measurements and some basic information, it should be possible to figure out exactly what you need for your application.
- (*) On some later model 2WD pickups, the rear spring hanger will be a 30mm inner diameter. Easy way to check is to compare the dia. of the shackle hanger bushing under the frame to that of the spring eye. If both are the same 30mm dia., then you need the 30mm/narrow bushing instead of the 40mm/narrow size.
- 17. How many shackles are needed?
-
So how many spring shackles are on a vehicle? Generally, assuming a
leaf sprung suspension, you'll have one spring shackle on one end of
each spring on a given axle. So for one axle, you'll typically have one
spring on each side, so 2 springs = 2 shackles or 1 pair of shackles.
If you have 2 leaf-sprung axles, then you have 2 pair of axles and thus
2 pair of shackles.
- A related question; can you put 2 shackles on one spring, as in one shackle on each end of the spring? Generally not, since there would be nothing to locate the axle fore-aft. Normally, the fixed spring eye at one end of the spring provides the axle location front-back and the shackle at the other end lets the spring length changes as it moves up/down.
- In some cases, folks will run a "double-shackle" on a rear spring for increased wheel travel. The idea is that you have two shackles linked end to end. The upper shackle normally stays flat against the bottom of the frame while the lower shackle works normally. Then when the suspension unloads and the axle drops away from the vehicle, the upper shackle can swing down and increase the wheel travel. While this does work in theory, that added wheel travel is basically "unweighted", in that the only weight on that wheel is the weight of the axle, wheel and tire. Since the traction the tire can generate is proportional to the weight it puts onto the ground, the "unweighted" tire will provide little added traction. So while you have several extra inches of wheel travel, if it does you no good, what is the point?
- A related question; can you put 2 shackles on one spring, as in one shackle on each end of the spring? Generally not, since there would be nothing to locate the axle fore-aft. Normally, the fixed spring eye at one end of the spring provides the axle location front-back and the shackle at the other end lets the spring length changes as it moves up/down.
- 18. What options are available for the 2WD B-series Mazda pickups?
-
Longer than stock spring shackles are needed to handle the longer than stock Belltech springs and prevent the shackles
from hitting the frame. One downside is tha added length will result in added lift height. To counter that and
also to re-center the rear wheels in the wheel well arch and restore the original driveshaft length,
an option is a combined 1" lowering / relocation block.
This block fits in between the Belltech spring pack, the spring center bolt fitss into one of the offset
holes and the pin on the other side fits into the spring perch or other lowering block. You may be able to accomplish
the same effect by drilling an offset center bolt hole in your existing lowering blocks.
There's recesses in the block for the head of that bolt at a typical 1" offset
The block then has a 9/16" center pin that fits into the spring perch on your axle.
We've released a 3D CAD model for that part.
- A stock length Toyota T100 shackle is the proper length. You'll need to add spacers on each side of the spring hanger bushing to account for the width difference between the T100 and Mazda shackles. These shackles have shouldered bolts top and bottom like the factory shackles. This helps to provide stable handling with lowered springs.
- Alternately, here's a 3D CAD design for the shackles and optional sleeves so that you can make your own shackles or have a set made for you.
- A stock length Toyota T100 shackle is the proper length. You'll need to add spacers on each side of the spring hanger bushing to account for the width difference between the T100 and Mazda shackles. These shackles have shouldered bolts top and bottom like the factory shackles. This helps to provide stable handling with lowered springs.

[Return to the top of this page]
Installation Instructions:
- Safety Notice
- Shackle Installation
- LSPV Bracket Installation
- Heat Shrink Tubing Installation
- Spring/shackle bushing replacement
Safety First! Before you undertake any suspension modifications, remember that such mods may change your vehicle's handling characteristics and stability. Raising your vehicle's center of gravity with extended shackles, body lifts, etc., may increase the likelihood of a rollover, especially at high speed or on uneven terrain. Hence, all 4Crawler Offroad products are designed and intended for off-road use only. It is entirely your responsibility to determine the fitness and suitability of this 4Crawler Offroad product for your application. 4Crawler Offroad will accept no responsibility for any unsafe condition, damage or personal injury arising from your use of this product. 4Crawler Offroad products should only be installed by those knowledgeable and experienced with leaf sprung suspensions. Your safety depends on it!
TOOLS NEEDED: You'll need a floor jack, jack stands, wheel chocks, an assortment of wrenches/sockets as need to remove the old and install the new shackles (M18 bolts need a 27mm (1-1/16") wrench), rubber mallet and some good graphite-loaded wheel bearing or silicone grease.
- Park your vehicle on a hard, flat surface and apply the parking brake. Chock both sides of rear tires if you're working on the front or chock front tires if you're working on the rear. Be sure the vehicle can't roll.
- Use floor jack under the axle to lift working end until both tires are 3-to-4 inches off the ground. It is not necessary to remove wheels and tires. Place jack stands under frame rails, close to the spring hangers you'll be working on. Lower vehicle onto jack stands, but leave floor jack under axle. You'll use it to raise and lower axle during shackle installation. Make sure jack stands holds the vehicle securely.
- Be sure axle is again supported by floor jack. Un-bolt and remove old shackle bolts and shackles. Slowly release floor jack pressure until tires rest on the ground.
- Inspect shackle mounting places, including perches, frame mounts and bushings, for excessive wear or damage. Damaged or worn parts must be replaced with new ones or repaired to as-new condition before the shackles are installed.
- Install shackles into upper mounts, probably easiest to install the bolt from the outside, placing the nut on the inside. Apply nuts, but do not tighten all the way yet. The shackle plate with the anti-rotation tabs should ideally be on the same side as the head of the bolt, but it can be placed on the side with the nut if desired. The bolts can also be installed from the inside direction if that's more convenient. The shackles come with extra long bolts, in order to have as much unthreaded shank inside the bushings. If needed, excess thread can be cut off if that makes it easier to install the shackle bolts.
- Use floor jack to raise axle until spring eyes and bushings fit into shackles and insert the bolts. You may want to apply grease to bolts to ease installation and reduce squeaking from poly bushings. Do not grease bolts if using rubber bushings, the petroleum base of the grease will attack and destroy the rubber bushings, so if you want to lubricate the rubber bushings, use a silicone-based lubricant. You may need to tap bolts with a rubber mallet during installation. Do not force a bolt if it catches or there is excessive resistance. Use floor jack to realign holes correctly. Excessive hammering can ruin bushings and deform shackles.
-
Tighten nuts on the shackle bolts.
- If using a plain bolt and lock nut, do not over tighten nuts until bushings bulge or shackles bend. Over tightening can "freeze" your suspension and prevent it from cycling properly. The ideal tightness with polyurethane shackle bushings is to just tighten the nut until the bushings just start to compress. With the locking tabs on our shackles, the bolt will not move and with the nylon locking ring on the lock nut, the nut will not move, so you don't have to use a specific torque on the shackle bolts, just tighten until you see the bushings just start to compress and that is enough.
- If using a sleeved bushing or a factory-style shouldered bolt, then you can use the Factory torque specification of 67 ft.lbs. of torque on the bolt and nut, as the sleeve or shoulder on the factory shackle pin prevents the bushing from being over-compressed.
- Recheck all fasteners for proper tightness and inspect periodically for tightness.
-
For Toyota pickups, 4Runners and Tacomas, the
Load Sensing Proportioning Valve (LSPV) sensing arm should be adjusted
to compensate for the lift achieved. The sensing rod bolts to
the axle and uses ride height to adjust rear brake pressure. If the
LSPV bracket was purchased with the shackles, un-bolt the sensing rod
from the axle, bolt in the LSPV adjusting bracket with the stock bolts.
Then bolt the sensing rod to the top of the bracket with the supplied
bolts. Check for proper brake operation and fine tune the sensing rod
length/height as needed. On some Tacoma models, you may need to add a
few washers to space the LSPV bracket off the axle a bit to clear the
bracket that holds the brake line. Alternaterly you can bend the
bracket back a little after bolting it to the axle then bend the top
forward a similar amount.
- Ideally you want the front brakes to lock up slightly before the rear brakes do. To test this, find a vacant parking lot (wet) or a dirt or gravel road. Drive up to about 15-20 MPH and brake hard to try and lock up the tires. Make sure the front tires lock up first. If the rears lock up too soon, shorten the adjustment on the LSPV sensing rod to lower the arm on the valve. Likewise, if the rear braking is too weak, lengthen the sensing rod to raise the arm on the valve and increase rear braking effort.
- You can use the heat shrink tubing to adapt factory 18mm spring pins to use with the popular "rears up front (RUF)" spring swap and you want to run poly spring bushings. Simply slide the heat shrink tubing onto the spring pin, trim it to length at the shoulder of the factory spring pin (where it steps down from 18mm to 14mm) an then shrink the tubing onto the spring pin. A heat gun will work or put the pins in 255F oven for 10-15 minutes or carefully use a propane torch on a low flame to heat the tubing up. If using a flame, take care not to apply direct flame to the tubing or it may bubble up or catch fire and be ruined. Once applied, you can lube up the spring pin with some silicone grease and install it into the bushing and it'll now fit the 19mm ID of the large poly bushing.
-
For replacing spring/shackle bushings,
follow the above instructions for removing spring shackles, or if
changing the forward spring eye bushing, remove that front
spring hanger bolt. Usually best to also remove the u-bolts holding the
springs to the axle if you find that easier.
-
Factory spring bushings are usually of two types:
- One is a split bushing without a sleeve, to replace these, simply pry each half of the old bushing out of the spring eye or hanger.
-
The second type is usually a one piece bushing with a sleeve bonded
into the center and often a sleeve on the outside of the bushing.
- These bushings are typically pressed into the spring eye and will need to be pressed out.
- Lacking a press, you can often use a small drill and drill a series of holes around the rubber between the inner and outer sleeves. The idea is to remove the center sleeve by cutting it free from the rubber. Then you can try using a SawZall to cut outward from the middle through the outer sleeve in one or two places to loosen it up.
- You can also try using a pry bar at the closing gap of the spring eye to open that up a bit. The idea is to loosen the grip of the spring eye on that pressed in bushing.
- And a final option is to use a hammer drill (that you can set to hammer-only mode) or an air hammer to drive out the old bushing. Use a blunt ended adapter in the drill or hammer and put something heavy behind the spring to push against. Then use the drill or air hammer to drive the bushing out with repeated blows. Note that a regular hand hammer probably won't work for this task as the spring and bushing will have time to "spring" back between hammer blows. But with a hammer drill or air hammer, you are putting in thousands of blows per second and that does not allow the spring or bushing to "spring" back between impacts. One advantage of this technique is that you can do it with the springs still attached to the vehicle. All you need to do is drop the spring eye out of the shackle or hanger far enough to get a straight shot at the bushing.
- The important considerations with replacing these one piece bushings is to be sure you need to replace them and if you need to replace them, figure out how you are going to do so before you order the bushings.
- The replacement poly bushings are of the split variety and easy to insert the replacement bushings, one half from each side.
- With the polyurethane material you can use any sort of lubricant you wish, silicone grease works well, or you can also use something like a graphite loaded wheel bearing grease to help reduce friction and squeaking with the new bushings. Over time, the graphite in the grease will build up on the surface of the bushings and provide lubrication for a longer period of time.
-
Factory spring bushings are usually of two types:
(Contact 4Crawler Offroad if interested in more information on any of these items)
And please be sure to send us a working, valid e-mail address if you want a reply
[Return to the 4Crawler Offroad page... ]Questions? -->
 <-- Comments? email: sales@4Crawler.com
[Last updated: 24.March.2026 ]
Visitor # since 13.AUG.2001