VW Diesel Pickup: Cheap Tricks
Trivia question: Where was Rudolf Diesel buried?
Cheap Tricks
- Here are some Cheap Tricks I've employed on my VW Diesel Pickup (a.k.a. Caddy):
-
Repairs
- Upgrades
- Other Info
- Upgrades
-
REPAIRS:
-
 Shift
Linkage Upgrade
Shift
Linkage Upgrade
-
 Fixing a hard to operate door
handle.
Fixing a hard to operate door
handle.
- Accelerator Pedal Bushing Replacement
-
Light Bulb Socket Repairs
- DIY Exhaust C-clamp Removal Tool
- Strut Bearing tips
- In-dash Clock Repair
- Windshield Washer Pump Repair
- Front Wheel Bearing Replacement
- Frozen parking brake got you stuck?
- Stupid Glow Plug tricks
- Repairing license plate light bulbs
- AnNoYiNg RaTtLes
- Air Conditioning
- CV Joint Overhaul (not my page)
- Fuel Filter Replacement
- Water Pump Replacement
- Clicking (broken) odometer got you stuck on 0.3 mile?
- Door alignment
- If you can't fix it yourself, here are some good VW repair shop recommendations...
-
-
UPGRADES:
- Waste Vegetable Oil Conversion
- Brighter Headlights
- Windshield Wipers:
- Cruise Control Installation
- Cold Air Intake
- Larger/taller tires
- CB Antenna Mounting
-
Add a tachometer to your diesel
- Caddy Rear Suspension Tricks
- A nifty 2" hitch receiver for your step bumper
- Not exactly cheap, but my Caddy Shack is definitely trick!
- Wheel well splash guards
- Polyurethane suspension bushings
- Brighter Backup lights
- Larger Side Mirrors
- Manual radiator fan control
- Custom exhaust
- Smog check (not!)
-
OTHER INFO:
- Jan's VW page has some good fix-it tips as well
- What is this Banana Scale thing anyway?
Return to the main VW Diesel Pickup Page...
![]()
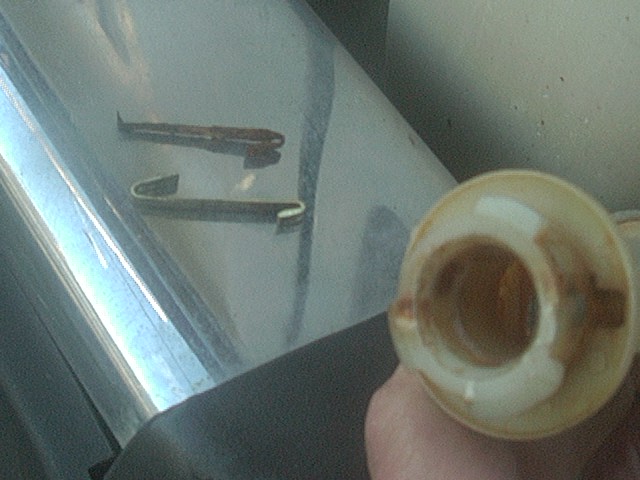
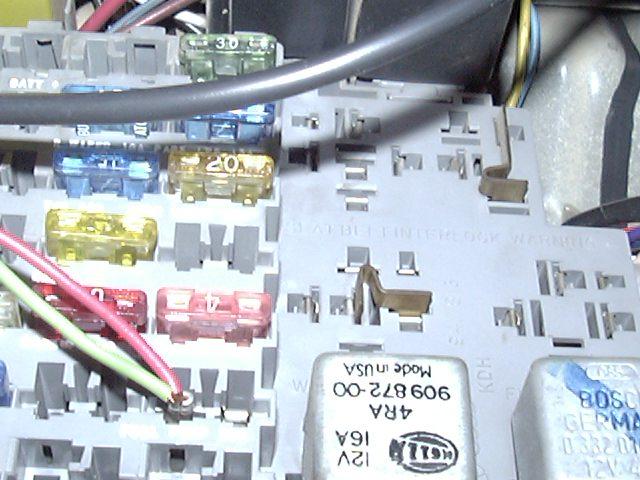
Light Bulb Socket Repairs:
A very common problem in the VW A1 vehicles is bizarre problems with tail lights and turn signals. Commonly you'll find the front turn signals stop working when the headlights are on, or the turn signals in back stop working when the brakes are applied or the brake lights don't work when the headlights are on. It turns out all these problems have a common cause, that is ground connections, or more precisely the lack of a good ground connection. So what is going on? Many of the bulbs in question are 1157 dual filament types. These bulbs have 2 filaments, with a connection on the bottom of the bulb for each and then a shared common connection on the side of the bulb base, typically connected to ground via a strip of metal on the side of the socket. The main problem is that VW seems to favor the use of a nickel plated steel or sometimes aluminum in the sockets. All is fine until that plating is compromised and then the underlying steel rusts or the aluminum oxidizes and suddenly you have no ground connection, at least via the designed path.
Then without a separate ground, the electricity in the bulb will try to find a path to ground via some other means. What seems to happen is that the circuit for the other filament in the bulb may be grounded when it is off. So when only one filament, like the running light, is on, it'll ground through the off brake light filament. Likewise, when the brake light filament is energized, it'll ground through the off running light filament. The problem is when you have the running lights on and hit the brakes. You now have the case where there is 12V on both filements with the common connection floating (i.e. not grounded), and with no voltage difference between the filaments, no current flows and no light comes out. This happened to me a few times, always at night (i.e. headlights on), I would see a brake light out, figure the bulb was shot. replace it the next day (i.e. no headlights on) and viola, it worked. At least until the next time I drove at night.when the brake lights were out again. Similar problem has occured to me with the front turn signals that share a bulb with the front parking lights.
So the rear fix is to find the bad ground connection and restore it to proper function. Below are two fixes I have used with good results:
 |
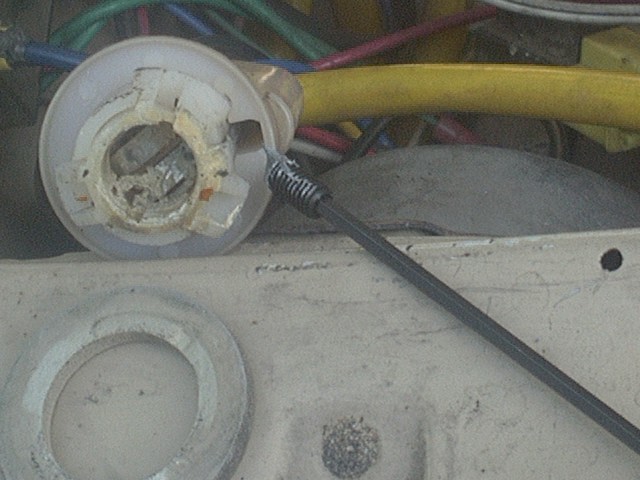 |
| 1. Rear brake light socket fix | 2. Front turn signal socket fix |
So in photo 1 above, I removed the badly corroded ground strip from the side of the socket (shown on top). Then I cut a strip of brass sheet and fashioned a replacement ground strip (the lower piece) and inserted it pack into the slot on the right side of the socket. In photo 2 above, I found that the strip had rusted down inside the socket where the actual ground wire is soldered to it and had popped loose. Not finding an easy way to remove the strip and wire, I instead I squirted a dab of metallic anti-sieze lube down the hole then found an 8mm set screw that I had laying around that fit prefectly into the hole in the side of the socket. I just screwed it in until it bottomed out in the hole, pressing the ground strip against the wire and restoring the connection. Seems to work fine and both the bove fixes are still problem-free after several years of operation.
[return to the top]DIY Exhaust C-clamp Removal Tool:
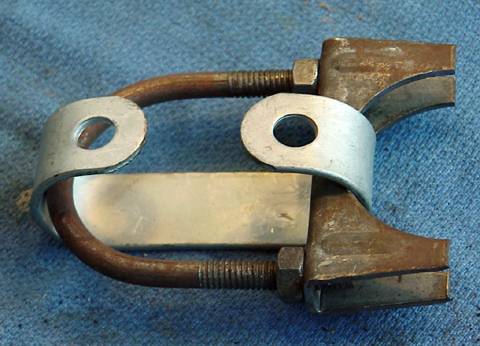
Many of the stock VW exhaust (toilet bowl) manifolds use a pair of spring-loaded C-clips to hold the downpipe to the manifold. Removing these clips to work on the exhaust or engine can be a bear. Usually you can pop them off with a long screwdriver. But then how to get them back on? You can buy the big $$$ specialty tool or make your own for a lot less money. Below are two examples of how:
 |
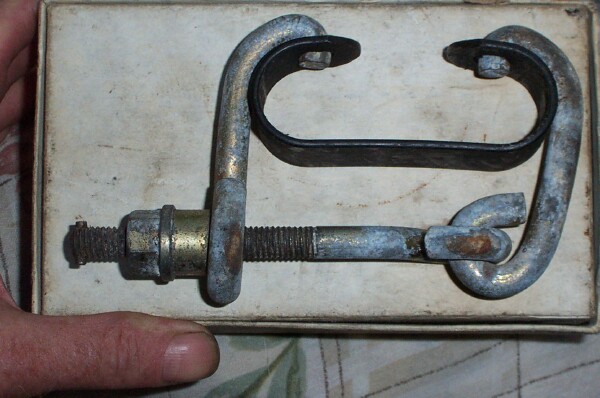 |
| A: An exhaust u-bolt clamp | B: Some bent/welded parts |
- Photo A:
- Shows a simple exhaust u-bolt clamp reversed and used to open the C-clip (a 2-1/2" clamp works well). You alternate from nut to nut turning them outward to open the clamp and turn them inward to install the C-clamp. And for the money, buy two of them, one for each clamp and leave them in place after opening the clip to make installation simple as well.
- Photo B:
- Shows a more elaborate fabricated tool similar to the specialty tool that works with just one nut for easier operation.
[return to the top]
In-dash Clock Repair:
Lewis Grimes submitted this repair:
"I'm lost with out the clock. I've have had to fix the clocks on both my trucks. It was simple. Just pull the instrument cluster pull three bolts at the ashtray, three screws at top of dash panel. You are on your own with the radio both of mine came with the dash panel. You'll also need to reach behind the far left side of the panel to press the release button on the headlight switch, pull the knob out all the way to remove it, then after the panel is free, you can push it back in to turn off the lights. Four bolts, one on the four corners of the cluster, pull the two screws on the panel that hide the fuses and the two screws that holds the panel under the steering wheel then reach up and remove the speedometer cable. Pull the cluster. Both of them the wire in the plastic was broke. We just soldered a wire in with a crimp-on lug and put it back together and they both worked."
This is of course assuming the problem is due to a broken power connection to the clock.
[return to the top]Strut Bearing Tips:
The MacPherson strut front suspension used on the A1 VWs is fairly simple, the strut itself is bolted to the wheel hub and that in turn sits on top of a ball joint, that forms one half of the pivoting mechanism for the steering. The other end of the strut is attached to a strut bearing that is in turn bolted to the top of the strut tower that forms part of the unibody. The strut bearing is a simple ball bearing that is in turn housed in a rubber and metal housing.
Pictured above is an exploded parts layout of the strut bearing. The key to a long lasting and quiet bearing is the highlighted bushing or spacer (#9). It is the part that sets the bearing pre-load and is usually supplied a little bit taller than the bearing is. The spacer can be ground down until the top washer (#10) just makes contact with the top of the bearing race inside the housing. I like to apply a good wheel bearing grease to the top of the race for the washer to rotate on. By keeping the bearing slightly pre-loaded it is less prone to clunking and should last a lot longer since its not getting hammered with every big bump in the road.
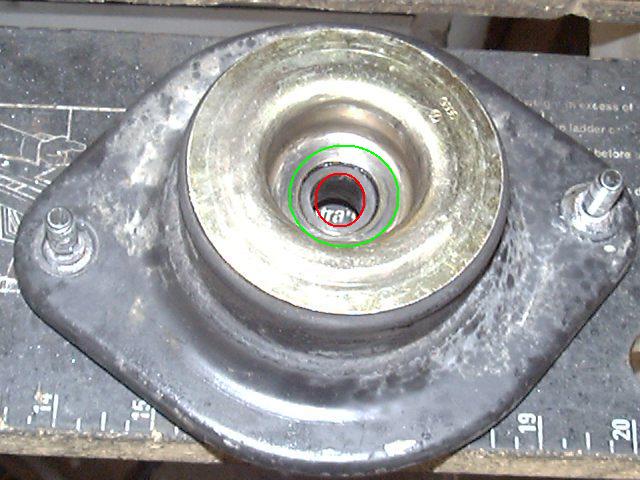 |
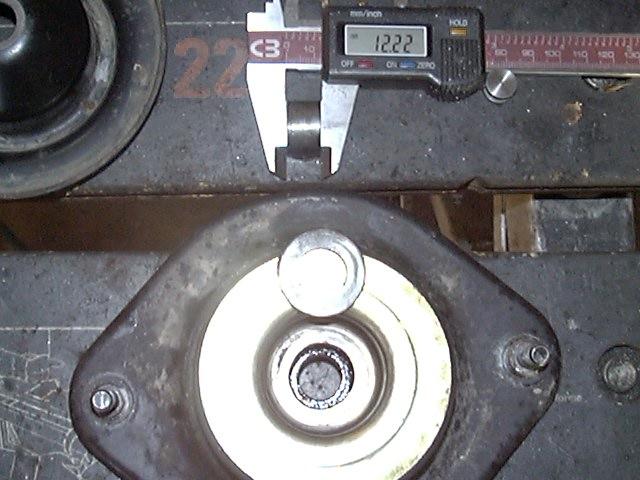 |
| Strut Bearing | Center Bushing Height Check |
Pictured above is a typical late model A1 strut bearing assembly. Note that it is not necessary to remove the bearing to do this modification, it can be done on the vehicle if needed (assuming weight it on the wheels). If you want to remove the strut bearings, you will need a spring compressor to disassemble the strut. In the center of the above-left image, you can see the bushing in the middle. In the above-right image, I use a pair of calipers to check the height of the bushing and compare that to the height of the bearing, itself. Calipers are not needed for this modification either (and your spacer height will likely not be equal to mine; i.e. 12.22mm is not some "magic" number), best test is to just use your finger to feel the height difference between the bushing and the surrounding top of the strut bearing surface. If the bushing is taller, remove it and touch it to the side of a grinding wheel until it sits flush in the bearing. Be careful to avoid grinding too much off the spacer as then you'll have too much pre-load on the bearing and will shorten its life and make steering effort higher. The idea is to make the top of the spacer flush with the top of the bearing, that's all. In the above-left photo, the part with the RED circle needs to be the same height as the part with the GREEN circle (click here or on the small image to see a larger version). All ball bearing assemblies vary somewhat in size/height due to manufacturing tolerances. Thus I suspect the strut bearing manufacturers supply a spacer that is as tall as the tallest possible strut bearing they make. If the bearing in your strut bearings are not as tall as that spacer, it needs to be trimmed to fit. This only needs to be done with new strut bearings or if you have one with excessive play. Once trimmed to the proper height, the spacer and bearing should not need further attention (aside from lubricating the bearing).
And I did not "make this up". I found this very tip mentioned briefly in the installation instructions that came with my new Bilstein HD A1 strut inserts. I recall it was only a one-line mention in the instructions, but I tried it and found that it worked very well. In fact, I am still running those same struts and bearings that were installed back in 1998 or so. Still going strong, bearings are still nice and tight with no knocking over bumps.
Also, if replacing the strut inserts, you should back filll the strut housing with a bit of engine oil, ATF or even anti-freeze. It nly takes a few ounces to fill the air gap around the strut insert, but the liquid will increase the heat transfer rate out of the strut insert to the steel body of the strut housing. Without backfilling, the dead air space effectively insulates the strut, which will tend to build up heat as it damps out road vibrations. I once "cooked" a set of struts on one long road trip that had a few hundred miles of rough dirt and gravel roads because they were not installed with the oil fill.
[return to the top]Windshield Wiper Upgrade:
One thing I missed from my old '81 LX pickup was the variable speed/intermittent wipers. My base model '82 had exactly one speed, SSLLOOWW :-(. I had heard that it was possible to swap out the wiper switch for the variable speed version. Anyway, one day I was poking around behind the steering wheel and found that the switch had the positions for the extra features, it was just blocked off with a plastic plug.
 |
 |
| Wiper Switch mod | Wiper Relay Mod |
In the above left image, you can see the screwdriver blade in the place where the white plastic pug used to be. While it was apart, I cleaned the grease and dirt out of the contacts. So, I put everything back together and tried out the wipers, same old single speed operation :-(. So, I figured I may have a single speed relay or something, so I located the relay, or should I say the relay socket. Instead of a relay all I found was a brass jumper, see image above-right. So I fired up the old ETKA parts program and went through a list of used relays I had just purchased. Sure enough one was VW #321-955-531A (updated/superceeded p/n is 171-959-143A), an intermittent wiper relay. Yanked out the jumper, pushed in the relay, and bingo, low and high speed plus intermittent operation!
[return to the top]Cold Air Intake:
Frequent any of the numerous car web forums and "air box" or "cold air intake" mods are all the rage. I always wondered about the location of the VW diesel air intake tube. It is directed to the side of the engine bay and sort of away from heat sources, but it still gets darn hot under the hood. I noticed a significant power drop in hotter weather, especially off the line. My old '81 truck had factory A/C which totally filled the front of the grill, I had plans to make an intake vent around the passenger headlight, but never got past the planning stage.

My '82 pickup has no A/C and there is a nice plastic baffle that fills in between the end of the radiator and the sheet metal of the core support. I picked up 4 - 45° ABS plastic elbows and a short length of 2" ABS. I bit of filing got the elbow to fit over the stock intake tube, a 2" hole cut in the front baffle allowed the end (with an elbow facing downwards) to project into the cool air out in front of the vehicle. The elbows were glued together and a single screw holds the new tube to the existing tube.
It seems to do the trick, I notice a lot less power loss in hot weather and the engine seems to run a bit easier on the highway. Probably getting a small amount of ram air effect. A fairly simple and inexpensive modification, under $8 for all the parts. And as an added benefit, moving the air intake out front resulted in a noticable decrease in the intake noise.
[return to the top]Windshield Washer Pump Repair:
When I first got my '82 Caddy, I noticed the windshield washers didn't work. Finally after about a year of no washers, I started investigating the problem. I had power to the connector, I removed the tank, cleaned out the gunk in it and still no washers. I then reached inside the tank and slipped the star washer off the inside of the pump and gently popped it out of the tank. I took the part down to VW and found out the only part they have is the entire tank assembly, for $50. My tank was fine, so I figured I didn't have anything to lose by tearing the pump apart for a look.
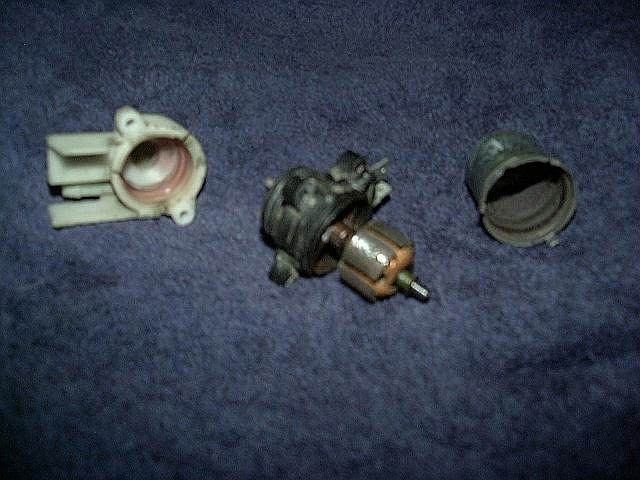
I tried applying 12V to the pump, but nothing happened. I checked the resistance and found it open. This was a bad sign, could be a fried coil, but I proceeded anyway. I pried open the 3 metal tabs that held the motor cover on and pulled it off. Rust was everywhere inside, preventing the rotor from turning. I then carefully pulled the pump housing off. Everything looked good there, cleaned out a bit of crud. So back to the motor. I cleaned up the rotor with some abrasive pads then filled the housing with some CLR and let it sit. That dissolved the rust and I cleaned it out and let it dry. A shot of oil in the end bushing and put the rotor back in place. Gave it a shot of power and it spun back to life. I applied some silicone sealant to the housing, crimped it back in place, put the pump back into the reservoir, pu the star washer on to hold it in place. Filling the tank with fresh washer fluid and viola, at least one washer worked. The other needed a bit of work with a small pin to unclog it then all was fine.
This was a fairly easy fix, no special tool, about and hour of actual work, so don't throw that old washer pump away, fix it!
- UPDATE:
- Unfortunately, I found that the pump had an internal leak, probably around the impeller shaft, that would allow the washer fluid to leak out in a few days. So, looks like a new pump/tank assembly is in order.
Larger/Taller Tires:
When I first got my old '81 VW Caddy, it had 175-70R13 tires on the stock 13x4.5 steel rims. I later had a set of 155-80R13 installed, then another set of 175-70R13s. All were about the same diameter, ~22.5" tall. I figured something taller would fit, so when I wore out the 175-70s, I wanted to get 175-80s, but had to settle for 165-80R13, which run about 23.5" tall. I ended up with a Kumho All Season radial tire and so far they have worked out fine. I later moved them to my '82 Caddy and run them on stock 13x5 alloy wheels.

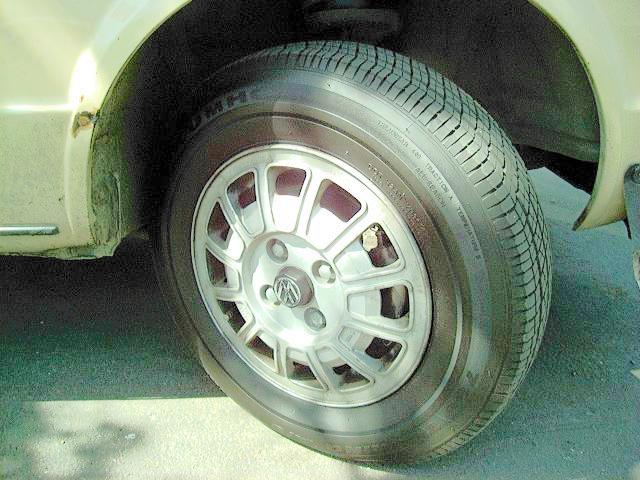

With my FF transmission, I found about a 130 RPM drop at 65 MPH on the highway, with little loss in acceleration. Later, with my '82 which has an FN transmission, I see a 300 RPM drop at 65. I still have decent clearance in the wheel well and I think even a 185-80R13 would fit, which is about 1.25" taller.
I'm now running a set of 185-70R13 Yokohama Avid Touring tires. About the same height and an inch wider than the Kumhos and they have a much stiffer sidewall for better cornering. This tire is about 5% taller than the stock 165-70R13 tires.
- IMPORTANT:
- Realize taller tires may affect the speedometer and odometer readings, typically making the actual speed and distance traveled greater than indicated.Use this handy on-line calculator to determine the amount of change.
CB Antenna Mounting:
I'm no CB radio nut or anything, but I was digging through my garage one day and found the following:
-
AM/FM/Cassette/CB radio
- Sound Barrier Model 1040SD
- 70 watt audio w/ removable face plate
- A power AM/FM antenna
- A 48" fiberglass CB antenna
- 18' of coax antenna cable
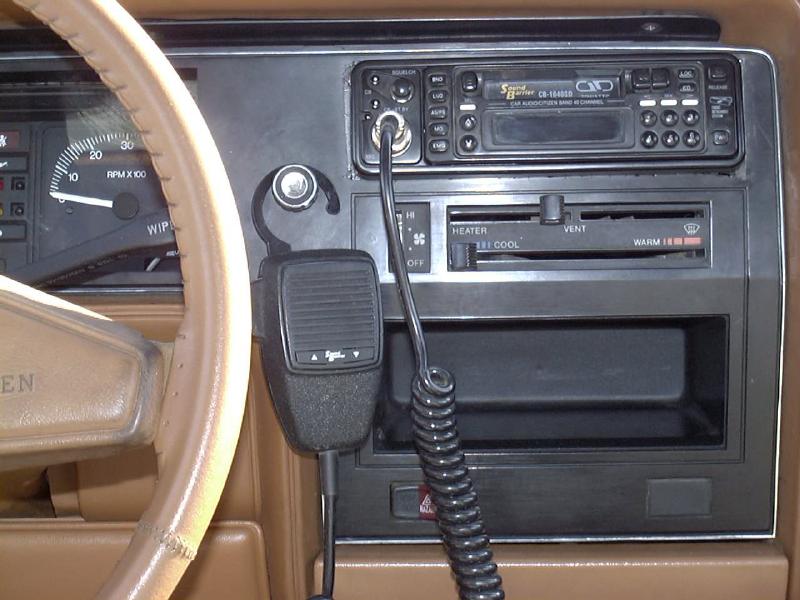
The radio that came in my latest '82 Caddy was garbage, so out it came and in went the 1040SD. Initially, I only installed the radio, the AM/FM antenna and I hooked up the coax for the CB. I found a microphone clip to hang the mic off of the cold start knob. I normally remove the mic unless I need to use it to transmit.
I kicked around some ideas for mounting the CB antenna. From my previous experiences, I knew I wanted the antenna mounted on solid ground plane, and I wanted to be able to use it with and without the camper shell, and for sure I was not too thrilled by the prospect of drilling lot's of holes to mount the thing.
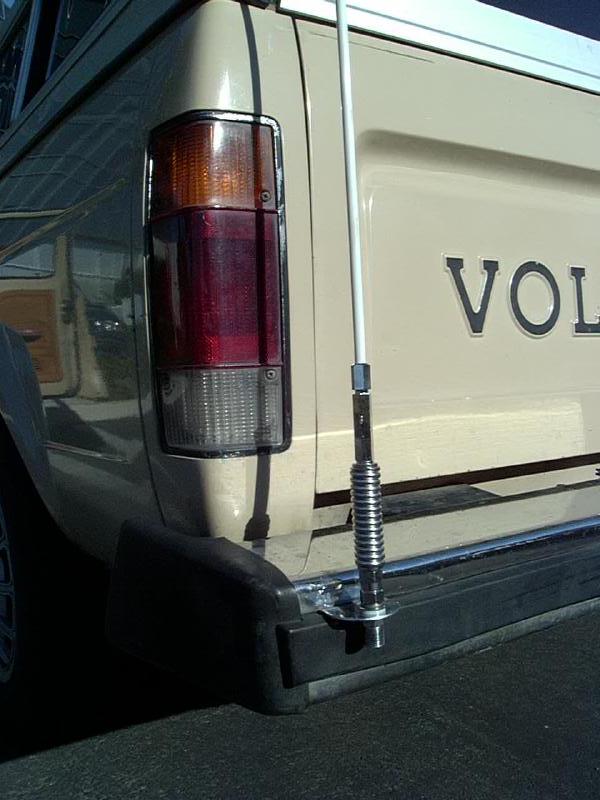
So, this is what I finally came up with. I found an inexpensive mounting bracket at my local electronics shop. I cut it to fit inside the recess in the rear bumper, beneath the plastic trim piece. I had to drill two holes for sheet metal screws to hold the bracket to the bumper, then the trim snaps back to cover this.
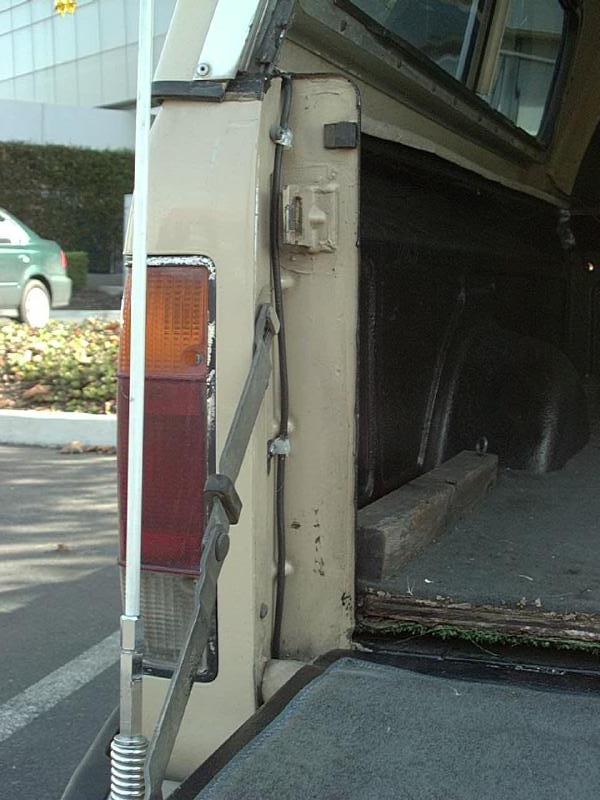
I only had to drill one large hole behind the drivers seat to run the coax cable out of the cab. I used a 3/4" rubber grommet to line the hole, which I also plan to use to run some power wires into the bed for 12V outlets and camper shell lighting. The coax cable is run along the underside of the bed rail, over the end of the bed and down the outside corner of the rear end where the tailgate fits. I used a couple of cable clamps to hold it in place. I get a decent SWR reading and the incoming signal is free of interference.
All in all a very clean installation and I'm quite happy with the results.
[return to the top]Parking Brake:
Does this sound familiar?
Has anybody else have their hand brake freeze on, on a cold morning? It was -3 this morning and my hand brake was frozen on again. Driving it does not free it. Any body got any comments or helpful hints? Would like to know of anybody else who has had this problem?
Well, it doesn't get to -3 here in sunny California too often, but I've had my parking brake "rust" in place once, never had it freeze. It had been raining and apparently the water in the brake drum caused it to rust to the shoes. With the slick pavement, the one wheel would not break loose and just skidded along as I tried to drive. I had to remove the wheel and wheel bearing nut and use a dead blow hammer to beat the brake drum off of the wheel. (God time to clean and re-pack the wheel bearings BTW). Luckily this was at home, so I had access to my tools.
Here's a handy tip from folks used to driving in cold weather:
When parking after driving in snow/slush, don't set the parking brake in the winter if possible. Problem is the brakes are warm when you stop, if snow/ice/slush get in there it can freeze. So if you have a manual tranny, put it in your lowest gear and put the front wheels against the curb. When I take my 4x4 up into the snow, I lock the front hubs and put it in 4-Lo and it for sure won't be going anywhere.
[return to the top]Door Handles:
Here is a step by step guide on how to remove/repair a door handle:
- Pry off the metal insert (start at the end nearest the lock).
- Then you will see a phillips head screw at the opposite end from the lock, remove this.
- Open the door, and there is a large phillips screw pointing towards the hinges of the door, remove this.
- Then slide the handle towards the hinges as far as possible, and it should come out. There is a plastic hook on the non-lock end.
- There really is no adjustment, but you can lubricate them while they're out. More than likely the ones that aren't working are broken.
This tip courtesy of John Van Vuren
[return to the top]Door Lock:
Here is a step by step guide on how to re-key a door lock to work with a different key:
- Remove door handle from truck as previously described
- Loosen phillips head screw that goes into back of lock cylinder
- Stick key into lock (not absolutely necessary)
- Remove phillips head screw, metal "fork", and coil spring, noting their relative positions
- The lock cylinder comes out the outside of the door handle, towards the key. There should be an O-ring type gasket between lock cylinder and handle.
- Slowly remove key from lock (the brass tumblers will move)
- Stick key into lock that you'd like to make the lock work with
- Look at the tumbler closest to the key, see which way it sticks out, then remove key and pull tumbler out with small needle nose pliers. The slots in the tumblers are in different locations, find another tumbler with the slot in the proper position so that it will be flush with the cylinder when the key is inserted.
- Repeat for the rest of the tumblers, and then the other side. I have always just been able to rearrange the tumblers to get the job done, but I'm guessing that it's possible you won't have all the proper tumblers. In that case, it's time to go junkyard scrounging.
- Also note that there are small springs for the tumblers, which push them out a little ways when the key is removed. Be sure they stay where they belong. Now isn't a bad time to clean all the old gummy grease out and re-lube.
This tip courtesy of John Van Vuren
[return to the top]Fuel Filter Replacement:
I think VW recommends replacing the fuel filter every 15,000 miles or so. I usually run mine until I start seeing bubbles in the clear fuel line, especially at full throttle, which seems to be about every 2 years and 20,000 miles. Replacement is a fairly easy process, requiring no tools. There are a few tips to make it easier, though.
I have an upper stress bar between the strut towers. It is a lot easier if I remove that first. Mine is held on with 13mm nuts, one of which requires a u-joint socket to remove. Its also easier if you remove the air intake cover and filter, by removing the 4 spring clips that hold it in place. Now, reach in, grab the filter and twist it off. Be careful to keep it level, it holds over a pint of fuel.
With the old filter off, take the new one and fill it with Automatic Transmission Fluid (ATF). You could also use clean diesel fuel, but the detergents in the ATF will give your injector pump and injectors a good cleaning. Wipe some of the ATF on the two rubber gaskets and then screw the filter on and tighten by hand.
Now start the engine and check for leaks. With the filter pre-filled, you should see the red ATF in the clear fuel line almost immediately. There should be no bubbles in the fuel line, if there are try checking the filter for leaks.
[return to the top]Water Pump Replacement:
Well, it finally happened after about a year of warning, my water pump gave up the ghost. I had been noticing a drop or two of dark liquid in the plug beneath the pump housing for the last year. Nothing major but this gave me ample warning to the impending failure. One night driving home on a bumpy road, I started hearing a (new) rattle. Upon investigating, I saw the belt to the water pump and A/C compressor looked loose. Upon further inspection, the A/C compressor itself was loose (in fact there were no bolts at the base) and the water pump was gone, as evidenced by my wet hand after pulling the water pump plug.
First step is to get the old pump out. With factory A/C, it is not possible to get the pump housing off while its attached to the vehicle. Several of the bolts are behind pulleys and brackets. So, to remove the pump I did the following:
- Remove the alternator and its belt
- Loosen the A/C compressor and remove its belt and the water pump pulley
- Remove the upper and lower timing belt covers - lower one has a bolt that goes through the water pump
-
Remove the radiator hoses and the radiator for more working room
- It its held by a clip and two nuts at the base
- I had to pull the battery for access to the driver's side nut
-
Disconnect the A/C compressor from its bracket
- Easy in my case- it wasn't connected - no bolts at its base!
-
Then remove the A/C compressor bracket, held in place by 4 bolts, two
below the compressor, two above:
- By lifting the compressor, an offset wrench can get to the two lower bolts
- A u-jointed 13mm socket will access the left hand upper bolt
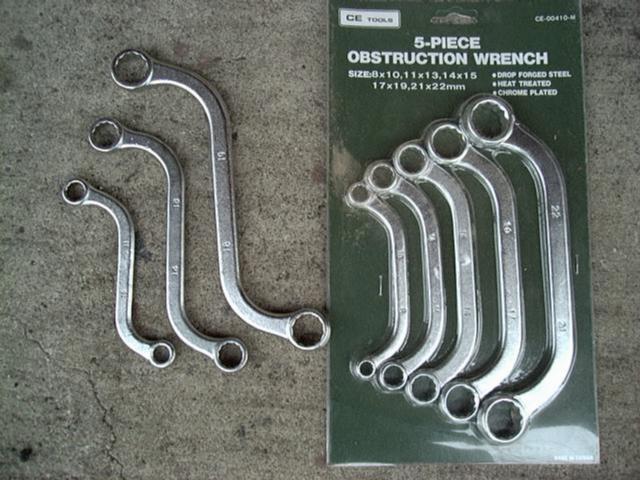
- A 13mm "obstruction" wrench (S-shaped) is needed for the right hand upper bolt (see image below)
- Note, I only used the 13mm S-wrench on the middle left, part of a set of 3 S's, to which I no longer have the packaging. I had also picked up the 5-piece U-shaped wrenches at the same time (same brand) when I saw both and was unsure of the exact tool that would work, so the $20 I spent on the U's was sort of wasted on this job, but I'm sure that these wrenches will come in handy somewhere (insert Tool Man grunt here:-)
- The pump can now be dropped out from under the A/C bracket
Once out, there are 7-10mm bolts to remove. Most likely they are corroded into place. I found that by heating each one up with a propane torch until it started smoking, then applying a slight tightening torque (to crack the threads loose), they all came out w/o a problem (even the one I snapped off before discovering the heat trick). Then, I wire brushed the bolts and ran a tap down the internal threads to prepare them for re-assembly. Then, with pump housing in hand, head off to the parts store to get a replacement. My pump is the older 40mm hub style. I found VW only carries this part in a full pump (to the tune of $140). Anyway, I found a GMB pump for $32, after first getting a 30mm version, I suggest holding the old and new pump housings up side by side to make sure the hub diameter and offset match.
To make re-assembly a bit easier, I made a few modifications. First, I ran a tap down the through hole in the water pump where the lower timing belt cover attaches. I found a 5/16x18 tap fit w/o drilling and a 1" allen-head screw fit nicely in place. On the A/C bracket, I cut out a section of the web near the hard-to-get-at bolt to allow for a bit more wrenching room.
- I had been experiencing repeated problems with the belts getting loose on this engine. I would get everything nice and snug and within a week, the A/C compressor belt would start "chirping" at idle. I had even paid a shop to "fix" this once, lasted a month or so. So when I finally got it all apart, I saw there were two small bolts that went through "ears" in the compressor into threaded holes in the cast bracket. I said "were" because there were no bolts there. The A/C compressor was just sitting in the cradle of the bracket. I also found the source of the problem as well. The bolts that fit in the threaded holes were perhaps 8mm, while the holes in the compressor were much larger, at least 10mm. This play allowed the compressor to slip back and forth on the retaining bolts as it was loaded and unloaded in use (picture the compressor twisting under the belt load). Over time, the compressor ears would fatigue and shear off the smaller bolts like a bolt cutter. I imagine first one then the other bolt would fail. So to fix this, I drilled out the threaded holes to the same size as the holes in the compressor and used a through-bolt and nylon lock nut (I recall using 7/16") to hold the two together. After securing the compressor this way, I never had a problem with loose belts. On the pulley side, the fit is really tight, I ground down a bolt (to 14mm head) to fit. I think an allen-head bolt would be a better choice. Note this fix was on an '81 (A1) diesel, w/c factory A/C and no power steering. Other years and engines are probably different.
To quote Bentley, "assembly is the reverse of the removal", use anti-seize or thread locking compound on all the bolts. I also tried using a teflon thread sealant on the water pump bolts. Autotech carries a set of stainless steel bolts for this application that resist corrosion.
One tip I have for properly tensioning the v-belts is as follows:
I wrap a nylon strap around the driven accessory (A/C compressor or alternator) then lay a board or piece of angle iron across the engine bay, resting on the passenger side strut tower and extending over the front of the bumper. Then, tie the strap around the lever and use a jack to raise the lever to apply the desired tension to the belt. Once tensioned, tighten the adjuster and pivot bolts and then drop the lever. Works like a charm and I've never had to re-tighten a loose belt.
Rating:

Mainly due to the A/C compressor and the restricted working room. I did the job on my non-A/C '78 Rabbit and it was a piece of cake.
[return to the top]Repairing License Plate Bulbs:
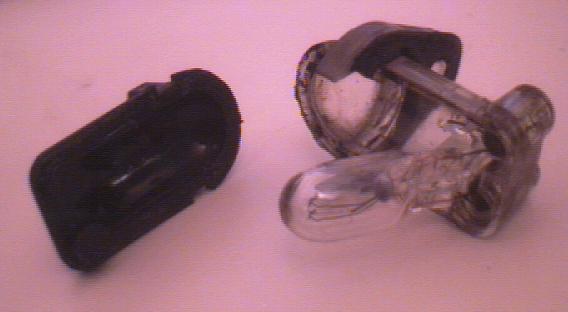
You know, those two little plastic encased light bulbs beside your rear license plate. Seems they last about 10 years then burn out. I pulled mine out and couldn't figure out how to get them apart, so I picked up new ones at the dealer (ouch!). Lewis Grimes, a fellow Caddy owner, passed on this tip for repairing said bulbs:
"You can rebuild the license plate light bulb. It is not hard. Take a putty knife and pry them open at the seams between the black plastic and the clear. Cut the wires at the bulb. The bulb is a push in side marker light bulb out of the early Rabbits and VWs with the same marker lights. And there are many other cars that use them . They have no base just wires. I twist the wires together with the one you cut. Test by turning on your lights and plugging the bulb in to see if they work (before sealing it up). Then, put it back together with silicone to seal them. Works great and and costs little to do. I get the bulbs out at the junk yard when I'm out there. Good Luck." "P.S. Get the License bulbs out of the trucks you can good or bad. They are hard to come by and are not cheap."Sounded simple enough, I had my old burned out lamps in the parts drawer (never throw anything away:-). Grabbed myself a sharp 1" wide woodworking chisel and carefully worked the chisel edge along the seam between the black and clear plastic. Place the assembly on a firm surface and apply steady pressure while rocking/twisting the chisel blade ever so slightly until you hear a faint "crack". Keep moving the blade around the seam, don't try to force it open from one point. After a few minutes of work, this is what you see:
 |
Cost:
1 New side marker lamp ~$1
Rating:
[return to the top]
Longer Wiper Blades:
My A1 VW came with 16" wiper blades. I was never happy with the coverage (or lack thereof) of the wipers. There was a section near the top and side of the windshield that was not cleared. I measured the clearances and it looked like an 18" blade would fit. I bought a set of dual-blade aerodynamic wiper arms and installed them. The driver's side fit perfectly, on the passenger side, I had a bit of interference on the outer end. I trimmed a bit (~1/4") of the plastic off the end of the arm and a corresponding bit off the wiper itself to correct the problem.
For additional coverage, I adjusted the driver's side wiper so that it was a bit higher on the windshield. It used to rest on a downward angle, I made it parallel to the hood. Now, at its upper stroke, it runs right the the left edge of the windshield.
After doing all this, I discovered Rain-X and now hardly ever use my wipers anymore.
Cost:
  1   Pr. 18" wiper arms   $10
  ----------------------------
                           $10
Rating:
[return to the top]
Brighter Backup Lights:
I tried a set of those 50W halogen backup lights a few years ago. The first set I tried had trouble with the leads breaking off inside the socket, so I went back to the stock bulbs. Recently I found some new bulbs. They still had the same design as before, but I tried injecting some hi-temp silicone inside the socket to prevent the bulb from moving and breaking the leads.
These bulbs worked for a while then I noticed I had no backup lights at all. The bulbs and fuse were fine, but I guess the 8A load fried the reverse switch on the transmission. This switch supplies current to the rear lights directly, there is no in-line relay. The switch read open-circuit all the time. A new switch cost me $16 at the dealer and only took a minute to install. On my 5-speed transmission, the backup switch is located just in front of the speedometer cable.
Note:
- The reverse switch comes in two varieties, be sure to get the part number off your existing switch before buying the part.
- If you intend to run hi-power backup lamps, I would strongly suggest adding a relay, as the reverse switch does not appear to have much of a current rating.
- Clean the inside of the reflector and the bulb. With the new switch and clean optics, the brightness of the backup lights are astonishing.
Cost:
  1   Reverse switch   $16
  ------------------------
                       $16

  (If needed).
Rating:
Apparently the new multi-LED bulbs provide more light at less current so may be a suitable upgrade without the need for a relay.
[return to the top]Cheap Air Conditioning Tricks:
After using the A/C for an extended period of time you might notice that the passenger side foot well is soggy or that running the defroster results in more fog on the windshield rather than less. Usually this is due to a plugged drain line for the A/C condensation.
 The
easiest way I've found to fix it (usually needs to be done once every
year or two) is to pull off the little cover plate right where the
passengers left foot would be (philips screwdriver). From here, you can
find the rubber drain hose, pull it off and blow some compressed air
through it. The hose is just the right size to insert the tip of an air
blowgun into. A blast or two and it is all clear. If it is really
plugged you may need to snake some wire down to open it up. Don't
forget to put the hose back on the drain tray before re-installing the
kick plate.
The
easiest way I've found to fix it (usually needs to be done once every
year or two) is to pull off the little cover plate right where the
passengers left foot would be (philips screwdriver). From here, you can
find the rubber drain hose, pull it off and blow some compressed air
through it. The hose is just the right size to insert the tip of an air
blowgun into. A blast or two and it is all clear. If it is really
plugged you may need to snake some wire down to open it up. Don't
forget to put the hose back on the drain tray before re-installing the
kick plate.
NOTE: If you suspect the drain is plugged and the drain pan is full, might be wise to have something on hand to collect the water that will drain out when you pull the hose off to unplug it. On mine, only a few ounces would collect and since the footwell was already soaking wet, I never bothered. Just wet-vac the carpet and leave a window cracked until the carpet dries.
If you get that au-de-locker-room smell emanating from your vents, you may have stuff growing inside your ventilation system. One relatively inexpensive way to combat this is to switch to the Vent position, all outlets open, fan on full speed and then spray in a whole can of Lysol disinfectant (choose a scent you can tolerate) into the air intake (under the plastic cover at the back of the engine compartment. This should suck the disinfectant through the ducts and put a stop to the critters growing in there.
Finally, an ounce of prevention is worth a pound of cure. The last few minutes of your trip, shut of the A/C while keeping the blower on. This will help dry out any condensation inside the system.
Cost:
 $0 - $2 (for the Lysol)

Rating:
[return to the top]
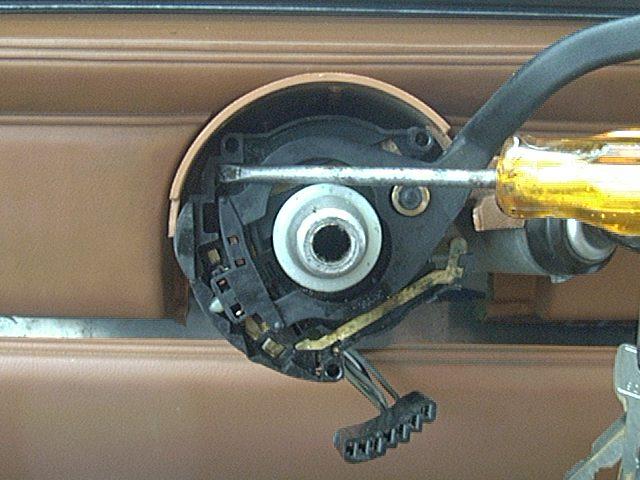
Door Re-Alignment:
My driver's side door was sagging (who's isn't!) to the point that the door latch was not working very well. I tried loosening up the hinges and moving the striker plate to their respective limits. No good. Then I tried the jack-under-the-door method and was able to get a bit of adjustment, but the improvement didn't last long. Then one day I read a USENET article from someone who was asking why they had a washer under one of the hinges and that it seemed to be messing up the door alignment.
Well, that weekend I went out to see if I could figure out what they might be talking about. If you look at the door hinge, the door piece attaches to the frame piece with a bolt. The door piece is attached to the front side of the frame piece. By placing a nice fat washer in between the halves of the *top* hinge, you can easily pull the latch side of the door up and permanently cure the sag.
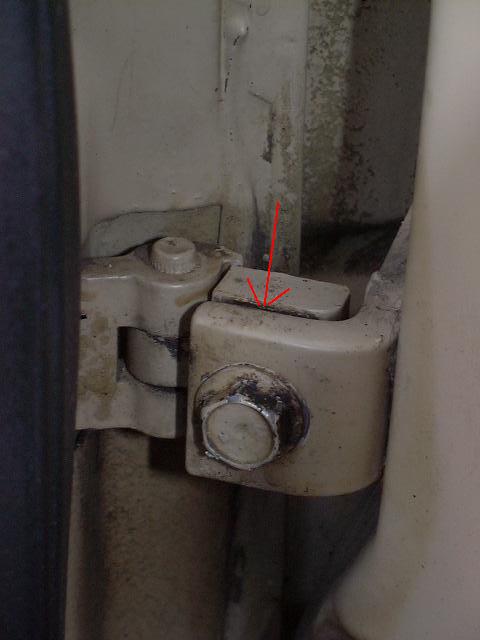
In the image, above, you can see the upper door hinge after the washer is installed. While the washer itself is not visible (red arrow indicates where it is installed), you can see the slight gap left between the two halve of the hinge due to the shim's thickness. Since the nearest part of the hinge is attached to the body and the far part is attached to the door, the shim serves to "push" the upper part of the door forward, and thereby lifting the bottom of the door.
Caveat: If the plastic piece on the latch pin is badly worn from the latch striking it, this fix may produce an annoying rattle in your door. If it does, here's a simple fix for it.
Parts:
  One or more washers

Cost:
  Under a buck (or free if you have a well-stocked junk drawer).

Rating:
[return to the top]
Smog Check (NOT):
Why don't light-duty, diesel-powered vehicles have to get a (CA) Smog Check?
"Inclusion of light-duty, diesel-fueled vehicles was considered during development of the California Smog Check Program. It was determined that when compared to the nation's vehicle fleet as a whole, light-duty, diesel-fueled vehicles and trucks represent a small portion of the entire fleet, less than one percent. In addition, while particulates are visible in diesel exhaust, smog-causing carbon monoxide and hydrocarbon emissions from diesel-fueled vehicles are comparatively low. Testing for NOx (oxides of nitrogen) in diesel emissions is under evaluation. With light-duty diesel vehicles comprising less than one percent of the total number of California registered vehicles, the costs associated with implementing a new regulatory program to include these vehicles are currently prohibitive."
Parts:
  None (YEAH)

Cost:
  Free (ALL RIGHT!)

Rating:
  Yes, we have no s.
[return to the top]
![]()
The Banana Scale:
The Shade Tree Howler Monkey scale was originated by Larry Soo, here's how the bananas rank:
| Bananas | Description |
| Easy. | |
| Moderately difficult. | |
| Pushing the limits of a stock howler monkey; opposable thumbs only get you so far. | |
| Requires the ability to communicate abstract ideas to other howler monkeys. | |
| The job should only be attempted by a professional orangutan. |
[return to the top]
![]()
Trivia answer: He wasn't (buried anywhere, that is), rather he fell overboard, or was otherwise "lost at sea" while crossing the English Channel, and was never found.
 ===>>
===>> 
Copyright© 1997-2022 Roger Brown - Content may not be reproduced without permission of the author
Visitor # since 17.SEP.2001
[Last updated: 14.April.2022 ]